Marathon All Quests Priority Contracts Guide And Map
Complete guide to all Priority Contracts across Marathon's six factions — CyberAcme, NuCaloric, Traxus, MIDA, Arachne, and Sekiguchi — with objectives, rewards, and faction unlock order.

Before we start, we have also written some related content that may be helpful to you:
Marathon Quick Start Guide Before Playing
Marathon All Quests Priority Contracts Guide And Map
Marathon Guide to Pinwheel Base Entry and FTL Array Scanning
This comprehensive guide covers every Priority Contract quest available from all six factions in Marathon: CyberAcme, NuCaloric, Traxus, MIDA, Arachne, and Sekiguchi. Each quest includes step-by-step walkthroughs, location details, reward information, and pro tips for completion.
Table of Contents
- Faction Overview and Unlock Order
- CyberAcme Priority Contracts
- NuCaloric Priority Contracts
- Traxus Priority Contracts
- MIDA Priority Contracts
- Arachne Priority Contracts
- Sekiguchi Priority Contracts
- DCON Locations Guide
- Essential Tips for Quest Completion
Faction Overview and Unlock Order
Marathon features 6 factions, each offering unique upgrades, rewards, and quest lines. Only CyberAcme is available from the start; the remaining 5 must be unlocked by completing Liaison Contracts.
| Faction | Agent | Focus | Unlock Requirement | Map Access |
|---|---|---|---|---|
| CyberAcme | ONI | Heat · Vault · Looting | Default (Starting) | All Maps |
| NuCaloric | GAIUS | Shields · Agility · Scouting | Complete Introducing: NuCaloric | Perimeter, Dire Marsh |
| Traxus | VULCAN | Loot · Salvage · Weapons | Complete Introducing: Traxus | Dire Marsh, Perimeter |
| MIDA | GANTRY | Sabotage · Explosives · Chaos | Complete Introducing: MIDA | All Maps |
| Arachne | CHARTER | PvP · Melee · Kill Streaks | Complete Introducing: Arachne | All Maps |
| Sekiguchi | NONA | Shell Biology · Abilities · Cores | Complete Introducing: Sekiguchi | Outpost (Level 12+) |
Recommended Unlock Path:
- Welcome to Tau Ceti (CyberAcme) → Unlocks all Liaison Contracts
- Introducing: NuCaloric → Stay on safe Perimeter map
- Introducing: MIDA → Quick completion on Perimeter
- Introducing: Arachne → PvP-focused, can be done on Perimeter
- Introducing: Traxus → Requires Dire Marsh (more dangerous)
- Introducing: Sekiguchi → Requires Outpost (Level 12+)
CyberAcme Priority Contracts
CyberAcme is your home faction, providing essential upgrades for vault space, heat management, and looting efficiency. These contracts serve as the gateway to unlocking all other factions.
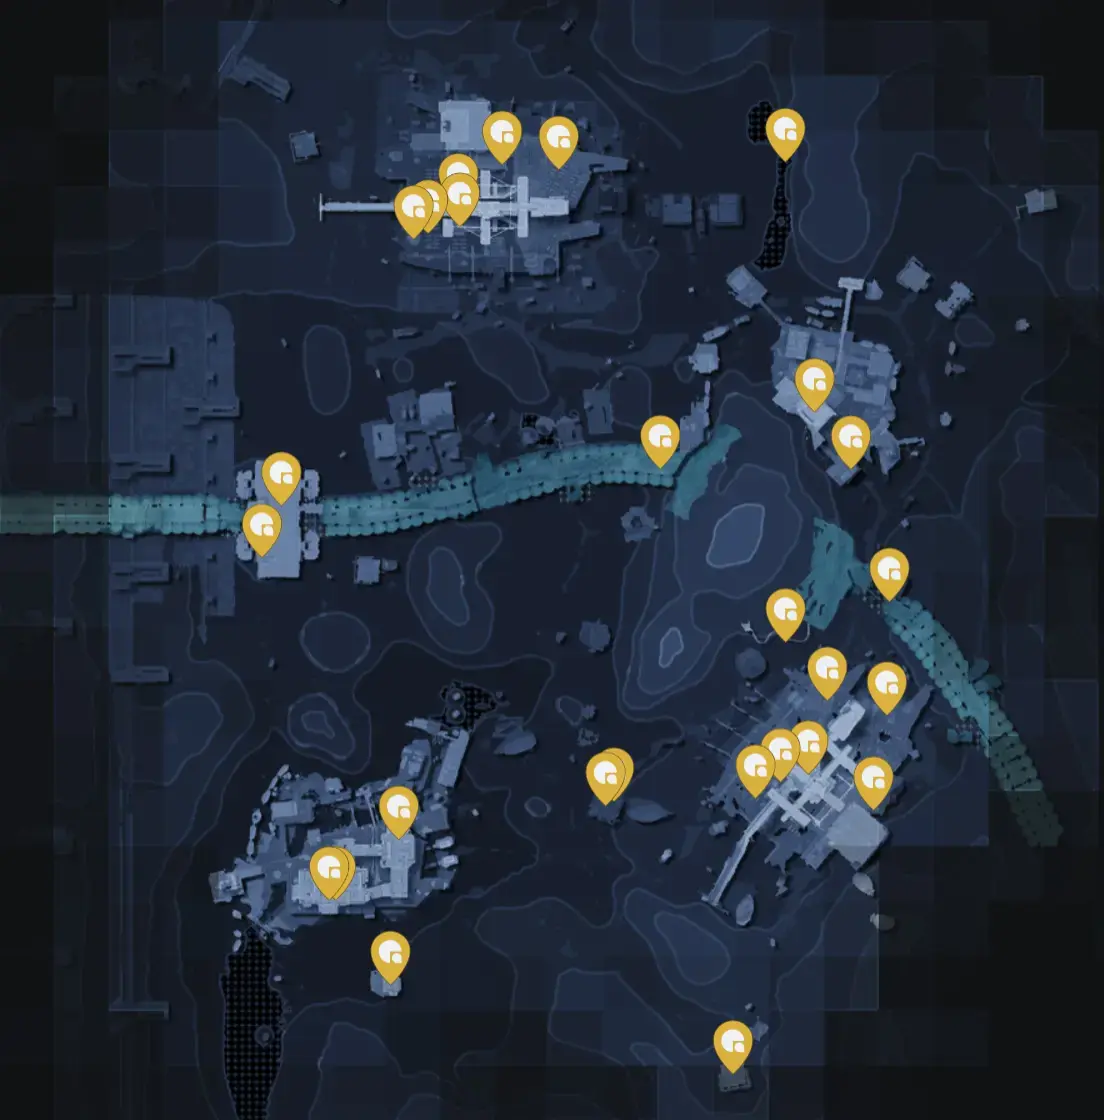
Welcome to Tau Ceti [1/2]
Map: Perimeter
Prerequisite: Prologue (Tutorial)
Rewards: V75 Scar, Protector V1 Shield, Volt Battery x4, Patch Kit x3, Shield Charge x3, 8XS Base Pack, 1,500 Credits, 180 CyAc Rep
Objectives:
- Defeat UESC in Perimeter (x3)
- Scan FTL array at any UESC radio tower in Perimeter
Step-by-Step Walkthrough:
Step 1: Eliminate UESC Forces
- Location: Any POI on Perimeter (North Relay, South Relay, Station, Overflow, Hauler)
- Action: Kill any 3 UESC mechanoids (turrets count)
- Tip: North and South Relay have consistent UESC spawns
Step 2: Scan the FTL Array
- Location: UESC Radio Tower (North Relay or South Relay)
- Action:
- Navigate to the radio tower (look for classic UESC blue/yellow colors)
- Climb to the roof using the ladder (second floor access)
- Interact with the FTL array panel
- Scan the card that pops out
Important Notes:
- This contract does NOT require successful exfil
- Dying after completing objectives still counts
- Objectives can be completed across multiple runs (not single-run)
- Green quest marker appears when near the correct tower
Welcome to Tau Ceti [2/2]
Map: Perimeter
Prerequisite: Welcome to Tau Ceti [1/2]
Rewards: Distance Runner V1 Leg Implant, Smoke Grenade, BRRT SMG, Light Rounds, Cardio Kick, 8XS Base Pack, consumables, 90 CyAc Rep
Objectives:
- Sabotage a UESC comms antenna in North OR South Relay
Step-by-Step Walkthrough:
Step 1: Navigate to Relay Station
- Location: North Relay OR South Relay POI
- Action: Mark the POI on your map and travel there
Step 2: Locate the Comms Antenna
- Location: Outskirts of the Relay POI (NOT on the roof)
- Description: Massive teal antenna structure sticking into the air
- Action:
- Find the antenna (northern side of North Relay, near rock face)
- Interact with the antenna control panel
- Antenna will glow and produce a small explosion
Important Notes:
- Does NOT require exfil to complete
- Match exit (alive or dead) completes the contract
- Unlocks all 6 Liaison Contracts upon completion
- You can now choose NuCaloric or Traxus next (recommend NuCaloric first)
Introducing: NuCaloric (LIAISON)
Map: Perimeter
Prerequisite: Welcome to Tau Ceti [2/2]
Rewards: Protector V1 Shield, Unstable Biomass, Patch Kit, Shield Charge, 1,000 Credits, 180 CyAc Rep
Objectives (Single Run):
- Acquire NuCal Employee ID from infested building in Columns
- Download employee data from terminal nearby
Step-by-Step Walkthrough:
Step 1: Travel to Columns
- Location: Columns area (southern Perimeter, between Overflow and South Relay)
- Landmark: Building covered in red tick pods with spider symbol on exterior
- Tip: Front doors are locked—use roof entrance
Step 2: Enter the Infested Building
- Action:
- Go to east side of building (near outer rock wall)
- Climb the ladder to the roof
- Find and break the hatch on the same side as the ladder
- Drop inside
Step 3: Clear the Ticks
- Action:
- Activate power inside (opens main door)
- Destroy tick nests with knife (quieter than guns)
- Clear all ticks in the corner room
Step 4: Collect Employee ID
- Location: Room directly to the right of entrance door
- Action: Pick up NuCal Employee ID from shelf
Step 5: Download Employee Data
- Location: Same room, red colony computer on central table
- Action: Interact with terminal to download data
- Completion: Both objectives complete simultaneously
Important Notes:
- MUST be completed in a single run (dying resets progress)
- Does NOT require exfil
- Bring healing items (Patch Kits, Shield Charges)
- Other players may camp this location—approach with caution
- Knife kills on ticks are silent and recommended
Introducing: MIDA (LIAISON)
Map: Any (Perimeter recommended)
Prerequisite: Introducing: NuCaloric
Rewards: Chem Grenade x2, EMP Grenade x2, Frag Grenade x2, Flechette Grenade x2, Unstable Lead x3, 1,000 Credits, 180 CyAc Rep
Objectives:
- Defeat UESC across Tau Ceti IV (x15)
- Smash glass across Tau Ceti IV (x20)
Step-by-Step Walkthrough:
Step 1: Choose Your Map
- Recommendation: Perimeter (safer, less player traffic)
- Alternative: Dire Marsh (more UESC but more dangerous)
Step 2: Eliminate UESC Forces
- Best Locations:
- Intersection (Dire Marsh) - high UESC density
- Complex (Dire Marsh) - consistent spawns
- North/South Relay (Perimeter) - safer option
- Action: Kill any UESC mechanoids (all types count)
Step 3: Smash Glass
- Technique: Use knife melee attack on glass (not shooting)
- Best Locations:
- Tunnels beneath Station (Perimeter)
- Second floor of Overflow (Perimeter)
- All buildings in North and South Relay
- Avoid: Hauler (mostly bulletproof glass with dots)
Pro Strategy:
- Combine both objectives by rotating between POIs
- Kill UESC, then smash all glass in the area
- Move to new POI when UESC respawn timer is active
- Intersection on Dire Marsh is optimal for both objectives
Important Notes:
- Does NOT require exfil
- “Smashing glass” = melee attack with knife
- Can be completed across multiple runs
- UESC respawn time is approximately 2-3 minutes
Introducing: Arachne (LIAISON)
Map: Any
Prerequisite: Introducing: Traxus
Rewards: WSTR Combat Shotgun, Random Enhanced Weapon Mod, MIPS Rounds, Unstable Gel, 1,000 Credits, 180 CyAc Rep
Objectives:
- Deal damage to Runners (x60)
- Down a Runner (x1)
Step-by-Step Walkthrough:
Step 1: Choose Hot Zones
- Perimeter Locations:
- Hauler (high player traffic)
- Overflow (near Warden spawn)
- North/South Relay (exfil camping)
- Dire Marsh Locations:
- Maintenance (central, high traffic)
- Algae Ponds (loot hotspot)
- Intersection (early game fights)
Step 2: Engage Enemy Runners
- Strategy:
- Listen for gunfire and ability sounds
- Third-party ongoing fights
- Use stealth (Assassin shell recommended)
- Deal chip damage from distance, then finish
Step 3: Down a Runner
- Action: Reduce enemy Runner health to zero (knockdown state)
- Tip: Does NOT require killing—down is sufficient
- Finisher: Optional, but prevents revival
Alternative Strategy (Controversial but Effective):
- Camp exfil locations in final minutes
- Wait for teams attempting to extract
- Ambush as they activate exfil beacon
- Community calls this “ratting”—works but unpopular
Important Notes:
- Does NOT require exfil
- Damage can be accumulated across multiple runs
- Only the “down a Runner” objective needs single completion
- Arachne upgrades focus on PvP and melee—prioritize if you enjoy combat
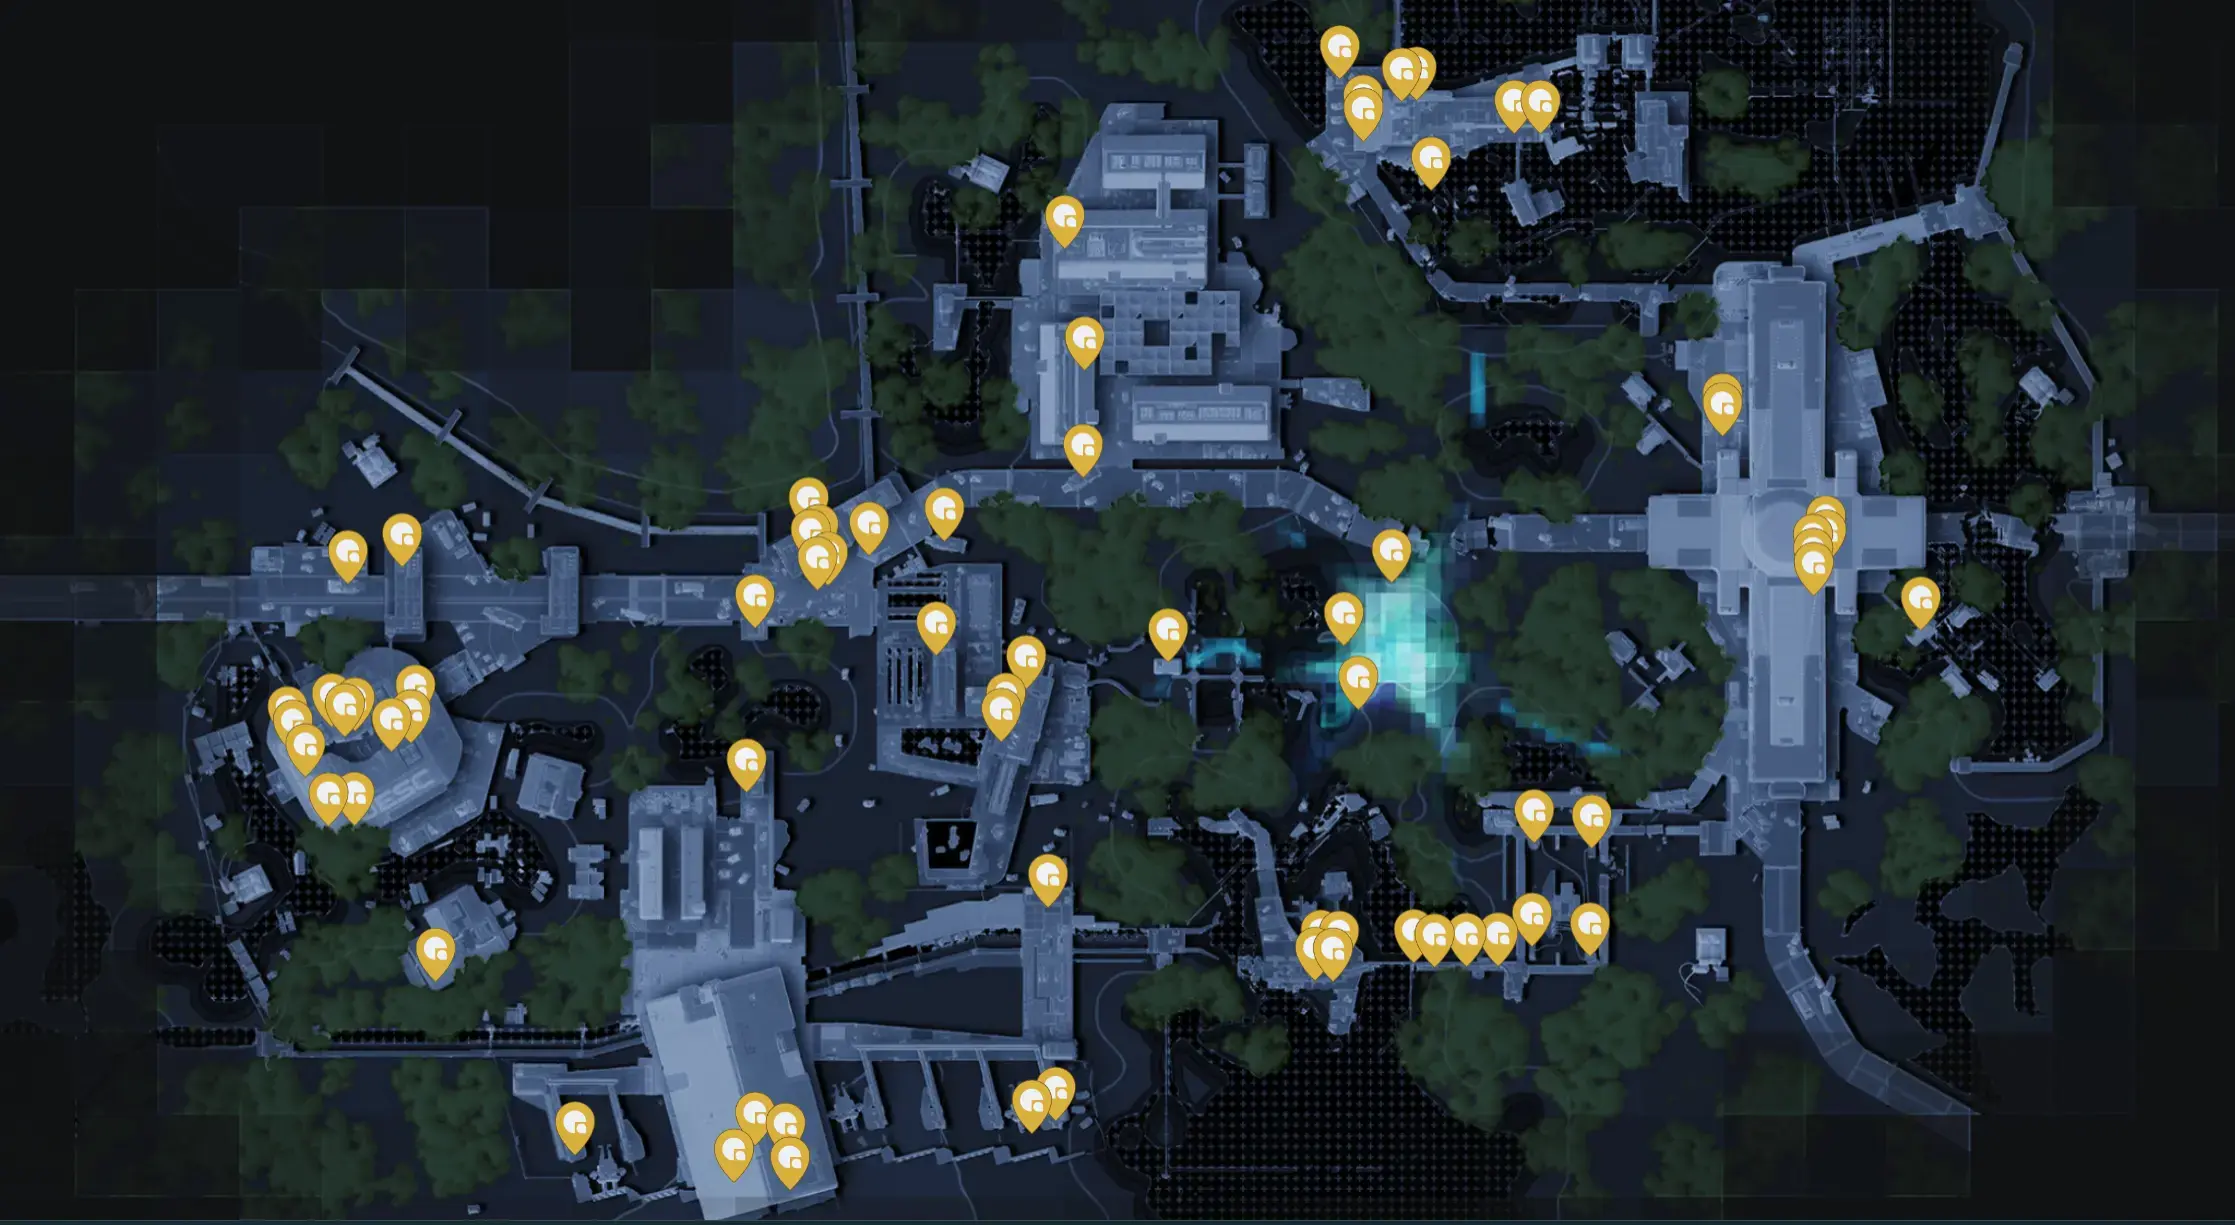
Introducing: Traxus (LIAISON)
Map: Dire Marsh
Prerequisite: Welcome to Tau Ceti [2/2]
Rewards: Bully SMG, Random Enhanced Chip Mod, Heavy Rounds, Unstable Gunmetal, 1,000 Credits, 180 CyAc Rep
Objectives (Single Run):
- Hack terminal at Intersection, Complex, OR Bio-Research
- Acquire Shipping Manifest from UESC Commander
- Scan the nearby stacked shipping container before it’s picked up
Step-by-Step Walkthrough:
Step 1: Choose Your POI
- Options: Intersection, Complex, or Bio-Research
- Recommendation: Complex or Bio-Research (Intersection is high-traffic)
- Action: Mark chosen POI on map and navigate there
Step 2: Hack the Terminal
- Complex Location: Southern side of POI, blue terminal on yellow wall (balcony)
- Bio-Research Location: First floor, western end, inside on wall by window
- Action: Interact with blue UESC terminal to hack
Step 3: Defeat UESC Commander
- Trigger: Hacking terminal spawns dropship with Commander
- Location: Near the POI where you hacked (visual distance)
- Action:
- Commander arrives with escort squad
- Eliminate Commander (purple shields—use EMP grenades)
- Collect Shipping Manifest from ground loot
Step 4: Scan Shipping Container
- Location: Near Commander drop-off point
- Description: Stacked containers with QR code markings
- Action:
- Walk around containers with Manifest in inventory
- Green objective marker appears when close
- Interact to scan container
Important Notes:
- MUST be completed in a single run
- Does NOT require exfil
- All three steps occur in same POI
- Bring ammo and healing for Commander fight
- EMP grenades disable Commander’s shield temporarily
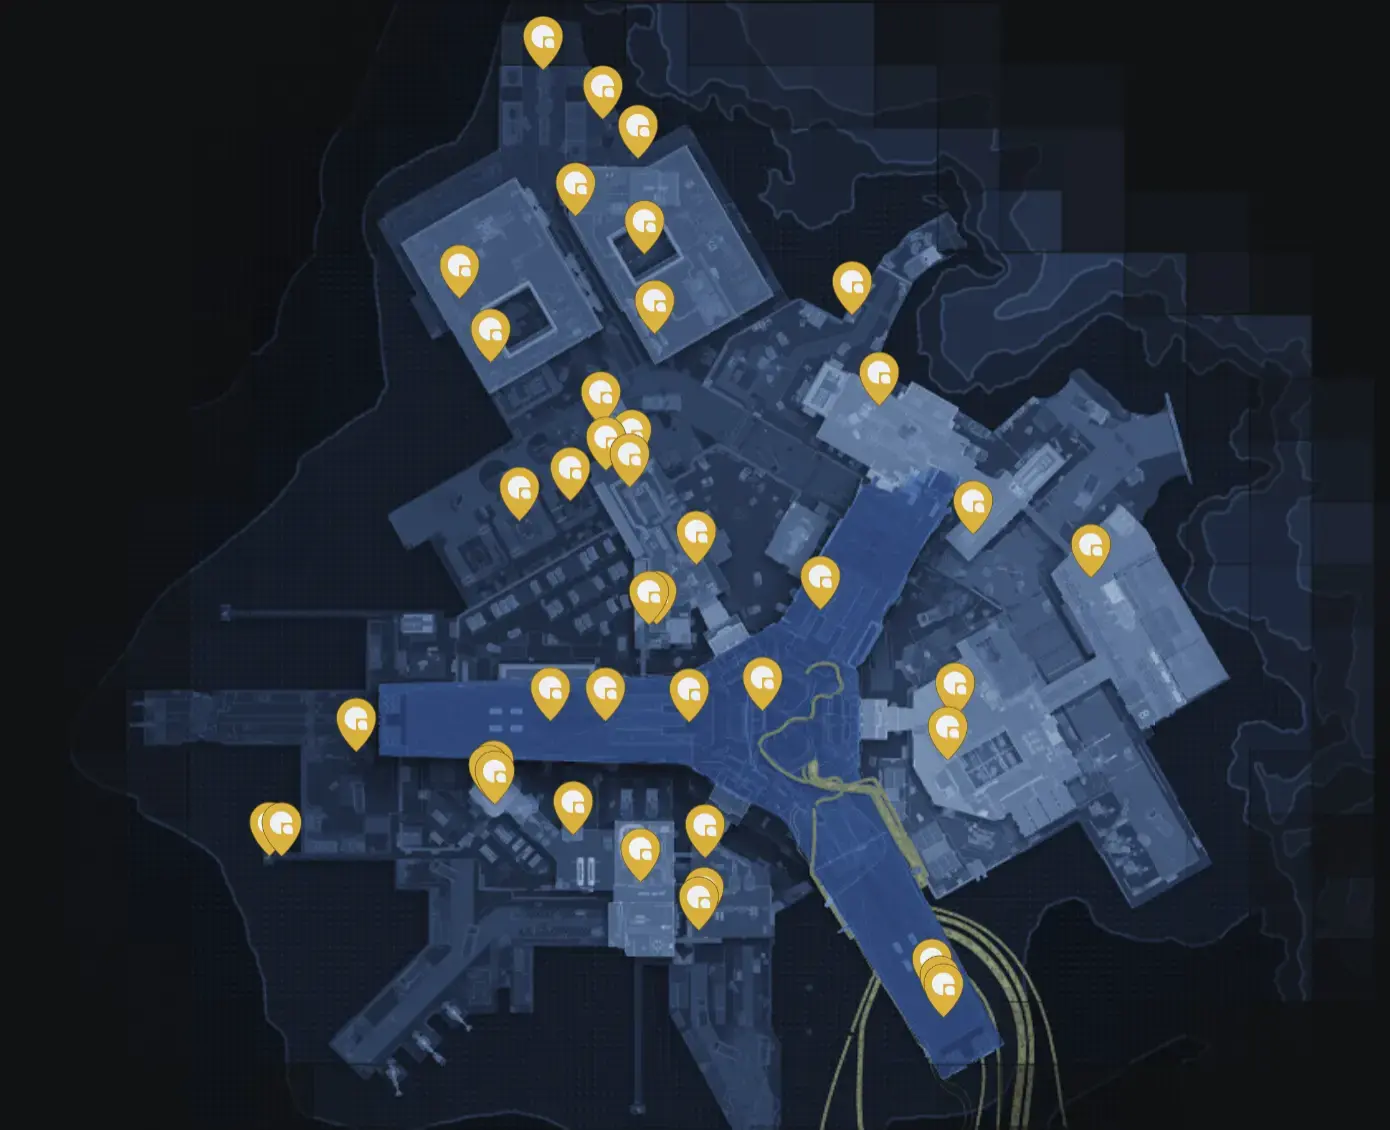
Introducing: Sekiguchi (LIAISON)
Map: Outpost
Prerequisite: Introducing: MIDA
Rewards: Random Core, Random Material, 1,500 Credits, 180 CyAc Rep
Objectives (Single Run):
- Inject the Necrotic Sample in southern Flight Control
- Scan your shell in southeastern Orientation
Requirements:
- Season Level 12+ (Outpost map access)
Step-by-Step Walkthrough:
Step 1: Access Outpost Map
- Requirement: Reach Season Level 12
- Loadout: Bring decent gear and healing (Outpost is dangerous)
- Shell Recommendation: Assassin (stealth for solo players)
Step 2: Inject Necrotic Sample
- Location: Southern Flight Control
- Action:
- Navigate to Flight Control POI
- Enter south corridor
- Find workshop containing Necrotic Sample (in drawer)
- Interact to inject sample
- Sample will periodically damage you until scanning
Step 3: Scan Your Shell
- Location: Southeastern Orientation
- Action:
- Run across roof towards Orientation
- Find scanner in top floor of offshoot building
- Look for closet-like booth on wall
- Interact to scan your shell
Step 4: Complete and Exit
- Note: Contract completes upon scanning—exfil NOT required
- Escape: Use smoke grenades and cloak to reach exfil safely
- Alternative: Die intentionally if exfil is too dangerous
Important Notes:
- MUST be completed in a single run
- Sample damages you periodically until scanned
- Consider Triage shell for free healing if struggling
- Outpost has Heat Cascade mechanic—watch your heat
- No crew exfils on Outpost—restricted exfils require boss key
NuCaloric Priority Contracts
NuCaloric focuses on biological research, shields, and agility. Their quests take you across Perimeter and Dire Marsh to collect data and scan bioprinters.
Survival Directive [1/1]
Map: Perimeter
Prerequisite: Introducing: NuCaloric
Rewards: Protector V1 Shield, Random Material, Patch Kit, Shield Charge, 1,500 Credits, 300 NuCal Rep
Objectives:
- Download geological survey data in southeast building in Station
- Download botany report from second-floor terminal in Overflow
Step-by-Step Walkthrough:
Step 1: Download Geological Survey (Station)
- Location: Station POI, southeast building
- Action:
- Navigate to Station
- Enter southeast building
- Find terminal inside
- Download geological survey data
Step 2: Download Botany Report (Overflow)
- Location: Overflow POI, second floor
- Action:
- Travel to Overflow
- Go to second floor
- Find terminal (southwestern room with windows overlooking lake)
- Download botany report
Important Notes:
- Objectives can be completed across multiple runs
- Does NOT require exfil
- Relatively simple two-step quest
- Overflow terminal is in room with windows facing southwest lake
Data Reconstruction [1/3]
Map: Perimeter
Prerequisite: Survival Directive [1/1]
Rewards: Faction Intel, Random Material, Patch Kit, Shield Charge, 8XS Med Pack Backpack, 1,500 Credits, 300 NuCal Rep
Objectives:
- Scan Sparkleaf Bioprinters in South Relay (x2)
- Scan Fungal Bioprinters in Overflow (x2)
- Download agricultural report in North Relay
Step-by-Step Walkthrough:
Step 1: Scan Sparkleaf Bioprinters (South Relay)
- Location: South Relay POI
- Description: Orange platforms with clear boxes labeled “INCUBATOR”
- Action:
- Navigate to South Relay
- Find 2 Sparkleaf Bioprinters
- Interact with each to scan
Step 2: Scan Fungal Bioprinters (Overflow)
- Location: Overflow POI
- Action:
- Travel to Overflow
- Find 2 Fungal Bioprinters
- Scan both
Step 3: Download Agricultural Report (North Relay)
- Location: North Relay, second floor, central building
- Landmark: Huge building with green walkway leading to blue double door, beneath NuCaloric logo
- Map Position: Approximately above “TH” in “NORTH” on map
- Action:
- Navigate to North Relay (heavy UESC resistance)
- Go to second floor of central building
- Find terminal
- Download agricultural report
Important Notes:
- Objectives can be completed across multiple runs
- Does NOT require exfil
- North Relay has heavy UESC presence—bring ammo
- Green quest marker appears when near bioprinters
Data Reconstruction [2/3]
Map: Dire Marsh
Prerequisite: Data Reconstruction [1/3]
Rewards: Protector V1 Shield, Faction Intel, Random Material, Patch Kit, Shield Charge, 1,500 Credits, 300 NuCal Rep
Objectives:
- Download harvest logs from second-floor terminal of Algae Ponds
- Hack Data Repositories along catwalk in AI Uplink (x3)
Step-by-Step Walkthrough:
Step 1: Download Harvest Logs (Algae Ponds)
- Location: Algae Ponds POI, second floor
- Action:
- Navigate to Algae Ponds
- Go to second floor
- Find terminal
- Download harvest logs
Step 2: Hack Data Repositories (AI Uplink)
- Location: AI Uplink (southeast of Algae Ponds)
- Landmark: Bridge structure held up by large columns
- Action:
- Travel southeast from Algae Ponds to AI Uplink
- Find 3 small screens on columns
- These are the Data Repositories
- Interact with all 3 (order doesn’t matter)
Important Notes:
- Objectives can be completed across multiple runs
- Does NOT require exfil
- AI Uplink catwalk is exposed—watch for enemy players
- Both objectives are in same general area
Data Reconstruction [3/3]
Map: Perimeter
Prerequisite: Data Reconstruction [2/3]
Rewards: Protector V1 Shield, Faction Intel, Random Enhanced Material, Self-Revive, Patch Kit, Shield Charge, +3 additional rewards, 300 NuCal Rep
Objectives (Single Run):
- Hack exterior Data Repositories in North OR South Relay (x2)
- Download AI maintenance protocol from second floor of Hauler
- Exfil successfully
Step-by-Step Walkthrough:
Step 1: Hack Exterior Data Repositories
- Location: North Relay OR South Relay (exterior)
- Action:
- Choose North OR South Relay
- Find 2 exterior Data Repositories
- Hack both
- Can be done in either Relay (doesn’t need to be same one)
Step 2: Download AI Maintenance Protocol (Hauler)
- Location: Hauler (large grounded ship, western Perimeter)
- Specific: Second floor, southwest side, near locked observation room
- Action:
- Navigate to Hauler
- Go to second floor, southwest side
- Find terminal near observation room
- Download AI Maintenance Protocol
- Leave immediately—UESC reinforcements drop regularly
Step 3: Extract Successfully
- Action:
- Navigate to active exfil point
- Survive until extraction complete
- MUST successfully exfil (dying fails the quest)
Important Notes:
- MUST be completed in a single run
- MUST successfully exfil (first NuCal quest requiring extraction)
- Consider bringing team for exfil support
- Hauler has frequent UESC drops—don’t linger
- Self-Revive reward is valuable for future runs
Traxus Priority Contracts
Traxus specializes in weapons, weapon mods, and salvage. Their quest line is one of the longest, featuring the 4-part Equitable Distribution chain.
Cutthroat Competition [1/1]
Map: Dire Marsh
Prerequisite: Introducing: Traxus
Rewards: V22 Volt Thrower, Volt Battery, Random Material, 1,500 Credits, 300 Traxus Rep
Objectives (Single Run):
- Loot Enhanced or rarer Rod Salvage in Maintenance
- Exfil successfully
Step-by-Step Walkthrough:
Step 1: Navigate to Maintenance
- Location: Maintenance POI, Dire Marsh
- Action: Mark on map and travel there
Step 2: Find Rod Salvage
- Target: Deimosite Rods or similar Rod Salvage
- Rarity: Enhanced (blue) or higher (purple/gold)
- Locations:
- Containers throughout Maintenance
- Arms lockers
- Tool carts
- Defeated enemy drops
- Action: Loot containers until you find Enhanced+ Rod Salvage
Step 3: Extract Successfully
- Action:
- Navigate to active exfil point
- Survive extraction
- MUST successfully exfil
Important Notes:
- MUST be completed in a single run
- MUST successfully exfil
- Rod Salvage is RNG—may take multiple attempts
- Maintenance is high-traffic—expect player encounters
- Don’t get greedy—grab the rods and leave
Equitable Distribution [1/4]
Map: Perimeter
Prerequisite: Cutthroat Competition [1/1]
Rewards: Bully SMG, Faction Intel, Heavy Rounds, Random Material, 1,500 Credits, 300 Traxus Rep
Objectives (Single Run):
- Acquire Self-Erasing Data Drive from second floor of Hauler
- Deliver Data Drive to DCON within time limit
Step-by-Step Walkthrough:
Step 1: Acquire Self-Erasing Data Drive
- Location: Hauler, second floor
- Action:
- Navigate to Hauler
- Go to second floor
- Find Data Drive (loot container or specific spawn)
- Pick up—timer starts immediately
Step 2: Deliver to DCON
- DCON Locations on Perimeter:
- North Relay: Roof of bunker northwest of North Relay compound
- Station: Northeast of Station compound near northern walkway
- Overflow: West of Overflow main building near cliffs
- South Relay Hills: On top of bunker in hills south of South Relay
- Action:
- Choose nearest DCON based on your position
- Navigate quickly (timer is active)
- Interact with DCON
- Place Data Drive in DCON inventory
- Wait for confirmation
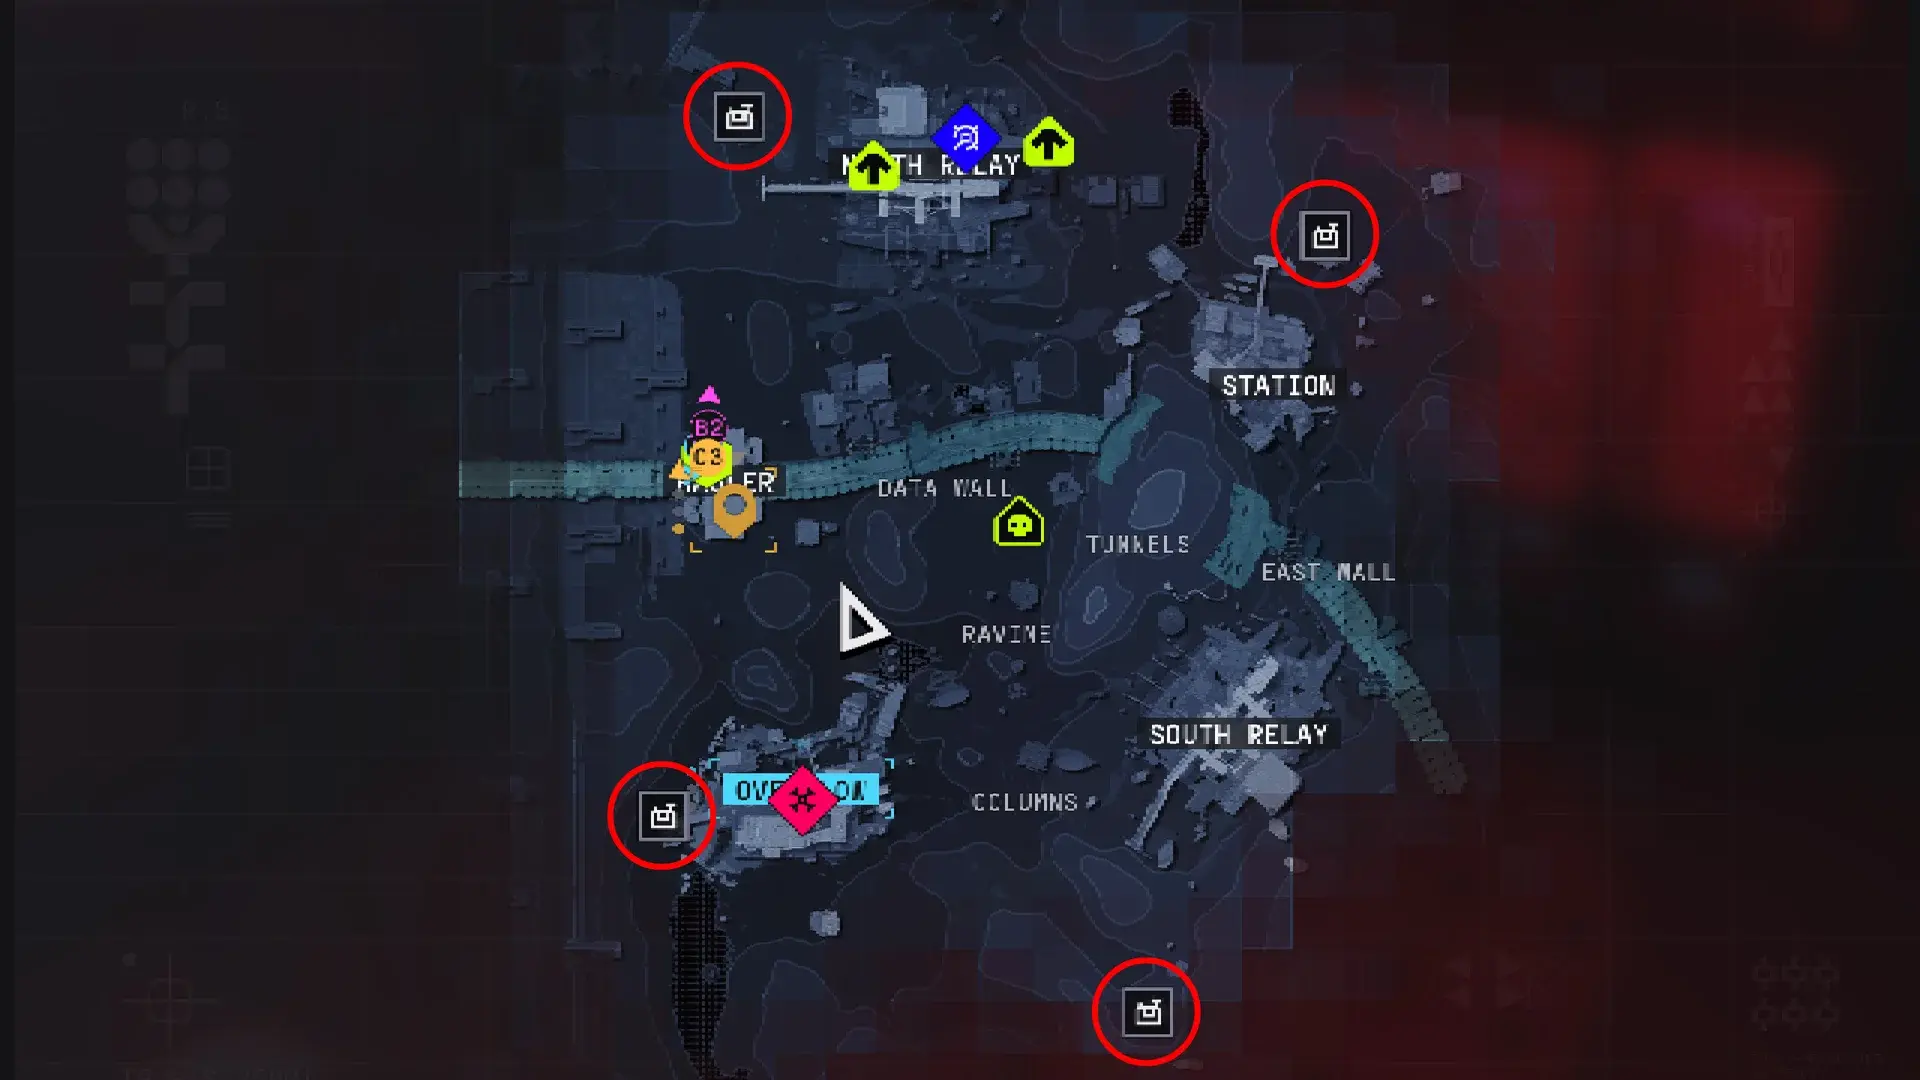
Important Notes:
- MUST be completed in a single run
- Timer starts upon picking up Data Drive
- Does NOT require exfil after delivery
- DCON only appears when you have relevant quest item
- Plan your route before picking up the drive
Equitable Distribution [2/4]
Map: Dire Marsh
Prerequisite: Equitable Distribution [1/4]
Rewards: Repeater HPR, Faction Intel, Heavy Rounds, Random Material, 1,500 Credits, 300 Traxus Rep
Objectives (Single Run):
- Summon Transport Drone via second-floor terminal in Algae Ponds
- Exfil UESC Supplies and Drone Manifest
Step-by-Step Walkthrough:
Step 1: Summon Transport Drone
- Location: Algae Ponds, second floor
- Action:
- Navigate to Algae Ponds
- Go to second floor
- Find terminal
- Interact to summon Transport Drone
Step 2: Locate UESC Supplies and Drone Manifest
- Location: Near drone landing zone
- Action:
- Drone lands and drops supplies
- Collect UESC Supplies
- Collect Drone Manifest
Step 3: Extract Successfully
- Action:
- Navigate to active exfil point
- Survive extraction with both items
- MUST successfully exfil
Important Notes:
- MUST be completed in a single run
- MUST successfully exfil
- Drone summoning may attract other players
- Both items must be extracted (not delivered to DCON)
- Consider team play for exfil security
Equitable Distribution [3/4]
Map: Perimeter
Prerequisite: Equitable Distribution [2/4]
Rewards: Magnum MC, Faction Intel, Heavy Rounds, Random Material, 1,500 Credits, 300 Traxus Rep
Objectives:
- Scan drones in tunnels beneath Station (x3)
- Deliver Unstable Gunmetal resources to DCON in Perimeter (x7)
Step-by-Step Walkthrough:
Step 1: Scan Drones (Station Tunnels)
- Location: Tunnels beneath Station POI
- Action:
- Navigate to Station
- Enter tunnel system beneath Station
- Find 3 drones
- Scan each drone
Step 2: Collect Unstable Gunmetal (x7)
- Locations:
- Containers throughout Perimeter
- Arms lockers
- Tool carts
- Enemy drops
- Note: RNG-based—may take multiple runs to find all 7
- Action: Loot consistently until you have 7 Unstable Gunmetal
Step 3: Deliver to DCON
- DCON Locations: See Equitable Distribution [1/4] section
- Action:
- Navigate to any Perimeter DCON
- Deliver all 7 Unstable Gunmetal
- Wait for confirmation
Important Notes:
- Objectives can be completed across multiple runs
- Does NOT require exfil
- Unstable Gunmetal is RNG—be patient
- Drones in tunnels are stationary—easy to find
- Can deliver Gunmetal in batches (doesn’t need to be all at once)
Equitable Distribution [4/4]
Map: Perimeter
Prerequisite: Equitable Distribution [3/4]
Rewards: Hardline PR, Heavy Rounds, Random Enhanced Material, Traxus Priority Access, 1,500 Credits, 300 Traxus Rep
Objectives (Single Run):
- Trace Commander location at terminal south of South Relay
- Acquire credentials from UESC Commander
Step-by-Step Walkthrough:
Step 1: Trace Commander Location
- Location: Terminal south of South Relay
- Action:
- Navigate to South Relay
- Go to terminal south of the POI
- Interact with terminal
- Commander location is revealed (spawns after ~4 minutes)
Step 2: Navigate to Commander Spawn
- Recommended Route: Columns → Ravine → through Data Wall hole → around North Relay exterior
- Timing: Commander spawns approximately 4 minutes after terminal activation
- Action:
- Take safest path (avoid high-traffic areas)
- Use smoke grenades for cover
- Consider cloak abilities if available
Step 3: Defeat UESC Commander
- Location: Revealed on map after tracing
- Action:
- Commander has escort squad
- Use EMP grenades to disable shield
- Eliminate Commander
- Collect UESC Credentials from ground loot
Important Notes:
- MUST be completed in a single run
- Does NOT require exfil
- Commander has purple shields—bring EMP
- Solo is challenging—team recommended
- If playing with squad, one player can activate terminal while others wait at spawn point
MIDA Priority Contracts
MIDA is the rebellion faction, focused on sabotage, explosives, and chaos. Their Protect/Destroy chain is one of the most complex quest lines in Marathon.
Order/Chaos
Map: Dire Marsh
Prerequisite: Introducing: MIDA
Rewards: Random Enhanced Equipment, Random Equipment, Random Material, 1,500 Credits, 300 MIDA Rep
Objectives (Single Run):
- Trigger alarms in south Complex by hacking a terminal
- Acquire Security Commander credentials
- Download data from terminal inside south Maintenance
Step-by-Step Walkthrough:
Step 1: Trigger Alarms (Complex)
- Location: South Complex, Dire Marsh
- Action:
- Navigate to Complex POI
- Find alarm terminal in southern Complex
- Hack the terminal
- Alarms will trigger (attracts attention)
Step 2: Acquire Security Commander Credentials
- Location: Near Complex (spawned after alarm)
- Action:
- Security Commander arrives with escort
- Defeat Commander
- Collect credentials from loot
Step 3: Download Data (South Maintenance)
- Location: South Maintenance, Dire Marsh
- Action:
- Travel to south Maintenance
- Find terminal inside
- Download data
- Complete all three objectives
Important Notes:
- MUST be completed in a single run
- Does NOT require exfil
- Alarm triggers UESC response—be prepared
- Spans across two POIs (Complex → Maintenance)
- Plan route before starting
Protect/Destroy [1/5]
Map: Dire Marsh
Prerequisite: Order/Chaos
Rewards: Overrun AR, Random Enhanced Equipment, Random Equipment, Light Rounds, +2 additional rewards, 300 MIDA Rep
Objectives (Single Run):
- Destroy the biosample analyzer inside west Quarantine
- Acquire UESC Biohazard Sample
- Deliver sample to DCON
Step-by-Step Walkthrough:
Step 1: Destroy Biosample Analyzer
- Location: West Quarantine, Dire Marsh
- Action:
- Navigate to Quarantine POI (western Dire Marsh)
- Enter main building
- Clear UESC enemies in pod area
- Find yellow stairs in corner (above containers)
- Go to second floor
- Locate biosample analyzer
- Shoot analyzer to destroy it
- Collect UESC Biohazard Sample
Step 2: Deliver to DCON
- DCON Location: Southwest of Quarantine POI (closest DCON)
- Action:
- Exit Quarantine building
- Navigate to DCON (marked on map when you have sample)
- Interact with DCON
- Place Biohazard Sample in inventory
- Wait for confirmation
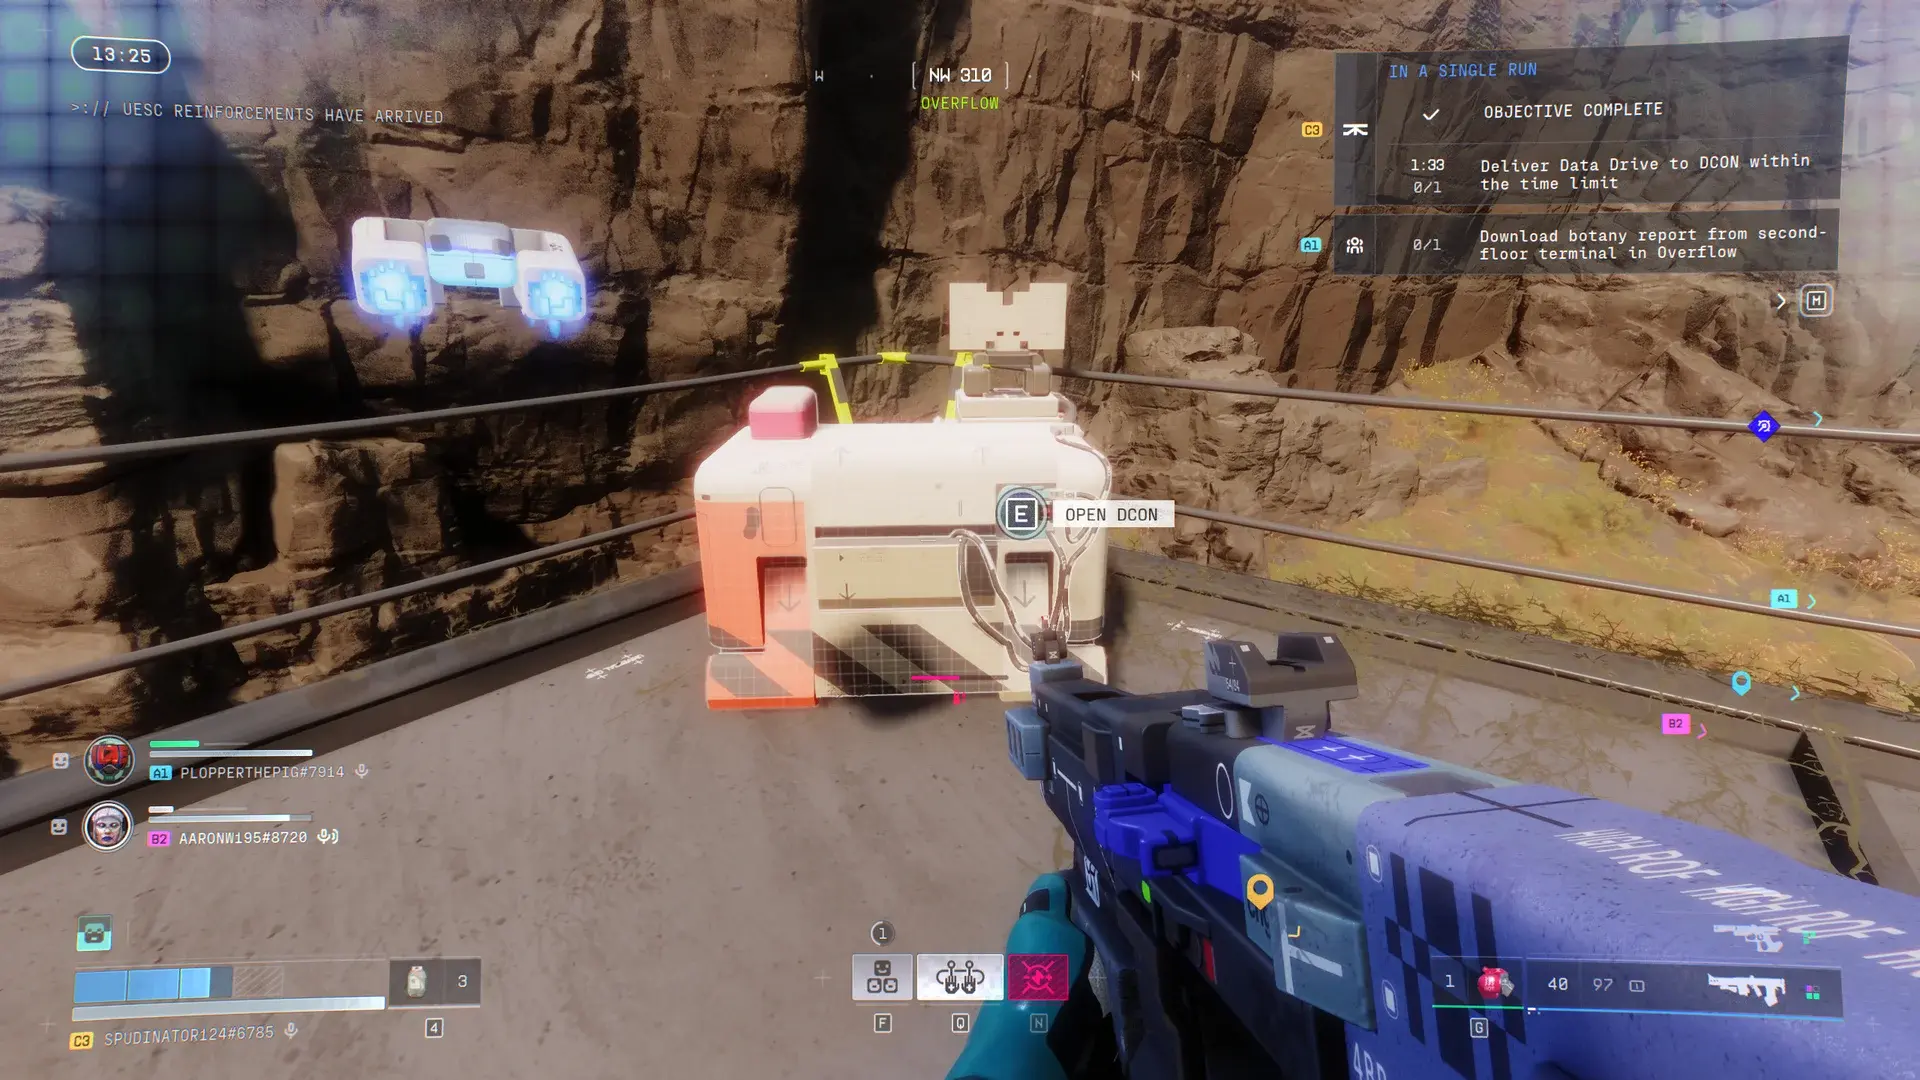
Important Notes:
- MUST be completed in a single run
- Does NOT require exfil after delivery
- Quarantine has heavy UESC presence
- DCON is very close to Quarantine (convenient)
- Sample is quest item—cannot be lost to death after delivery
Protect/Destroy [2/5]
Map: Dire Marsh
Prerequisite: Protect/Destroy [1/5]
Rewards: Random Enhanced Equipment, Faction Intel, Heavy Rounds, Random Material, 1,500 Credits, 300 MIDA Rep
Objectives (Single Run):
- Download malware from terminal in West Gate gatehouse
- Submit a dropship request south of Canal
- Upload malware to the UESC dropship
Step-by-Step Walkthrough:
Step 1: Download Malware (West Gate)
- Location: West Gate gatehouse, Dire Marsh
- Action:
- Navigate to West Gate
- Enter gatehouse
- Find terminal
- Download malware
Step 2: Request Dropship (South of Canal)
- Location: South of Canal area, Dire Marsh
- Action:
- Travel to Canal area
- Go south of Canal
- Find dropship request terminal
- Submit request
- Wait for dropship to arrive (yellow vehicle)
Step 3: Upload Malware to Dropship
- Location: Dropship roof
- Action:
- Navigate to dropship landing zone
- Climb onto dropship roof (use nearby ledges and containers)
- Interact to upload malware
- Dropship will attempt to leave—drop off quickly
- Ship explodes in distance (quest complete)
Important Notes:
- MUST be completed in a single run
- Does NOT require exfil
- Climbing dropship roof is tricky—use surrounding terrain
- Dropship timer is limited—act quickly
- Explosion can be heard across map—reveals your position
Protect/Destroy [3/5]
Map: Dire Marsh
Prerequisite: Protect/Destroy [2/5]
Rewards: Random Enhanced Equipment, Faction Intel, Heavy Rounds, Random Material, 1,500 Credits, 300 MIDA Rep
Objectives (Single Run):
- Acquire UV Protocol from Intersection
- Tag 3 marked locations in Maintenance
Step-by-Step Walkthrough:
Step 1: Acquire UV Protocol (Intersection)
- Location: Intersection, Dire Marsh
- Specific: Blue building in southwest area
- Action:
- Navigate to Intersection
- Find blue building in southwest
- Shoot 4 electrical boxes
- Collect UV Protocol
Step 2: Tag 3 Locations (Maintenance)
- Location: Maintenance POI, Dire Marsh
- Tag Locations:
- Location 1: Northeast side of rooftop (white wall with black X—only visible when close)
- Location 2: Red pillar at north entrance (MIDA symbol painted on it)
- Location 3: Mid-height of south entrance pillar (in hangar area)
- Action:
- Navigate to Maintenance
- Go to each location
- Get close enough for HUD marker to appear
- Interact to tag each location
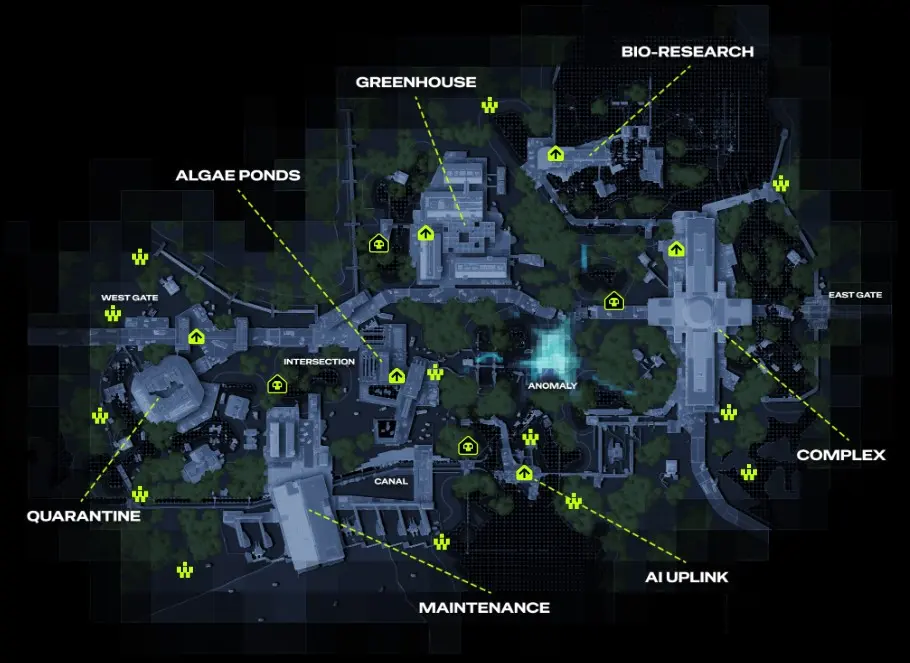
Important Notes:
- MUST be completed in a single run
- Does NOT require exfil
- Tag markers are proximity-based (only appear when close)
- Maintenance has claymores and turrets—watch for traps
- All 3 tags must be completed (can’t skip any)
Protect/Destroy [4/5]
Map: Outpost
Prerequisite: Protect/Destroy [3/5]
Rewards: Random Enhanced Equipment, Faction Intel, Heavy Rounds, Random Material, 1,500 Credits, 300 MIDA Rep
Objectives (Single Run):
- Download shipping manifest in Processing
- Scan tagged containers in Airfield (x4)
- Complete within 20-minute timer
Requirements:
- Season Level 12+ (Outpost map access)
Step-by-Step Walkthrough:
Step 1: Download Shipping Manifest (Processing)
- Location: Processing POI, Outpost
- Action:
- Navigate to Processing
- Find terminal
- Download shipping manifest
- Timer starts (20 minutes)
Step 2: Scan Tagged Containers (Airfield)
- Location: Airfield POI, Outpost
- Containers: 4 containers with graffiti markings
- Action:
- Travel to Airfield
- Find 4 tagged containers (marked with graffiti)
- Scan each container
- All 4 must be scanned
Step 3: Manage Timer
- Time Limit: 20 minutes from manifest pickup
- Tip: Move efficiently between POIs
- Warning: Outpost is small but vertical—travel takes time
Important Notes:
- MUST be completed in a single run
- 20-minute timer from manifest pickup
- Does NOT require exfil
- Outpost has Heat Cascade—watch your heat
- High player traffic—expect encounters
- Consider Assassin shell for stealth
Protect/Destroy [5/5]
Map: Dire Marsh
Prerequisite: Protect/Destroy [4/5]
Rewards: Random Enhanced Equipment, Faction Intel, Heavy Rounds, Random Enhanced Material, MIDA Priority Access, 1,500 Credits, 300 MIDA Rep
Objectives (Single Run):
- Use explosive gear to destroy target
- Complete final sabotage objective
Step-by-Step Walkthrough:
Step 1: Prepare Explosive Gear
- Required: Grenade OR Destroyer Prime ability
- Note: Basic grenade works—doesn’t need to be fancy
- Tip: Bring multiple in case of misses
Step 2: Navigate to Target Location
- Location: Intersection, Dire Marsh (main building)
- Action:
- Travel to Intersection
- Enter main building
- Find target objective
Step 3: Destroy Target
- Action:
- Use explosive on target
- Confirm destruction
- Quest completes
Important Notes:
- MUST be completed in a single run
- Must have explosive gear (grenade or ability)
- Does NOT require exfil
- Final mission in Protect/Destroy chain
- MIDA upgrades now available—focus on explosives and mobility
Arachne Priority Contracts
Arachne is the murder cult faction, focused entirely on PvP combat, melee, and kill streaks. Their quests are straightforward but require player engagement.
The Fleeting Grave [1/1]
Map: Any
Prerequisite: Introducing: Arachne
Rewards: WSTR Combat Shotgun, MIPS Rounds, 300 Arachne Rep
Objectives:
- Defeat downed Runners with your finisher (x10)
Step-by-Step Walkthrough:
Step 1: Engage Enemy Runners
- Best Locations:
- Hauler (Perimeter)
- Maintenance (Dire Marsh)
- Intersection (Dire Marsh)
- Exfil points (final minutes)
- Action:
- Find and engage enemy teams
- Reduce enemies to downed state (not killed)
Step 2: Use Finisher on Downed Runners
- Action:
- Approach downed Runner
- Use finisher move (melee interaction)
- Repeat 10 times
Important Notes:
- Can be completed across multiple runs
- Does NOT require exfil
- Finishers are silent—won’t attract attention
- Arachne upgrades focus on melee damage and PvP
- Consider Assassin shell for stealth approaches
Sekiguchi Priority Contracts
Sekiguchi specializes in shell biology, ability cooldowns, and cores. Their quests are experimental and often involve self-modification.
Baseline Calibration
Map: Any
Prerequisite: Introducing: Sekiguchi
Rewards: Random Core, Random Material, 1,500 Credits, 300 Sekiguchi Rep
Objectives (Single Run):
- Take fall damage (x40)
- Take damage from ticks (x20)
- Overheat your shell (x3)
Step-by-Step Walkthrough:
Step 1: Take Fall Damage (x40)
- Method:
- Find elevated position (roof, ledge, platform)
- Jump down (not enough to kill you)
- Repeat until 40 instances recorded
- Tip: Small falls count—don’t need dangerous jumps
- Location: Any map with verticality
Step 2: Take Tick Damage (x20)
- Location: Infested buildings (Columns on Perimeter, various on Dire Marsh)
- Action:
- Find tick-infested area
- Allow ticks to damage you (don’t kill them immediately)
- Let damage tick up to 20 instances
- Tip: Use shield to survive—don’t let ticks kill you
Step 3: Overheat Shell (x3)
- Method:
- Sprint continuously
- Use abilities repeatedly
- Jump frequently
- Wait for heat bar to max out
- Repeat 3 times
- Tip: Can be done safely in quiet areas
Important Notes:
- MUST be completed in a single run
- Does NOT require exfil
- Can be done solo in safe areas
- Bring healing to survive tick damage
- Sekiguchi upgrades reduce ability cooldowns—worth the grind
DCON Locations Guide
DCONs (Data Connection terminals) are used to deliver quest items during runs. They only appear when you have relevant quest items.
Perimeter DCON Locations (4 Total)
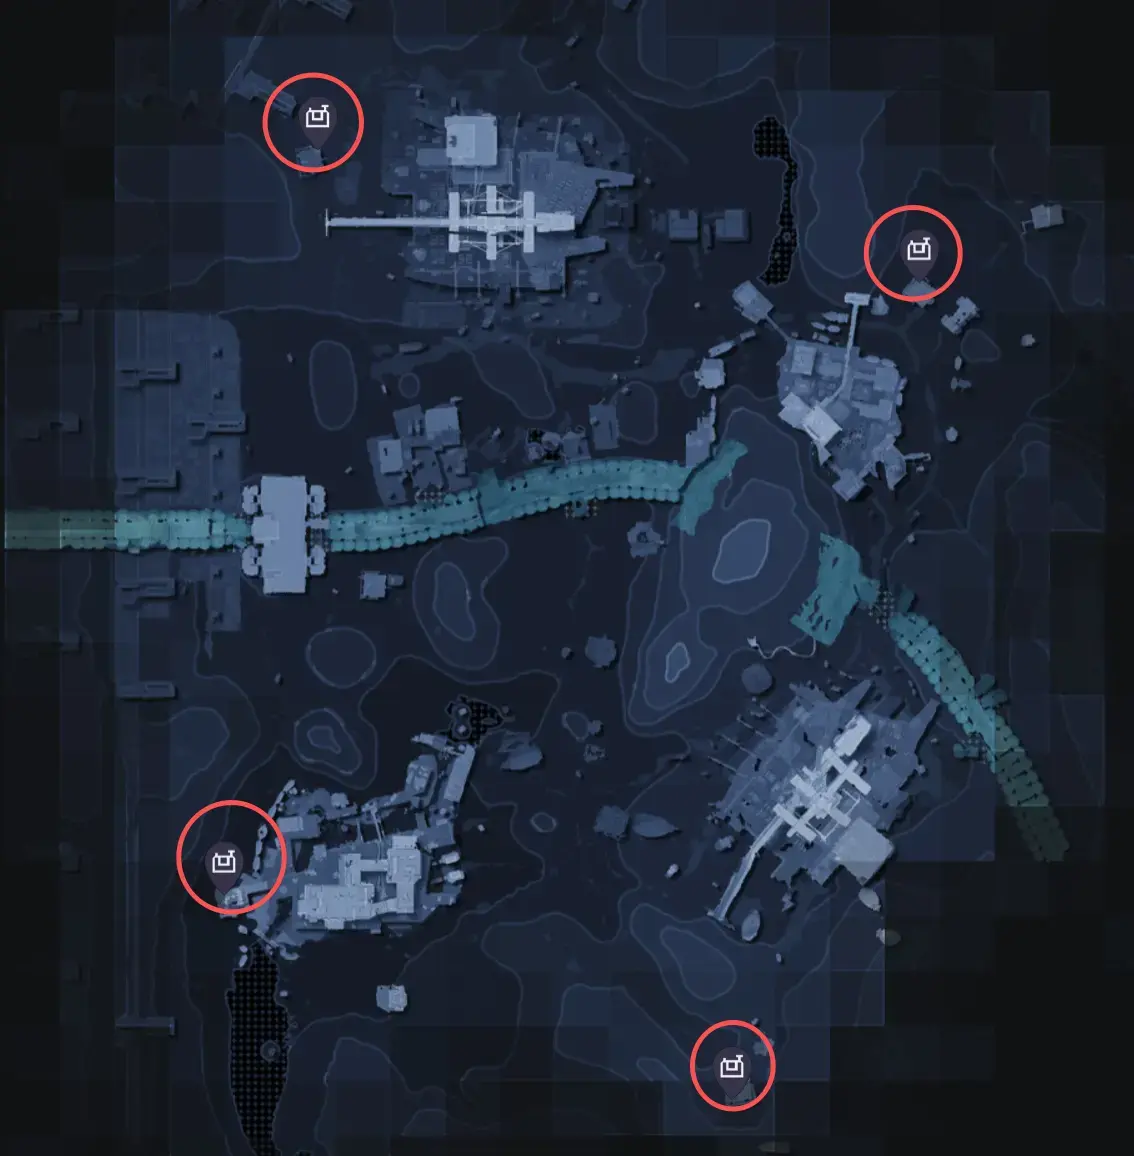
| Location | Description |
|---|---|
| North Relay | Roof of bunker northwest of North Relay compound |
| Station | Northeast of Station compound near northern walkway |
| Overflow | West of Overflow main building near cliffs |
| South Relay Hills | On top of bunker in hills south of South Relay POI |
Dire Marsh DCON Locations (3 Total)
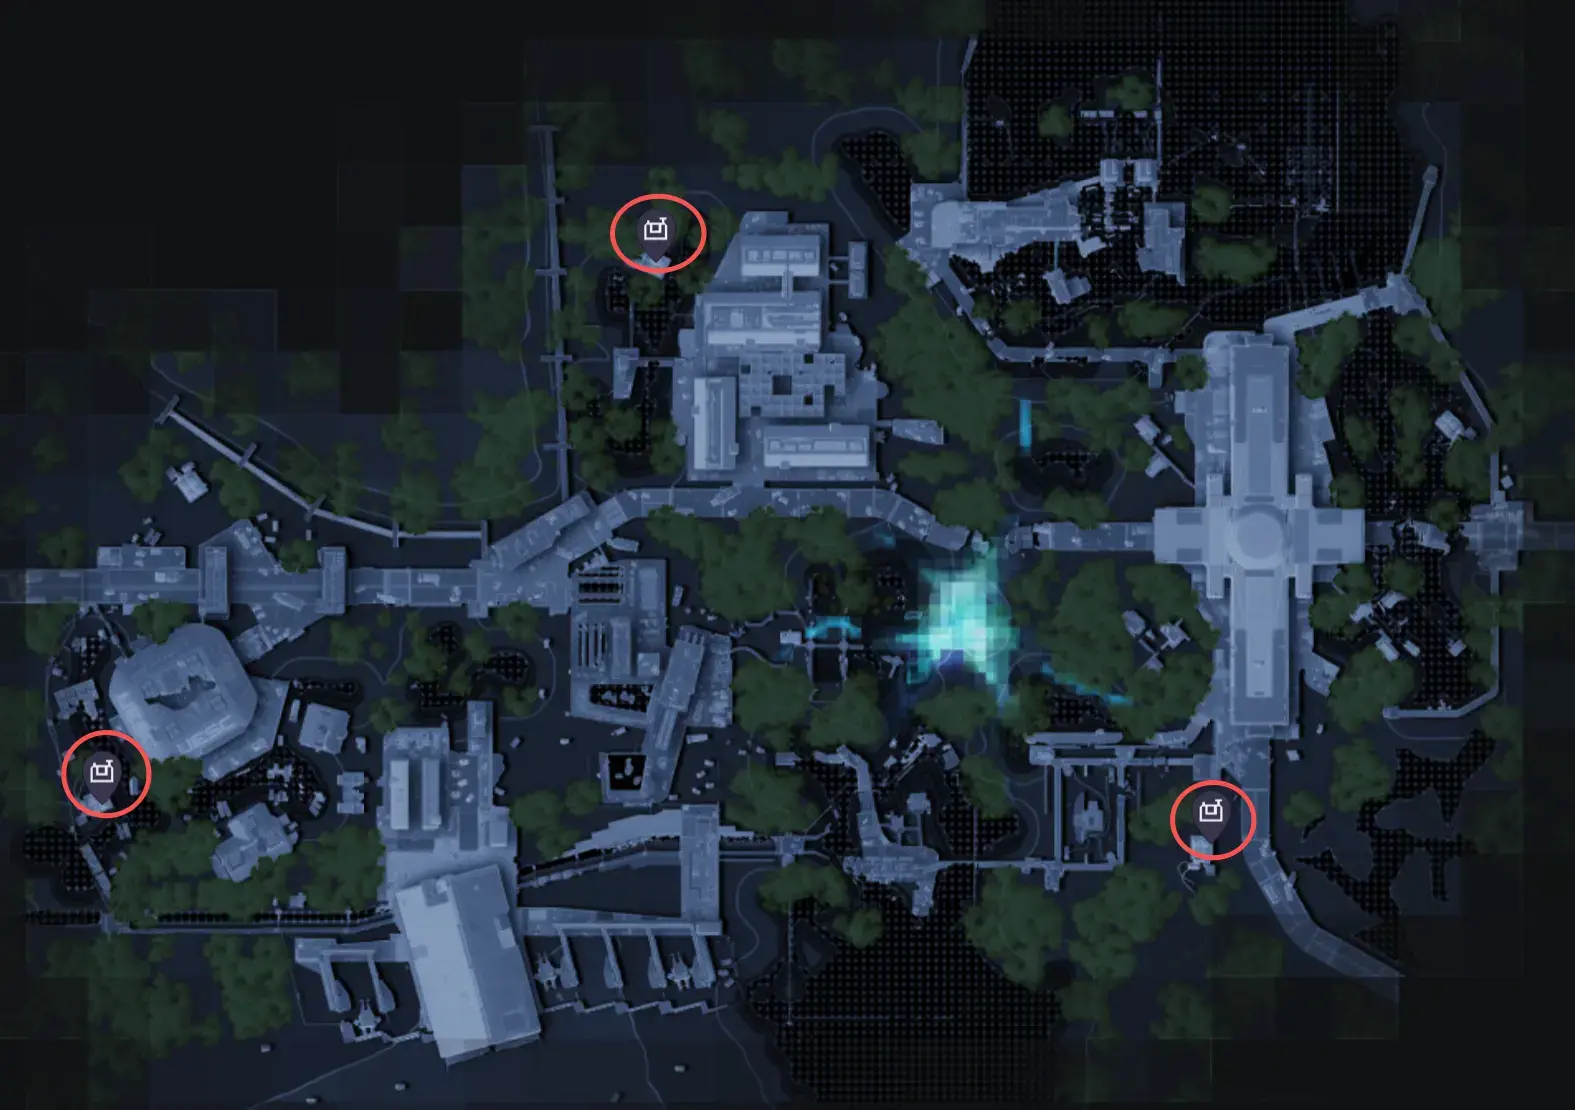
| Location | Description |
|---|---|
| Complex | Outside building south of Complex, east of AI Uplink |
| Quarantine | Outside building in marsh directly south of Quarantine |
| Greenhouse Hills | On south side of hill structures north of Greenhouse |
Outpost DCON Locations (3 Total)
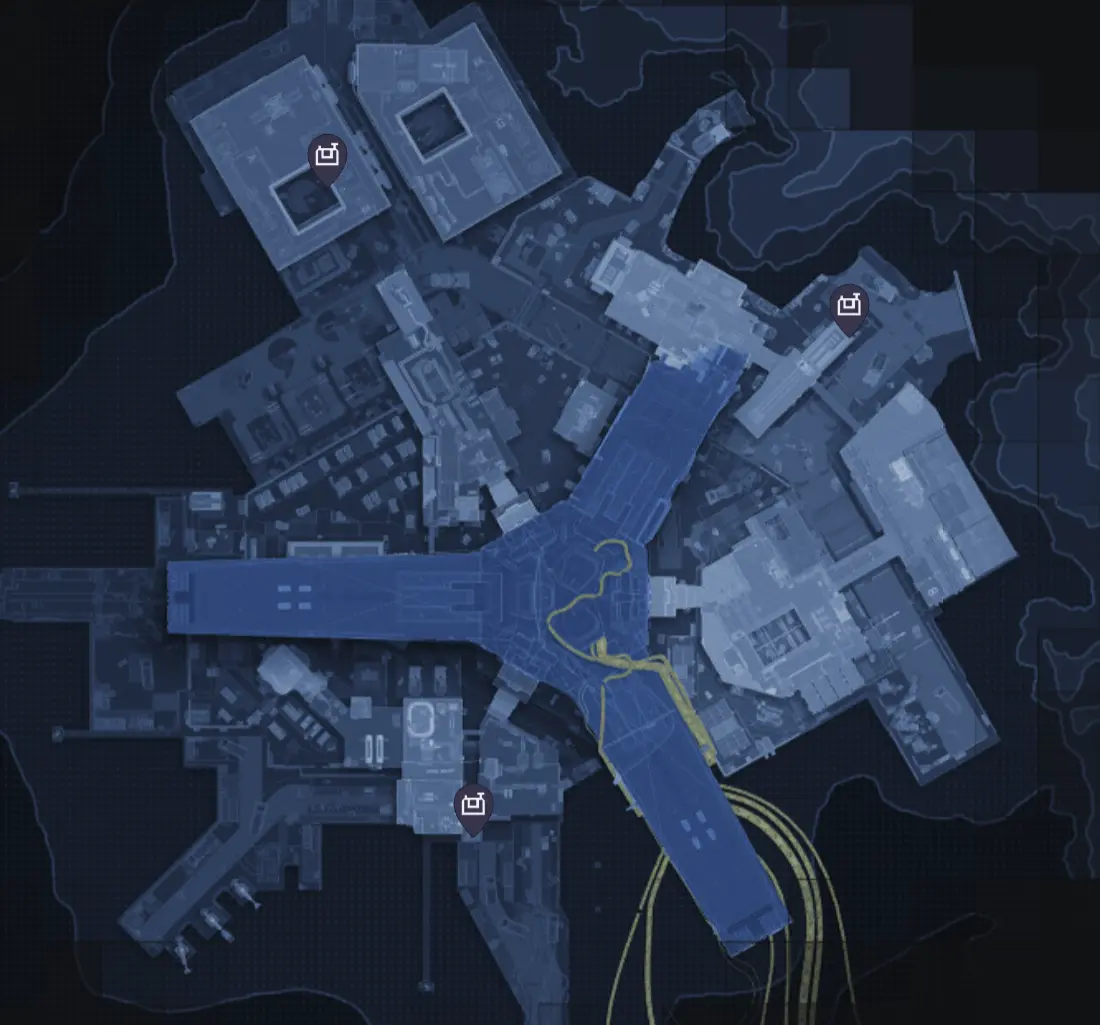
| Location | Description |
|---|---|
| Airfield | West building at Airfield |
| Dormitories | Near Orientation and Dormitories, outside long rectangular building |
| Processing | East of Processing, between two buildings on roof |
Important DCON Notes:
- DCONs only appear when you have quest items to deliver
- Items deposited are transmitted immediately (safe from death)
- Can also deposit personal items for safe storage
- DCONs are marked with white icon when nearby
- Plan routes to pass DCONs before extraction
Essential Tips for Quest Completion
General Quest Strategies
Single-Run Quests:
- All objectives must be completed without dying
- Death resets entire quest progress
- Does NOT always require exfil (check individual quests)
- Bring appropriate gear for all objectives
Multi-Run Quests:
- Objectives can be completed across multiple runs
- Progress persists through death
- Still may require exfil for final objective
- Can batch objectives efficiently
Loadout Recommendations
For Combat Quests:
- Primary weapon with ample ammo
- EMP grenades (for Commander fights)
- Healing items (Patch Kits, Shield Charges)
- Consider Triage shell for team healing
For Stealth Quests:
- Assassin shell (invisibility)
- Suppressed weapons
- Smoke grenades
- Knife for silent takedowns
For Loot Quests:
- Thief shell (loot detection)
- Extra backpack space
- Loot speed upgrades
- Focus on container-rich areas
Map-Specific Tips
Perimeter:
- Safest map for early quests
- Good for learning mechanics
- Lower player density
- Recommended: NuCaloric, early CyberAcme
Dire Marsh:
- Medium difficulty
- Higher player density
- More valuable loot
- Recommended: Traxus, MIDA quests
Outpost:
- Highest difficulty (Level 12+)
- Heat Cascade mechanic
- Vertical combat
- Recommended: Sekiguchi, endgame content
Common Failure Points
Timer Management:
- Some quests have hidden timers (Equitable Distribution 1/4)
- Plan routes before picking up timed items
- Use smoke and abilities to escape quickly
Exfil Camping:
- Other players camp exfil points
- Use alternative exfils when possible
- Consider early extraction with valuable items
- Smoke grenades block exfil beacon aggro
Quest Item Loss:
- Quest items are “fragile”—destroyed on knockdown
- Avoid combat when carrying quest items
- Deliver to DCON as soon as possible
- Some quests don’t require exfil—use this to your advantage

Marathon Database
Looking for a full breakdown of every weapon, runner, core, implant, mod, and item? Check out the Marathon Database — a complete interactive reference with filters and hover details for all in-game content.
Frequently Asked Questions
What are Priority Contracts in Marathon?
Priority Contracts are the main quest lines given by each of the 6 factions. They offer the greatest rewards and faction reputation, and must often be completed in a single run without dying.
Do I need to exfil to complete quests?
Some quests require successful extraction, while others complete automatically when you leave the match (alive or dead). Check individual quest requirements carefully.
Which faction should I level first?
CyberAcme is your starting faction and should be prioritized first to unlock other factions. Focus on their vault expansion and heat management upgrades early.
What happens if I die during a single-run quest?
You'll need to restart the entire quest chain from the beginning on your next run. All objectives must be completed without dying between steps.
How do I unlock all 6 factions?
Complete CyberAcme's Liaison Contracts sequentially: NuCaloric → Traxus → MIDA → Arachne → Sekiguchi. Each unlocks the next faction in the chain.
About the author

Editor-in-Chief
Jack Cao is the founder and Editor-in-Chief of GameGuidesBox. He has been writing practical game guides for over a decade, specializing in action RPGs, extraction shooters, and competitive FPS. Every guide he signs is playtested first-hand: his logged test time includes 47 hours across two Crimson Desert playthroughs with DPS verification, 180 hours building a full Windrose settlement, and 45 hours across six Yunyun Syndrome endings runs. Favorite games include Titanfall 2, Baldur's Gate 3, Metro, PUBG, and CS2.
You may also like

Marathon Best Weapons Ranked + Loadout Combos
The full Season 2 weapon tier list for Marathon — launch arsenal plus the new KKV-9SD and D54 Battle Pistol — with loadout combos that pair each top gun with the right Shell and attachments.
Marathon Map Loot Routes: High-Value Extraction Timing
Optimized loot routes for every major zone on Tau Ceti IV, with extraction timing windows that maximize value per run.
Marathon Runner Shell Tier List: All 8 Shells Ranked
Stop queueing the wrong Shell. Here is the definitive S-to-C ranking for all eight Runner frames after 100+ hours across Season 1 and Season 2 Nightfall.
Comments