Mortal Shell II Resolve Mechanic Explained: Why There Is No Stamina Bar and How Break Damage Works
Confused by the missing stamina bar in Mortal Shell II? We break down the Resolve economy, enemy posture, and Harden so you can fight on the game's terms.
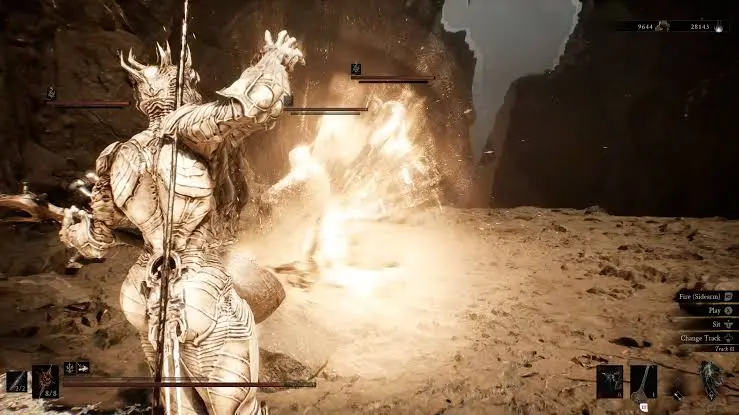
Mortal Shell II Resolve Mechanic Explained: No Stamina Bar, One Economy
Mortal Shell II’s biggest design swing is deleting the stamina bar. You can swing, sprint, and dodge forever, but the game does not hand you freedom for free. Every strong action answers to Resolve, a single golden meter that turns aggression into the whole game. This guide explains how Resolve is earned and spent, how enemy posture and Riposte fit the loop, and why “no stamina” is not the same as “no thought.”
Table of Contents
- Preparation: Reading the Resolve Bar Before You Swing
- Core Walkthrough: Building and Spending Resolve in Real Fights
- Important Notes: Why No Stamina Does Not Mean Button Mashing
- Rewards and Build Payoffs From a Full Resolve Economy
Preparation: Reading the Resolve Bar Before You Swing
Resolve is the yellow bar above your health. It fuels three things and nothing else:
| Spends Resolve | Does Not Spend Resolve |
|---|---|
| Shell Ability (your equipped Shell’s active skill) | Light / heavy melee attacks |
| Sidearm (ranged secondary weapon) | Dodge and sprint |
| Ability Tarstone (unique skill gem) | Block and basic guard |
You refill Resolve by landing melee hits. Perfect guards and parries also hand Resolve back, which is why defense feeds offense instead of just keeping you alive. Critically, basic movement is free. There is no green bar to ration, so the question is never “can I afford another attack” but “am I generating enough Resolve to matter.”
Compare this to the 2020 original Mortal Shell, which used a conventional stamina bar for attacks, dodges, and sprinting. The sequel keeps the Harden fantasy but re-frames resource management as an offensive skill. Resolve is never a penalty bar; it is momentum.
Core Walkthrough: Building and Spending Resolve in Real Fights
1 Earn Resolve Through Melee Pressure, Not Patience
Location: Any encounter. Action: Stay in range and land hits. Every connecting melee strike refills Resolve; bigger single kills refill it faster than several small ones. Outcome: A full bar is not safety, it is waste. If you have Resolve and are not using it, you are sitting on the game’s most useful resource. Keep attacking so the fighting refills the meter.
2 Use Perfect Guards to Fill Enemy Posture and Trigger Riposte
Location: Against any enemy with a break meter under its health bar. Action: Block at the exact moment a hit lands for a perfect guard. This deals Break Damage and fills the enemy’s posture meter. When the meter is full, the enemy is staggered and open. Outcome: A light attack triggers the Riposte, the biggest free hit in the game. Note the day one patch: only light attacks start a Riposte now, not heavy ones. A red-marker attack cannot be blocked at all, so dodge those instead.
3 Spend Resolve on Shell Abilities, Sidearms, and Ability Tarstones
Location: Mid-exchange, when the meter is healthy. Action: Fire your Sidearm to interrupt brutes or blow basic enemies off their feet; pop your Shell Ability for its signature effect; use an Ability Tarstone for a unique skill. Outcome: These tools all draw from the same pool, so every expenditure is a choice between immediate damage, control, and survival. A Sidearm shot is paid for through close-range commitment, which keeps the kit connected instead of sitting outside the loop as an emergency button.
4 Harden to Absorb Hits Mid-Combo and Keep Momentum
Location: During your own attack strings. Action: Activate Harden to turn to stone mid-swing. The incoming hit is absorbed and you finish the attack immediately after, instead of being knocked out of the animation. Outcome: This is the heart of aggressive play. Harden does not cancel your swing; it pauses the damage and lets you continue the sequence, converting a would-be trade into sustained pressure. Time it against single committed strikes, not long enemy strings.
5 Pick a Seal That Matches Your Defensive Instinct
Location: Loadout screen before a fight. Action: Choose the Seal that fits how you actually play. Outcome: Seals reshape your Break Damage economy:
| Seal | Best For | Main Advantage | Main Risk |
|---|---|---|---|
| Base Seal | Beginners | Blocking plus perfect guards | Defensive meter can run dry and stun you |
| Parry-Only Seal | Experienced players | Faster posture breaks | No traditional blocking |
| Harden Seal | Aggressive players | Absorb hits mid-combo | Requires good timing |
The Slayer Seal is a separate easy-mode option: Sidearms deal Break Damage and you gain Health and Resolve on Riposte, but it locks certain achievements. Night Mode is the hard toggle, granting extra Gloom from kills.
Important Notes: Why No Stamina Does Not Mean Button Mashing
- Passivity is expensive. Resolve lacks meaningful passive regen when combat goes quiet. Step back too long and you run out of answers. The game rewards engagement, not waiting.
- Enemies are built around your freedom. With no stamina to exploit, foes are aggressive and track your movement hard. The removal of the bar raises the pressure on positioning, spacing, and reads.
- Red-marker attacks are unblockable. Dodge them; a guard will not save you. Learn to read the tell.
- Sitting on block is a slow death. Holding guard drains a separate defensive meter, and emptying it leaves you stunned wide open. Perfect guards, not held blocks, are the win condition.
- Spending Resolve competes with recovery. A Shell Ability, a Sidearm shot, and a special all pull from one pool. Decide whether you want to extend momentum or protect it.
- Resolve capacity and per-action cost are not published in this guide’s sources. Treat exact numbers as unconfirmed until a patch note or official table surfaces.
Rewards and Build Payoffs From a Full Resolve Economy
| Shell | Resolve Synergy | Why It Pays Off |
|---|---|---|
| Tiel | Invisibility on perfect dodge builds stagger | Safe, momentum-keeping opener for bosses |
| Eredrim | Shoulder Bash spends Resolve for Break damage | Repeated Riposte windows on bosses when upgraded |
| Proxima | Biosampler pulls enemies, harvests sellable samples | Funds upgrades, sustaining the Resolve economy |
| Genessa | Generates Resolve to summon clones | Offloads pressure while you refill the bar |
The takeaway: Resolve is the through-line of every build. Shells change how you approach danger, but aggression is the economy for all of them. Master the refill-through-contact loop and Harden timing first; everything else is a flavor on top.
Frequently Asked Questions
What exactly does Resolve do in Mortal Shell II?
Resolve is the yellow bar that powers your Shell Ability, your Sidearm shots, and your Ability Tarstones. You refill it by landing melee hits and by landing perfect guards or parries. It does not gate basic movement.
Is there any passive way to regenerate Resolve?
Not meaningfully. Sources describe Resolve as lacking passive regeneration when combat goes quiet, which is the whole point: passivity costs you options. You earn it by engaging, and environmental Resolve Branches can top you off before a fight.
Why is there no stamina bar in Mortal Shell II?
The sequel removes stamina so you can swing, sprint, and dodge without a fatigue limit. The restraint moved from a penalty bar to the Resolve economy, where your strongest tools all draw from one shared resource.
How do I break enemy posture and trigger a Riposte?
Land perfect guards or parries to fill the break meter under the enemy health bar. When it is full, the enemy is open; a light attack triggers the Riposte. After the day one patch, only light attacks start a Riposte, not heavy ones.
Can the Harden mechanic cancel my attack animation?
Harden lets you turn to stone mid-swing to absorb a hit, then finish the attack immediately after. It does not cancel the swing; it pauses the hurt and lets you continue the sequence, which is the core of aggressive play.
About the author

Editor-in-Chief
Jack Cao is the founder and Editor-in-Chief of GameGuidesBox. He has been writing practical game guides for over a decade, specializing in action RPGs, extraction shooters, and competitive FPS. Every guide he signs is playtested first-hand: his logged test time includes 47 hours across two Crimson Desert playthroughs with DPS verification, 180 hours building a full Windrose settlement, and 45 hours across six Yunyun Syndrome endings runs. Favorite games include Titanfall 2, Baldur's Gate 3, Metro, PUBG, and CS2.
You may also like
Mortal Shell II How to Respec: Mether's Severance Guide
Mether's Severance turns Mortal Shell II's Glimpse commits into a refundable loop. Here is the exact respec route via Merrick and Zhirelle, what the refund covers, and when it is worth spending Coin.
Mortal Shell II: Every Playable Shell, Ability Tree, and Unlock Location
Confused about which Shell to bond first? We mapped all the playable Shells — the eight permanent bodies plus prologue-only Harros — with their full ability trees and exact unlock routes.
Mortal Shell II All 44 Bosses: Locations, Beacons, and Drops Checklist
Struggling to track down every grotesque in Fainweald? We mapped all 44 boss encounters, their nearest Beacon, and exactly what each one drops. Click to unlock the full checklist.
Comments