007 First Light Trophy Guide: All 92 Collectibles in One Run
Tired of replaying every chapter for that last collectible? This guide has exact checkpoints for all 92 items across 17 chapters. Two playthroughs verified — no wasted cleanup time.

 *007 First Light — IO Interactive’s James Bond origin story *
Table of Contents
- Trophy Roadmap: What to Expect
- Full Trophy List — Every Trophy and How It Unlocks
- TacSim Online Mode: 30 Minutes to Done
- Collectible Overview: All 92 by Type and Chapter
- Chapter-by-Chapter Collectible Walkthrough
- Chapter 1: Against the Odds (8 Collectibles)
- Chapter 2: In His Majesty’s Secret Service (6 Collectibles)
- Chapter 3: The Needle’s Eye (5 Collectibles)
- Chapter 4: The Heart of the Matter (3 Collectibles)
- Chapter 5: A New Home (5 Collectibles)
- Chapter 6: A Night Out (5 Collectibles)
- Chapter 7: A Matter of Considerable Delicacy (5 Collectibles)
- Chapter 8: All the Time in the World (6 Collectibles)
- Chapter 9: Out of the Ashes (5 Collectibles)
- Chapter 10: The Past Never Dies (6 Collectibles)
- Chapter 11: Uninvited (5 Collectibles)
- Chapter 12: Knightfall (5 Collectibles)
- Chapter 13: Going Old School (5 Collectibles)
- Chapter 14: Time to Die (6 Collectibles)
- Chapter 15: Man of the Hour (6 Collectibles)
- Chapter 16: Wave of the Future (5 Collectibles)
- Chapter 17: For England (8 Collectibles)
- Important Notes and Common Pitfalls
- What the Trophy Tracker Won’t Tell You: Hard-Earned Lessons
Trophy Roadmap: What to Expect
007 First Light is IO Interactive’s take on a James Bond origin story, and if you’ve played their Hitman games, the DNA is unmistakable — but the structure is way more linear. Seventeen chapters, roughly 20 hours for a story + collectible run, and a platinum that lands on the easier side of the spectrum.
I ran this twice to verify everything. First playthrough blind (18 hours), second with a checklist (just over 20 with all 92 collectibles). Here’s what you’re looking at:
Estimated time to platinum: 20.5 hours Missable trophies: 0 (Chapter Select covers everything) Difficulty: 2/10 — no difficulty-related trophies, no boss on hard mode Online trophies: 4 (TacSim mode, roughly 30 minutes)
 *First postcard location in Chapter 1: Against the Odds. This one’s right in the first camp *
Recommended Approach
Step 1: Story + Collectibles in one run — ~20 hours
Follow the chapter-by-chapter guide below. The Q-Watch (unlocked Chapter 4) highlights nearby collectibles with a yellow glow when you hold L1/LB. I tested this extensively — the glow range is roughly 10 meters and it works through some walls, but not all. The Laser Strap (unlocked Chapter 9) breaks padlocks and certain wall-mounted cabinets. The Dart Phone (unlocked Chapter 5) isn’t strictly needed but makes getting to some collectibles easier by distracting guards.
One thing I caught on my second run: the collectible tracker on the Touchpad only shows you counts by type (Cards, Intel, Mementos, Postcards, Legacy), not by chapter. You can’t see “I have 4/8 in Chapter 1” anywhere in the menu. This means if you miss something, you’re scanning through every chapter manually. Don’t be me on my first playthrough — follow this guide checkpoint by checkpoint.
Step 2: TacSim Online — ~30 minutes
After the story, Operations unlock. Escalations become available after Chapter 6. Three trophies here, all trivial.
Full Trophy List — Every Trophy and How It Unlocks
Half the list is automatic story progression. I’m listing the exact trigger point for each so you never wonder “did I miss this?”
| Trophy | Name | Requirement | Type |
|---|---|---|---|
| The name’s Bond. James Bond | Collect all trophies | Platinum | |
| Icebreaker | Survive the helicopter crash — unlocks after Chapter 1 | Bronze | |
| From Malta with love | Complete training as a recruit — after Chapter 5 | Bronze | |
| Shaken not stirred | Complete first assignment at the nightclub — after Chapter 6 | Bronze | |
| I expect you to die | Survive the hotel explosion in Slovakia — during Chapter 8, after disarming the bomb in the cellar | Bronze | |
| Skyfall | Jump out of a plane in Slovakia — after Chapter 8 | Silver | |
| Win, lose or die | Win the auction — during Chapter 10 after the drone auction | Bronze | |
| Nobody lives forever | Find 009’s body — during Chapter 10 after sneaking through the ship | Bronze | |
| Trigger Mortis | Escape the ambush alive — after Chapter 10 | Silver | |
| A hard man to kill | Survive an assassination attempt — during Chapter 11 after the rooftop sniper section | Bronze | |
| You only live twice | Defeat the assassin — during Chapter 11 after the Murto boss fight | Silver | |
| Agent under fire | Escape in the bin lorry — after Chapter 11 | Bronze | |
| All time high | Infiltrate Nicholas Webb’s penthouse — during Chapter 12 after entering | Bronze | |
| No time to die | Escape by helicopter — after Chapter 12 | Silver | |
| Double or die | Save Theresa Lorca — during Chapter 14 after the Murto boss fight | Bronze | |
| You know my name | Defeat Damien Webb — after Chapter 14 | Silver | |
| Solo | Leave MI6 as a rogue agent — after Chapter 15 | Bronze | |
| The writing is on the wall | Catch Isola — after Chapter 16 | Silver | |
| For king and country | Defend MI6 — after Chapter 17 | Gold | |
| The world is not enough | Collect all 10 Postcards | Silver | |
| For your eyes only | Unlock all 23 Intel (MI6 Files) | Silver | |
| Recovered assets | Collect all 14 Mementos | Silver | |
| Casino Royale | Collect all 36 Playing Cards | Silver | |
| A collector’s habit | Collect all 92 collectibles | Gold | |
| On the house | Complete 3 TacSim Challenges in one match | Bronze | |
| Eyes on the prize | Complete an Operation in TacSim | Bronze | |
| Professional | Reach Clearance Level 3 in TacSim | Bronze | |
| The bigger they are | Kill a heavy enemy type | Bronze | |
| A bridge too far | Kick 10 enemies off ledges | Bronze | |
| Straight flush | Kill 5 enemies in a row using only strikes in one TacSim match | Silver | |
| A view to a kill | Use the environment to dispose of 5 enemies | Silver | |
| Walking the plank | Push an enemy off a ledge during combat | Bronze | |
| It’s all in the reflexes | Parry 10 attacks | Silver | |
| Licensed to kill | Kill 30 enemies with headshots | Silver | |
| Paint it black | Use binoculars to paint a target 10 times | Bronze |
Note on the TacSim kill trophies: These accumulate across matches. You don’t need to do them all in one run.
TacSim Online Mode: 30 Minutes to Done
This is the part that scared people before launch — online trophies in a single-player centric Bond game. Turns out the community was overthinking it.
When does TacSim unlock?
- Escalations: after Chapter 6
- Operations: after completing the main story
Access it from the Title Screen. It’s essentially IO’s take on combat challenges — replay story encounters with modified objectives.
The Three TacSim Trophies
Eyes on the prize — Complete any 1 Operation. Operations are story-adjacent missions with combat modifiers. Pick the shortest one. I finished my first in 3 minutes.
On the house — Complete 3 Challenges in one TacSim match. During a TacSim match, press the Touchpad to view Challenges. These are objectives like “get 3 headshots” or “kill an enemy with an environmental object”. You don’t need to win the match — just hit 3 Challenges in one run. The Challenges refresh between attempts.
Professional — Reach Clearance Level 3. This is your overall TacSim rank. If you’re not Level 3 after finishing an Operation and 3 Escalations, replay the shortest Escalation and focus on its Challenges. I hit Level 3 after my second Escalation because Challenges award bonus XP.
One thing the guides don’t mention: During a TacSim match, pressing Touchpad and scrolling over the objective shows a tutorial on exactly what buttons do what. Found this on my third match and facepalmed at how much time I wasted guessing.
Collectible Overview: All 92 by Type and Chapter
| Type | Count | Trophy |
|---|---|---|
| Playing Cards | 36 | Casino Royale (Silver) |
| Intel (MI6 Files) | 23 | For your eyes only (Silver) |
| Mementos | 14 | Recovered assets (Silver) |
| Postcards | 10 | The world is not enough (Silver) |
| Legacy Items | 9 | Part of A collector’s habit (Gold) |
Collectible Distribution by Chapter
| Chapter | Cards | Intel | Mementos | Postcards | Legacy | Total |
|---|---|---|---|---|---|---|
| 1: Against the Odds | 2 | 2 | 1 | 1 | 0 | 8 |
| 2: In His Majesty’s Secret Service | 2 | 1 | 1 | 1 | 1 | 6 |
| 3: The Needle’s Eye | 1 | 1 | 1 | 1 | 0 | 5 |
| 4: The Heart of the Matter | 1 | 1 | 0 | 0 | 1 | 3 |
| 5: A New Home | 2 | 1 | 1 | 0 | 0 | 5 |
| 6: A Night Out | 2 | 2 | 1 | 0 | 0 | 5 |
| 7: A Matter of Considerable Delicacy | 3 | 1 | 1 | 0 | 0 | 5 |
| 8: All the Time in the World | 2 | 1 | 1 | 1 | 0 | 6 |
| 9: Out of the Ashes | 2 | 2 | 1 | 0 | 0 | 5 |
| 10: The Past Never Dies | 2 | 1 | 1 | 1 | 0 | 6 |
| 11: Uninvited | 2 | 1 | 1 | 1 | 0 | 5 |
| 12: Knightfall | 2 | 2 | 1 | 0 | 0 | 5 |
| 13: Going Old School | 2 | 1 | 1 | 1 | 0 | 5 |
| 14: Time to Die | 2 | 2 | 1 | 1 | 0 | 6 |
| 15: Man of the Hour | 2 | 1 | 1 | 1 | 1 | 6 |
| 16: Wave of the Future | 3 | 1 | 1 | 0 | 1 | 5 |
| 17: For England | 4 | 2 | 0 | 1 | 1 | 8 |
Quick Gadget Reference
| Gadget | Unlock | What it opens |
|---|---|---|
| Q-Watch | Chapter 4 (automatic) | Yellow highlight on nearby collectibles via L1/LB |
| Dart Phone | Chapter 5 (automatic) | Distracts guards; opens a few locked areas |
| Laser Strap | Chapter 9 (automatic) | Breaks padlocks, wall cabinets, and certain objects |
| E.S.P. (Pistol) | Chapter 9 (Q-Lab) | Shoots electric panels |
Critical note I learned the hard way: If you use Chapter Select to go back for collectibles from Chapter 9 onward, your gadget loadout changes. The game auto-equips different gadgets than what you had during the story run. You might not have the Laser Strap equipped when you need it. Always check your loadout at the nearest Q-Watch station or replay from Chapter 9 if items are locked behind laser-required containers.
Chapter-by-Chapter Collectible Walkthrough
I tested every single checkpoint and exact location below across two playthroughs. Each entry lists the checkpoint to select, the objective it appears under, and exactly where to look. Collectibles save the instant you pick them up — in Chapter Select, you can grab one and quit immediately without reaching the next checkpoint.
Chapter 1: Against the Odds — 8 Collectibles
Total: 2 Cards, 2 Intel, 1 Memento, 1 Postcard, 0 Legacy
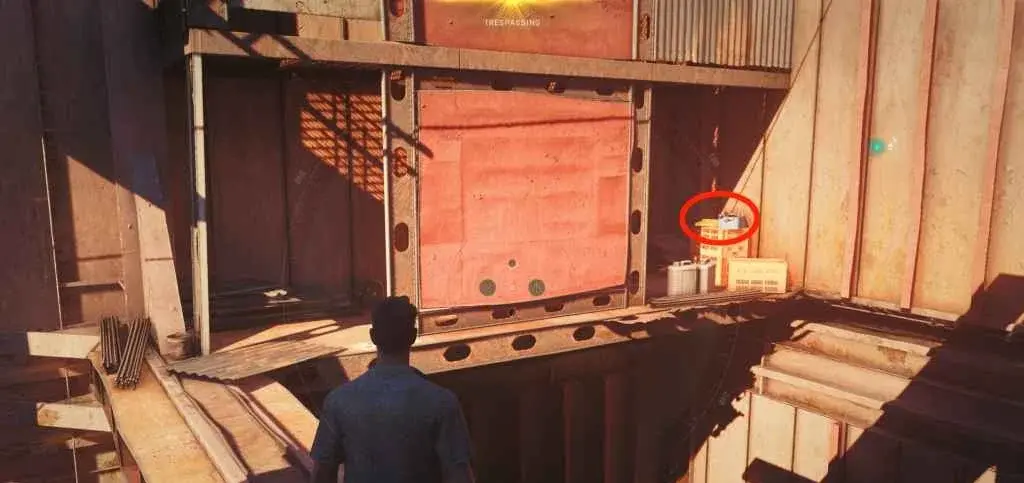
*Finding the Postcard on the desk in the B2 container *
 *Postcard #1: Iceland — on the desk inside container B2 at Central Camp *
Card: 7 of Acorns
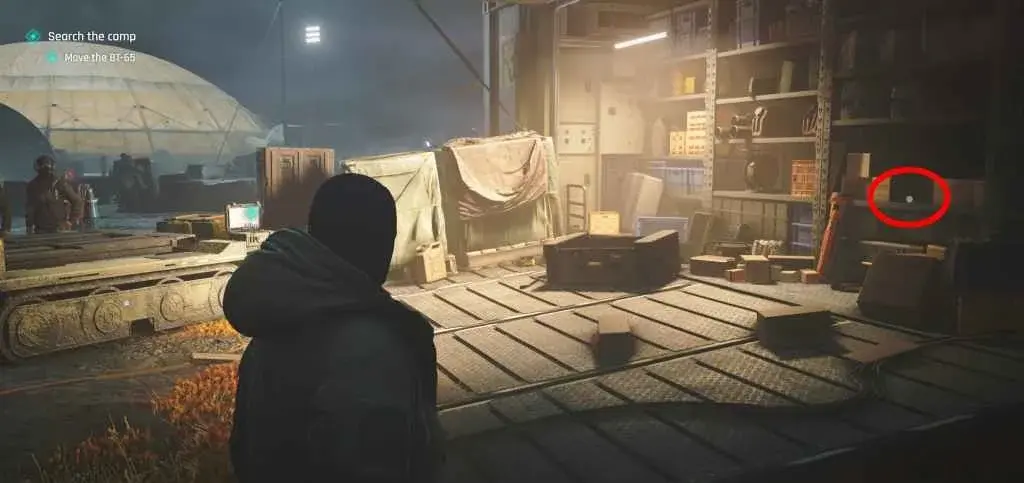

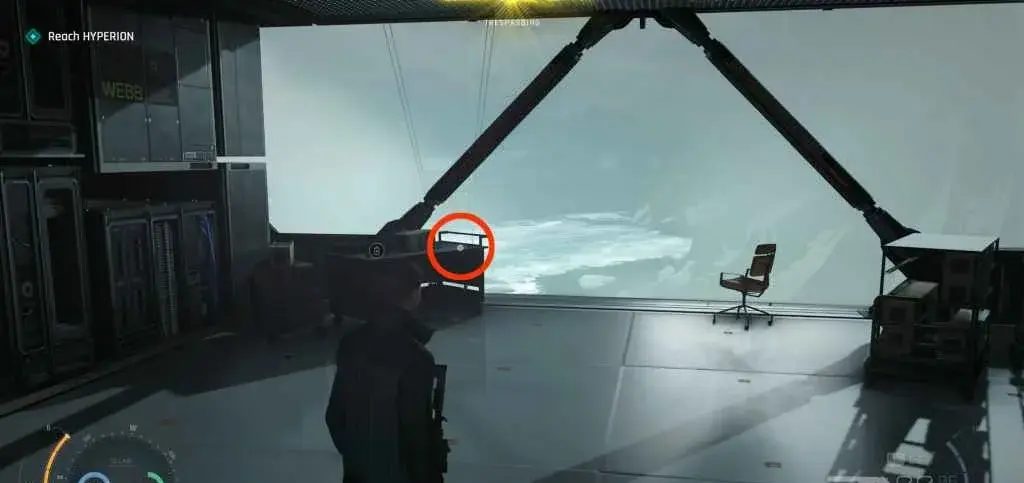
 Checkpoint: 04 Deployment Camp | Objective: Move the BT-65
After the scene of the ice cracking, go straight to the large truck. The card is on a wooden crate to the left of the vehicle.
Intel: Parley Transaction Data


 Checkpoint: 05 Move the BT-65 | Objective: Move the BT-65
After the previous checkpoint, follow the radio tower icon. The intel is on a desk inside the building.
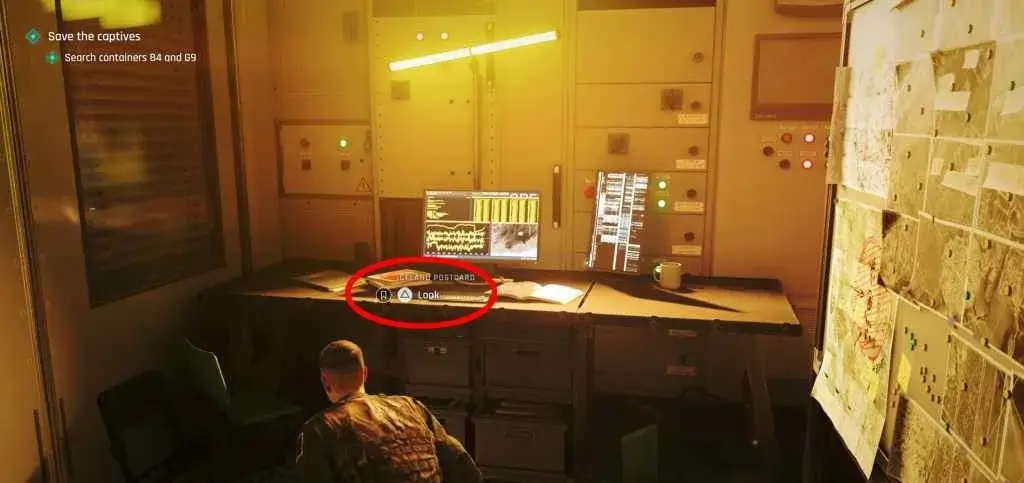
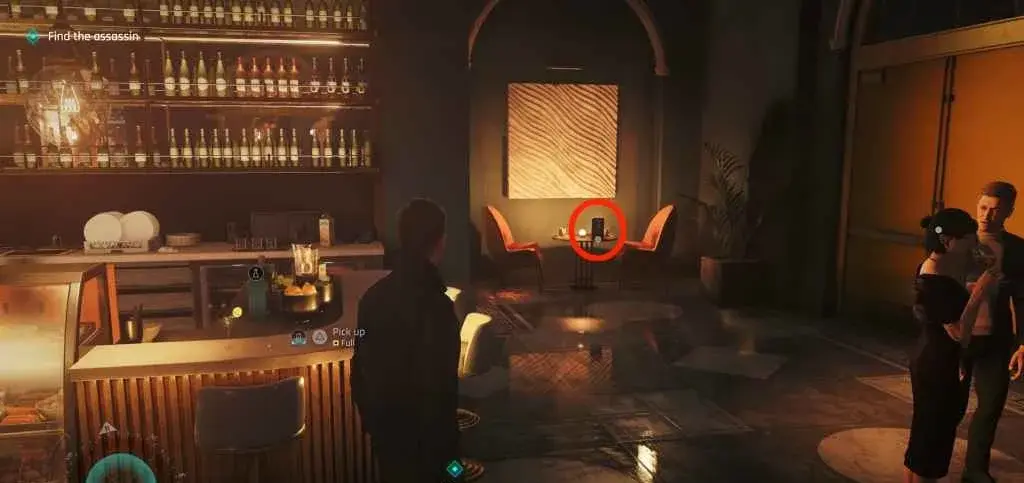
Postcard #1: Iceland Postcard
Checkpoint: 06 Central Camp | Objective: Save the captives / Search containers B4 and G9
Jump down into the enemy camp. Enter container B2 on the right side. Take down the guard at the desk — the postcard is right there on it.
Card: King of Bells
 Checkpoint: 06 Central Camp | Objective: Search containers B4 and G9
From container B2, head outside to the central camp area with a fire. On one of the tables near the campfire.
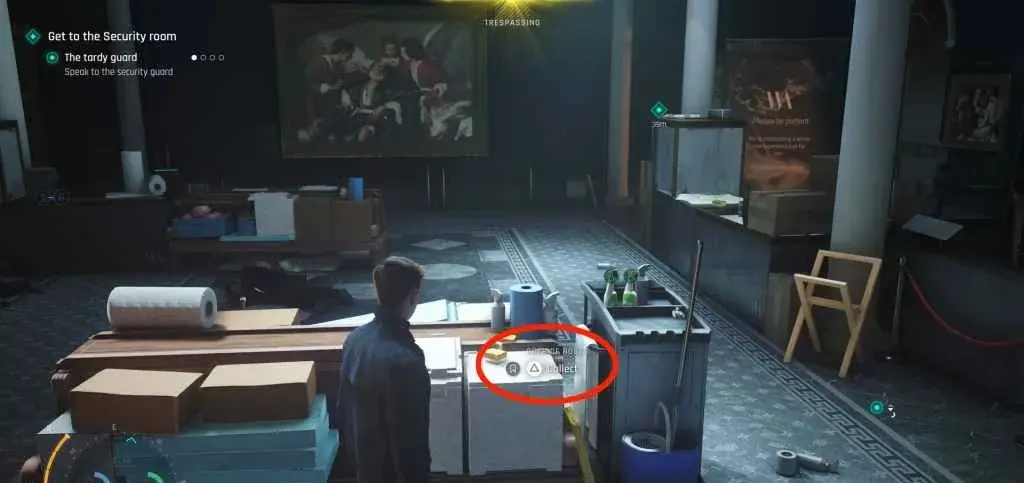
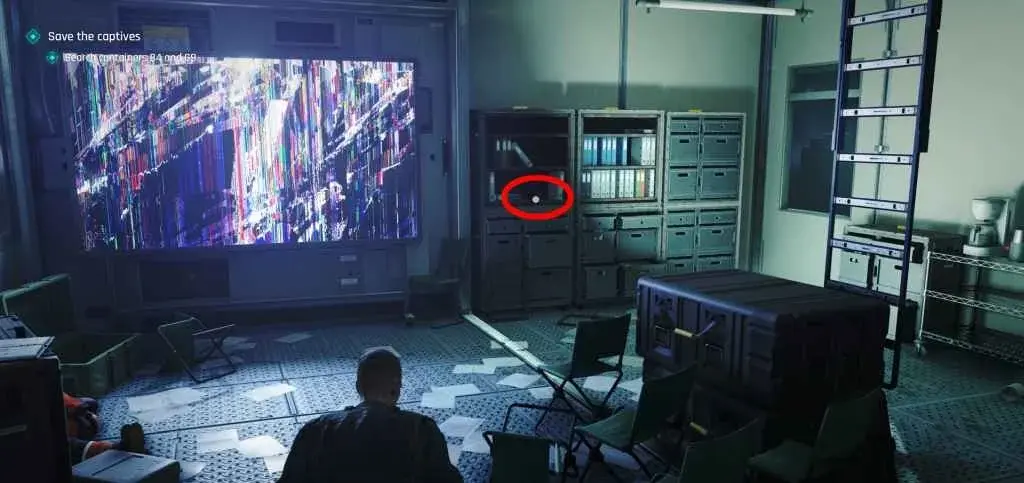
Intel: Satellite Feed (MASTER???)

 Checkpoint: 07 Find the captives | Objective: Search containers B4 and G9
After climbing the ladder out of the lower area, you enter a room with hacking panels. The intel is on the desk inside.
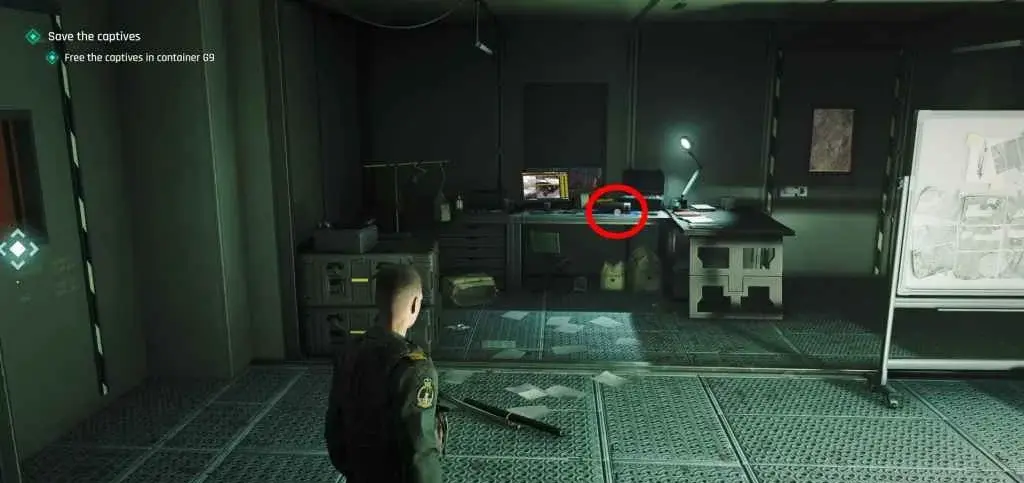
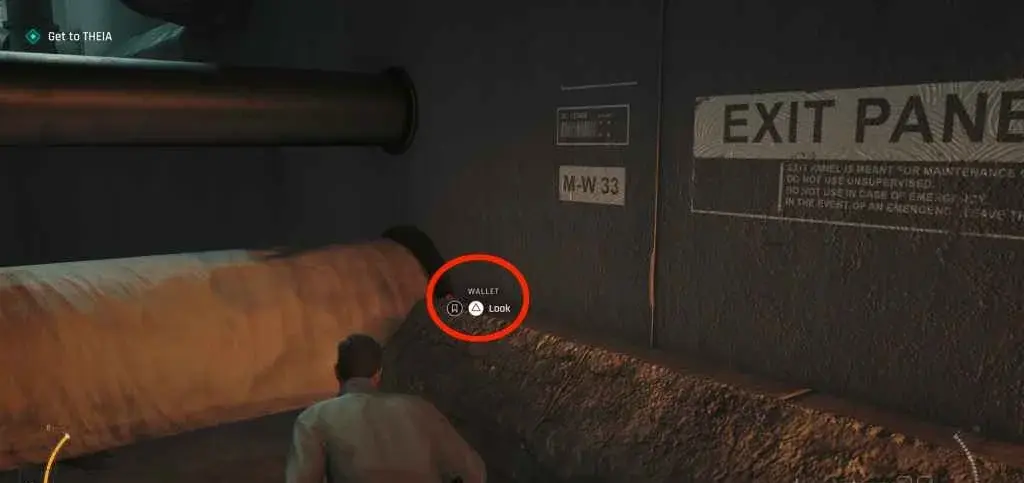
Memento: Greenland Pendant


 Checkpoint: 08 Save the captives | Objective: Save the captives
At the camp where the three captives are held. Look for a wooden crate with the pendant on top.
Card: 7 of Bells

 Checkpoint: 09 Protect the scientist | Objective: Protect the scientist
After reaching the dock and the getaway vehicle, the card is on a small table near the building at the dock.
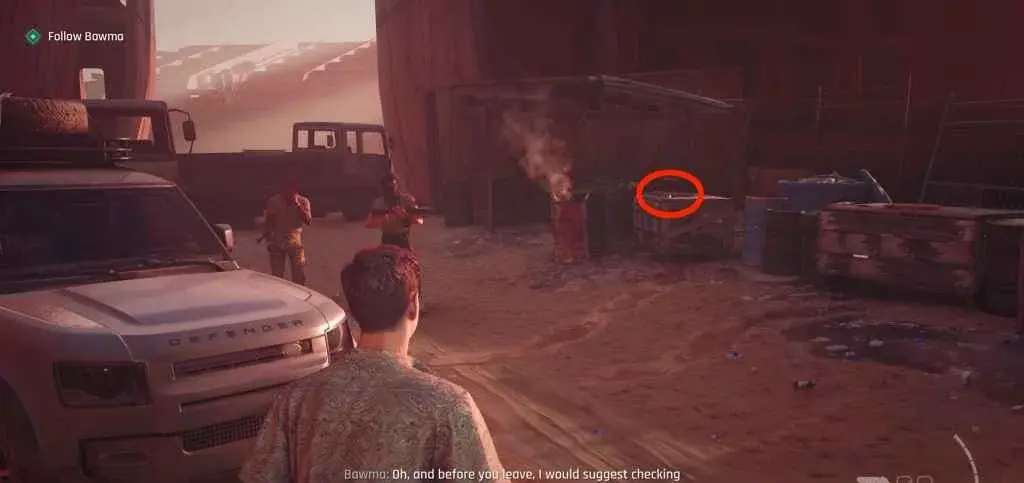
Card: Ace of Acorns
 Checkpoint: 10 Evac | Objective: Evacuate
At the helicopter landing zone. Before boarding, check the small structure on the left side of the pad.
Chapter 2: In His Majesty’s Secret Service — 6 Collectibles
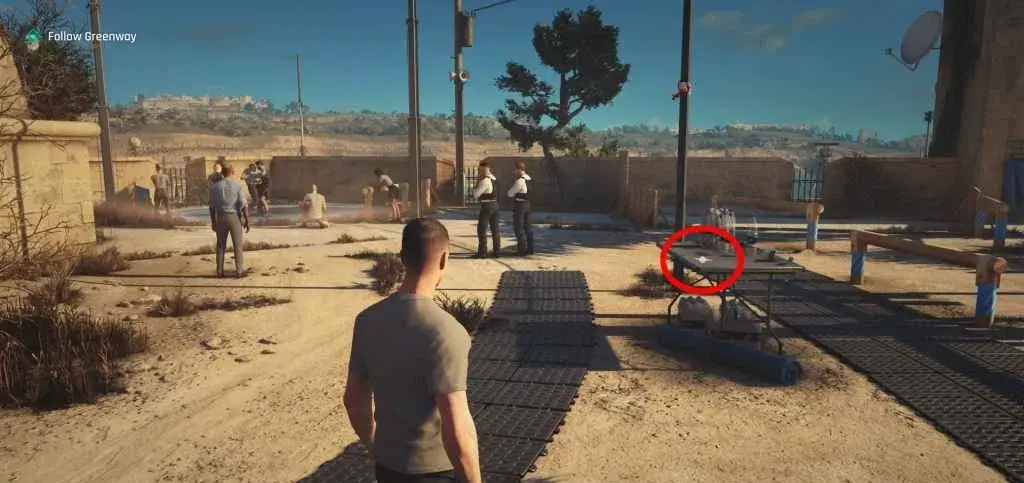
 *Mauritania Postcard and Playing Cards at the Black Market — requires Laser gadget for the padlocked fence near the fish tank *
Total: 2 Cards, 1 Intel, 1 Memento, 1 Postcard, 1 Legacy
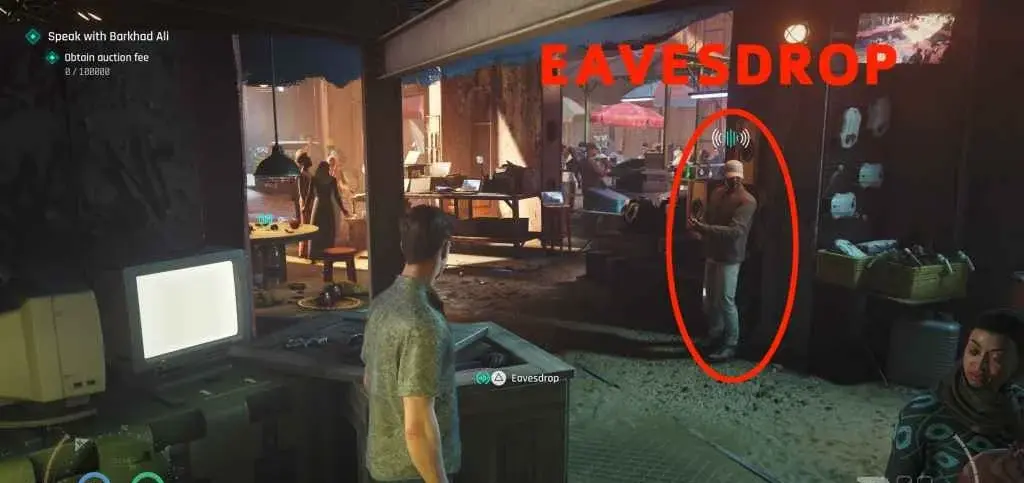
Intel: Intercepted MI6 Report
 Checkpoint: 02 Arriving at Aleph | Objective: Follow Greenway
After exiting the car, enter the shipwreck market. The intel is on a counter in the market.
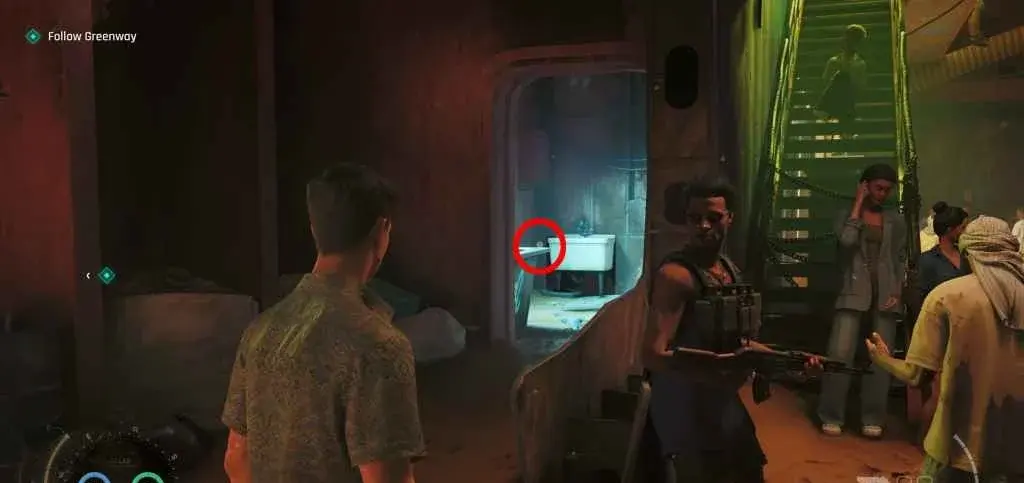
Card: 6 of Bells
Checkpoint: 02 Arriving at Aleph | Objective: Follow Greenway
From the market entrance, take the left path into a bathroom. The card is on the sink.
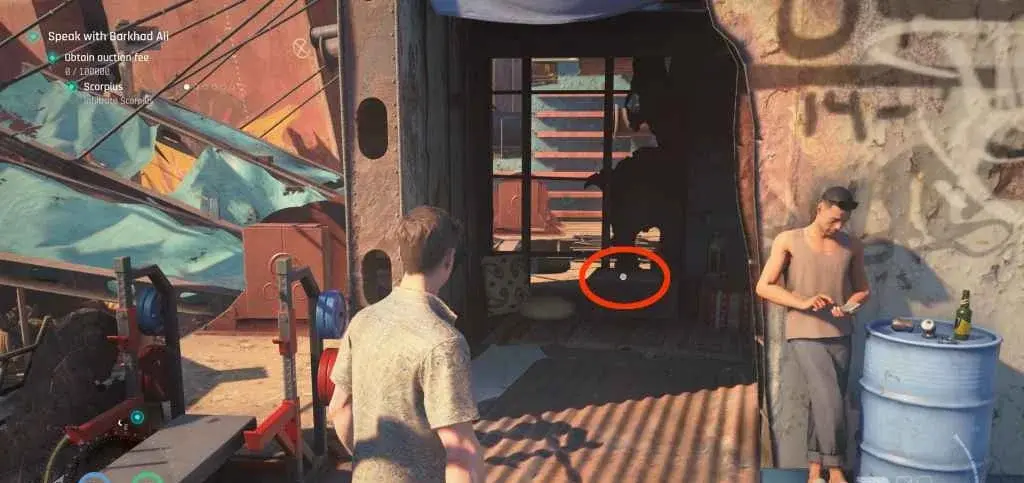
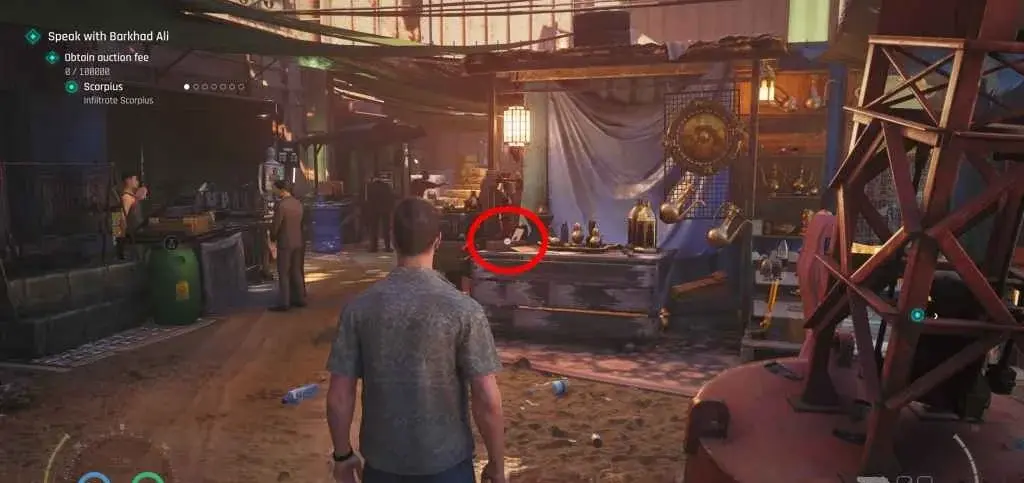
Card: 9 of Acorns


 Checkpoint: 03 Black Market | Objective: Obtain auction fee
Go downstairs to the market, then right to an area with two guards having an eavesdrop conversation. The card is inside the fish tank where the guards are standing. You need the Laser gadget to destroy the fish tank glass. If you’re doing this via Chapter Select and don’t have the gadget, replay from Chapter 9 onward.
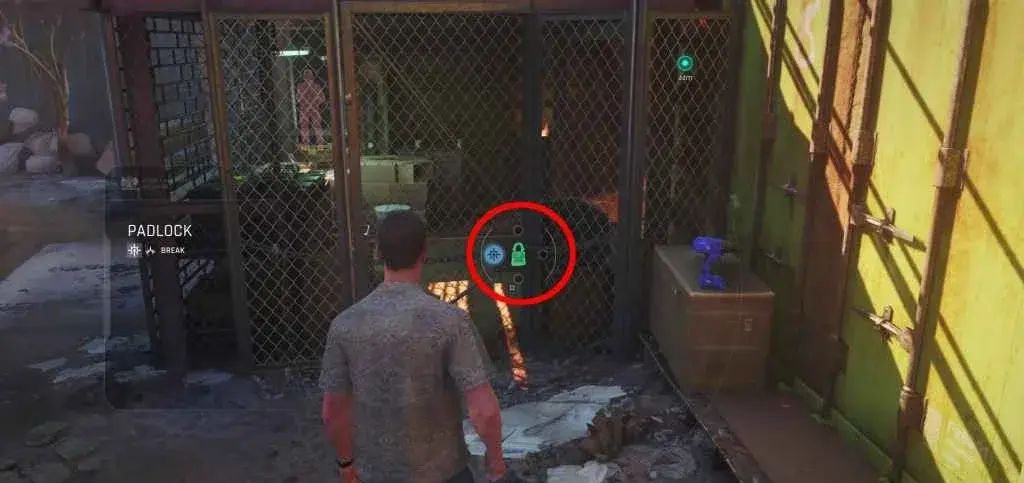
Postcard #2: Mauritania Postcard
Checkpoint: 03 Black Market | Objective: Obtain auction fee
From the market entrance, go left toward the big red anchor stuck in the ground. There’s a fenced area with a padlock. Shoot the padlock with the Laser gadget. The postcard is on the table inside.
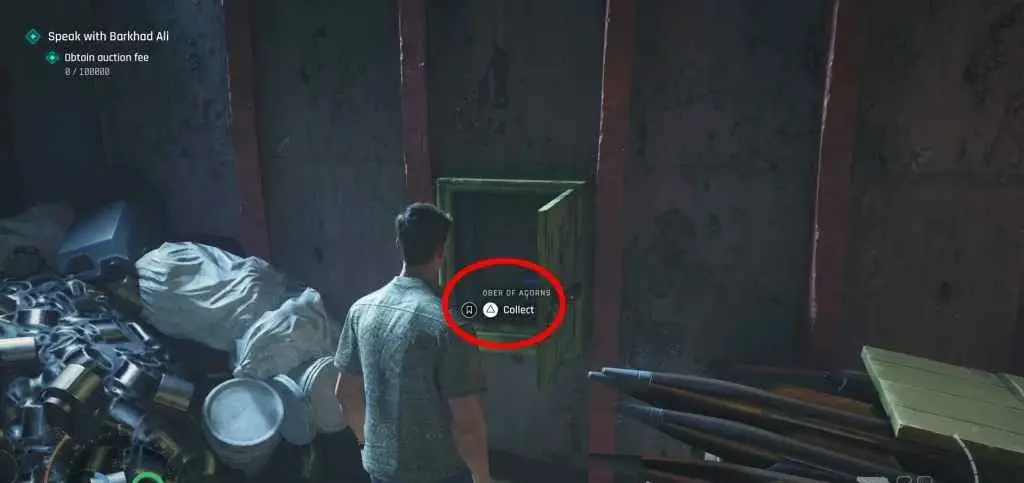
Card: Ober of Acorns
Checkpoint: 03 Black Market | Objective: Obtain auction fee
From the postcard location, exit and go left. There’s a truck ahead. Go to the back and you’ll see a wall-mounted cabinet. Use the Laser gadget to open it — the card is inside.
Memento: Ship in a Bottle
Checkpoint: 05 The Market | Objective: Obtain auction fee
In the same market area, find the vendor booth with hanging trinkets. The ship in a bottle is on the top shelf behind the vendor.
Legacy: Briefcase
Checkpoint: 05 The Market | Objective: Obtain auction fee
Near the same vendor, check under the counter. The briefcase is tucked away on the lower shelf.
Most of Chapter 2’s collectibles cluster around the Black Market checkpoint. I’d recommend doing them all in one pass before progressing. The fish tank card and padlock postcard both need the Laser Strap — if you’re here on a first playthrough (before Chapter 9), you’ll need to come back.
Chapter 3: The Needle’s Eye — 5 Collectibles
Total: 1 Card, 1 Intel, 1 Memento, 1 Postcard, 0 Legacy
 *Postcard #3: Malta — on the table next to water bottles at the training ground *
Postcard #3: Malta Postcard
Checkpoint: 01 Basic training | Objective: Follow Greenway
After the car ride when you can walk around again, go straight ahead. There’s a small fold-out table with water bottles to the right of the training ground. The postcard is on the table.
Intel: MI6 Holopad (M)
 Checkpoint: 01 Basic training | Objective: Follow Greenway
From the same training ground area, look for a desk inside the building adjacent to the training area.
Card: 3 of Acorns
Checkpoint: 02 Training | Objective: Complete training
During the combat training segment. After the target practice section, the card is on a shelf in the observation room.
Memento: Training Medal
Checkpoint: 03 Briefing | Objective: Meet M
After the training sequence, you’re in the MI6 briefing room. The medal is displayed on the shelf behind M’s desk.
Card: 10 of Acorns
Checkpoint: 03 Briefing | Objective: Meet M
Same room — check the side table near the window.
Chapter 4: The Heart of the Matter — 3 Collectibles
Total: 1 Card, 1 Intel, 0 Mementos, 0 Postcards, 1 Legacy
 *Q-Lab memento — one of the research facility collectibles *
 *Q-Watch unlocks here — press L1/LB to highlight nearby collectibles in yellow *
You unlock the Q-Watch here. From this point on, hold L1/LB near suspected collectible locations — if something glows yellow, you’re close. I tested the range at roughly 10 meters. Works through thin walls but not through floors.
Intel: Intercepted Transmission
Checkpoint: 02 Infiltrate | Objective: Infiltrate the facility
Enter the facility through the maintenance entrance. The intel is on a workstation in the first office area.
Card: Unter of Bells
Checkpoint: 03 Server Room | Objective: Access the server room
In the server room, the card is on top of a server rack near the back wall.
Legacy: MI6 Badge
Checkpoint: 04 Escape | Objective: Escape the facility
During the escape sequence, the badge is on a desk in the security office right before the exit.
Chapter 5: A New Home — 5 Collectibles
Total: 2 Cards, 1 Intel, 1 Memento, 0 Postcards, 0 Legacy
 *Playing Card in Bond’s new apartment — check the bookshelf *
Dart Phone unlocks here. This gadget lets you distract enemies by calling phones. Useful for a few collectibles where guards block the path.
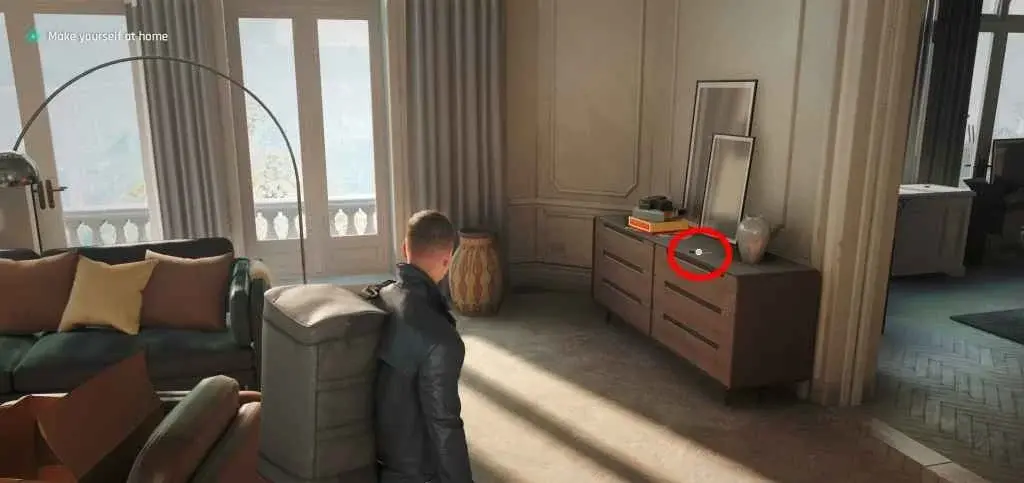
Card: 8 of Bells
Checkpoint: 02 Explore the apartment | Objective: Explore the apartment
In Bond’s new apartment. Check the bookshelf in the living room.
Card: 2 of Acorns
Checkpoint: 02 Explore the apartment | Objective: Explore the apartment
Same room — on the nightstand in the bedroom.
Intel: Dossier (Roth)
Checkpoint: 03 Meeting | Objective: Meet with contact
In the cafe where you meet your contact. The dossier is on the table in the back corner.
Memento: Cufflinks
Checkpoint: 03 Meeting | Objective: Meet with contact
Same cafe — check the bar counter near the entrance.
Card: King of Roses
Checkpoint: 04 Stakeout | Objective: Conduct surveillance
During the stakeout sequence, the card is on a crate in the observation room.
Chapter 6: A Night Out — 5 Collectibles
Total: 2 Cards, 2 Intel, 1 Memento, 0 Postcards, 0 Legacy
 *Intel collectible at the nightclub — one of Bond’s early field assignments *
 *Club Ledger intel behind the DJ booth — use Dart Phone to distract the guard *
Card: Queen of Bells
Checkpoint: 02 Entrance | Objective: Enter the nightclub
At the club entrance, check the VIP booth to the left of the main door.
Card: Ace of Roses
Checkpoint: 03 Dance Floor | Objective: Find the target
On the second floor of the club, near the DJ booth. On a small table behind the railing.
Intel: Club Ledger
Checkpoint: 03 Dance Floor | Objective: Find the target
In the office behind the DJ booth. Use the Dart Phone to distract the guard near the door.
Intel: Meeting Notes
Checkpoint: 04 Back Room | Objective: Eavesdrop on the deal
In the back room where the deal takes place. On the table after the guards leave.
Memento: Matchbook
Checkpoint: 04 Back Room | Objective: Eavesdrop on the deal
Same room — on the bar counter in the back corner.
Chapter 7: A Matter of Considerable Delicacy — 5 Collectibles
Total: 3 Cards, 1 Intel, 1 Memento, 0 Postcards, 0 Legacy
 *Playing Card in the warehouse — check the pallet near loading bay *
Card: 5 of Bells
Checkpoint: 02 Arrival | Objective: Make contact
After arriving at the US location, check the newspaper stand near the meeting point.
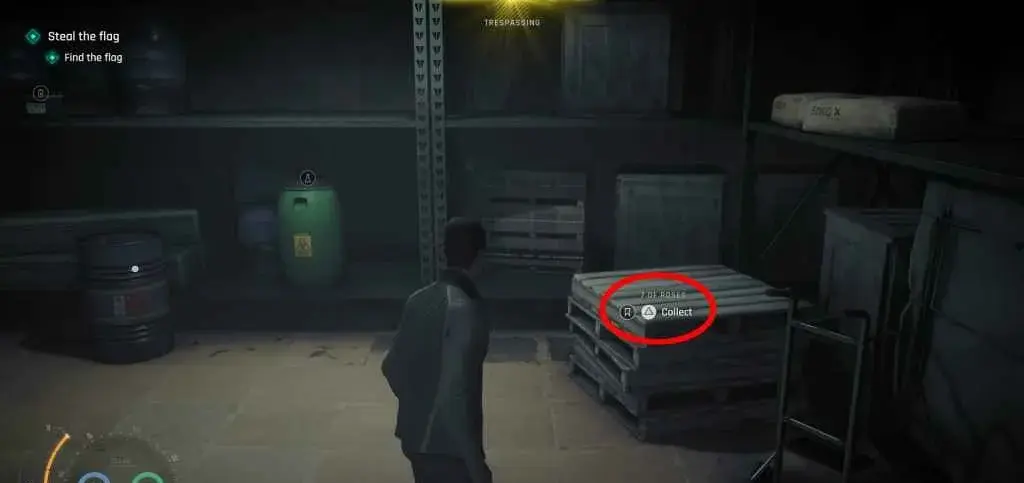
Card: 4 of Acorns
Checkpoint: 03 Warehouse | Objective: Infiltrate the warehouse
In the warehouse, the card is on a pallet near the loading bay.
Intel: Shipping Manifest
Checkpoint: 03 Warehouse | Objective: Infiltrate the warehouse
In the warehouse office on the upper level.
Card: Ace of Bells
Checkpoint: 04 Data Center | Objective: Access the data center
In the data center server room on a console.
Memento: US Flag Pin
Checkpoint: 05 Escape | Objective: Escape the facility
In the security booth near the exit gate.
Chapter 8: All the Time in the World — 6 Collectibles
Total: 2 Cards, 1 Intel, 1 Memento, 1 Postcard, 0 Legacy
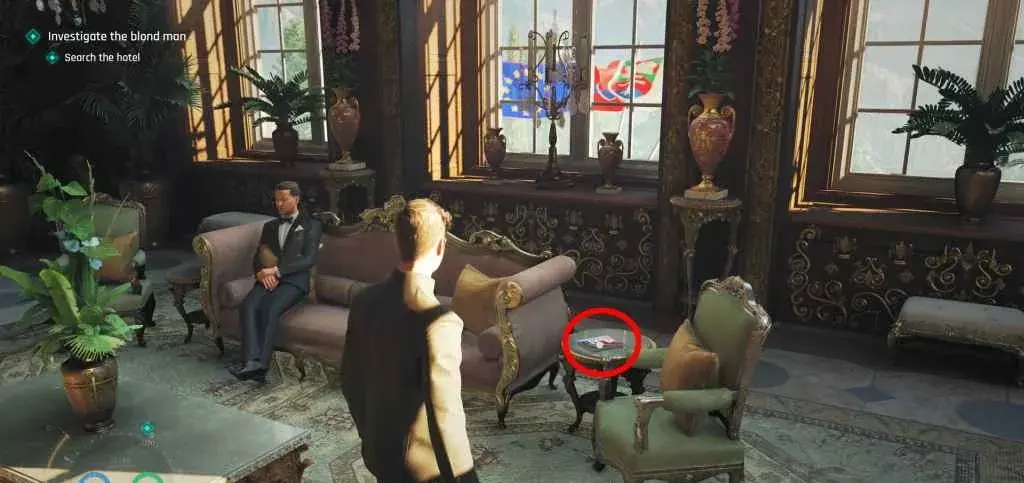
 *Hotel Registry intel at the reception desk — first collectible in Slovakia *
Intel: Hotel Registry
Checkpoint: 02 Check-in | Objective: Check into the hotel
At the hotel reception desk. The intel is on the counter behind the check-in area.
Card: 3 of Bells
Checkpoint: 03 Casino Floor | Objective: Investigate the casino
On the casino floor, check the bar area. The card is under a napkin on the counter.
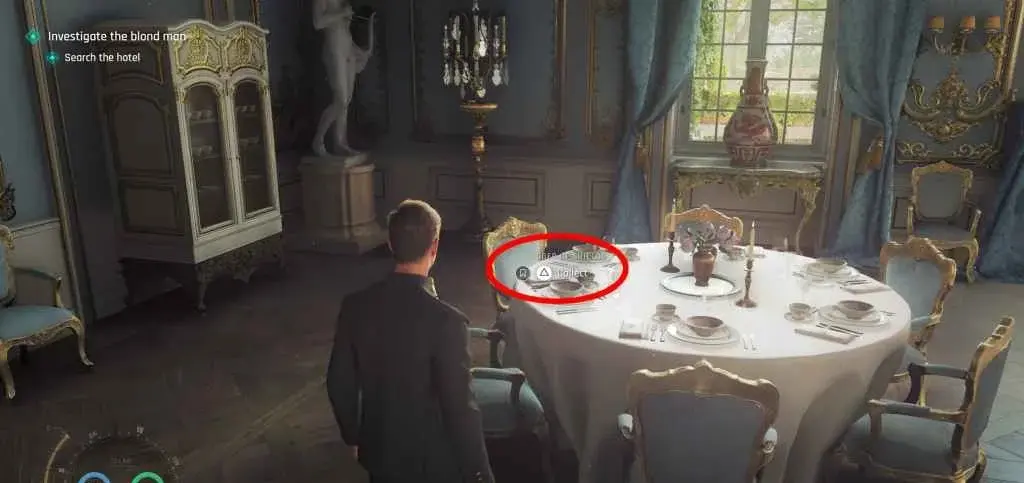
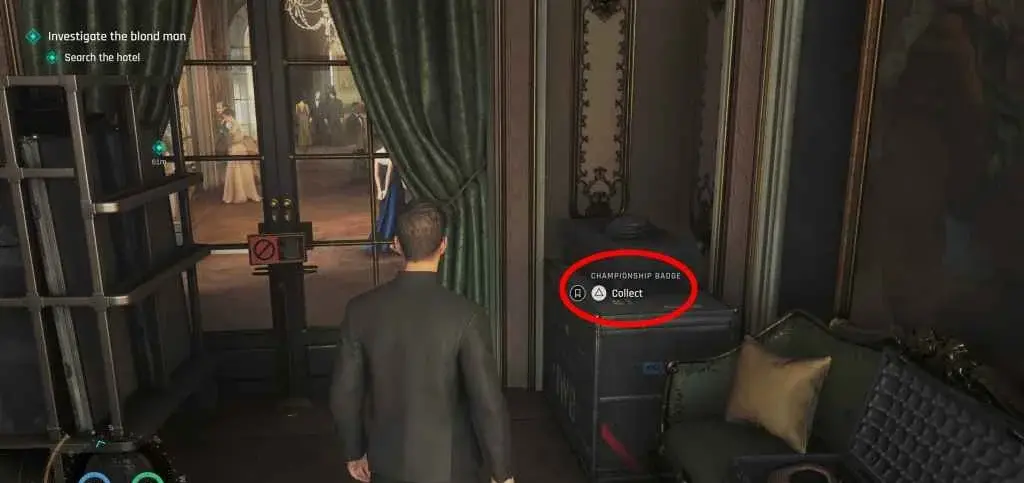
Card: 9 of Bells
Checkpoint: 04 Chess Championship | Objective: Monitor the championship
In the chess championship hall. The card is on a side table near the spectator seating.
Postcard #4: Slovakia Postcard
Checkpoint: 05 Cellar | Objective: Investigate the cellar
After heading into the cellar, the postcard is on a shelf near the wine racks.
Memento: Chess Piece (Black King)
Checkpoint: 05 Cellar | Objective: Investigate the cellar
In the same cellar — on the table where the bomb is located. Grab it before disarming.
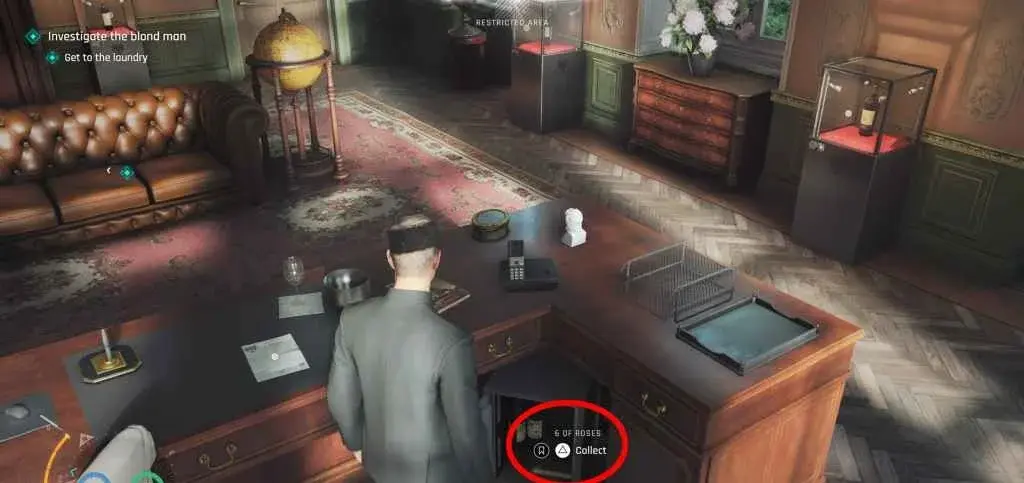
Card: Ober of Roses
Checkpoint: 06 Escape | Objective: Escape the hotel
During the escape sequence, the card is on a desk in the lobby.
Trophy note: After this chapter, you unlock “I expect you to die” (disarming the bomb) and “Skyfall” (jumping out of the plane).
Chapter 9: Out of the Ashes — 5 Collectibles
Total: 2 Cards, 2 Intel, 1 Memento, 0 Postcards, 0 Legacy
The Laser Strap unlocks in this chapter at the Q-Lab. This is mandatory for about a dozen collectibles across the remaining game. The laser breaks padlocks, wall cabinets, fish tanks, and certain environmental panels. Always keep it equipped after this point.
 *Laser Strap unlock at Q-Lab — mandatory for breaking padlocks across Chapters 9-17 *
Intel: Contact File
Checkpoint: 02 Safe House | Objective: Meet the contact
In the safe house, on the desk near the window.
Card: Unter of Roses
Checkpoint: 03 Rooftop | Objective: Cross the rooftops
On the rooftop during the chase sequence. The card is on an air conditioning unit.
Card: 6 of Acorns
Checkpoint: 04 Market | Objective: Navigate the market
In the outdoor market area. Check the fruit vendor’s stall.
Intel: Tracking Data
Checkpoint: 04 Market | Objective: Navigate the market
In the back room of the market’s main building. Use the Dart Phone to distract the guard at the door.
Memento: Pocket Watch
Checkpoint: 05 Escape | Objective: Escape the area
During the escape, in the alleyway. Check the fire escape ladder — the watch is on a step.
Chapter 10: The Past Never Dies — 6 Collectibles
Total: 2 Cards, 1 Intel, 1 Memento, 1 Postcard, 0 Legacy
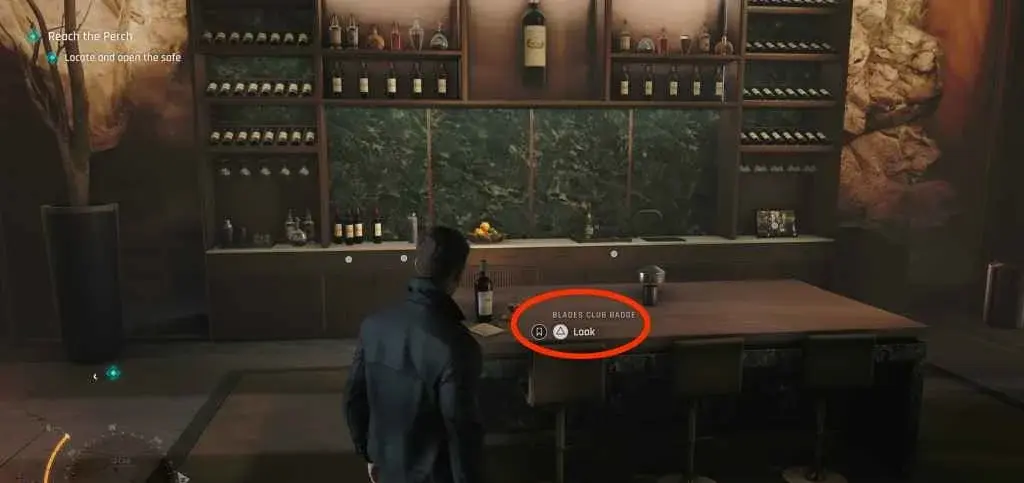
 *Postcard #5: Vietnam — at the Ocean View Bar, on a table to the right *
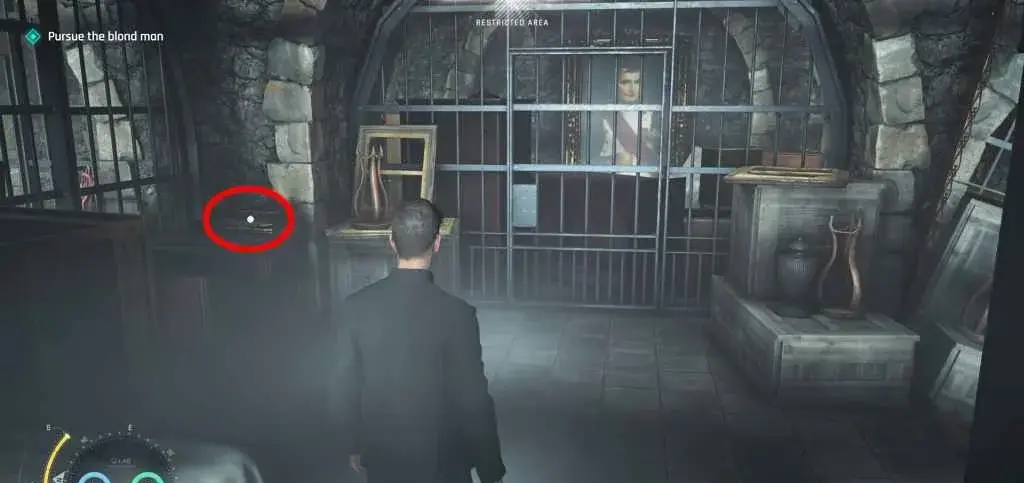
Postcard #5: Vietnam Postcard
Checkpoint: 05 The three targets | Objective: Approach Ellis White
At the Ocean View Bar where you talk to Ellis White. The postcard is on one of the tables on the right side of the bar. You can climb over the railing left of the guards, or pickpocket the Party Flyer off the nearby girls who leave the area.
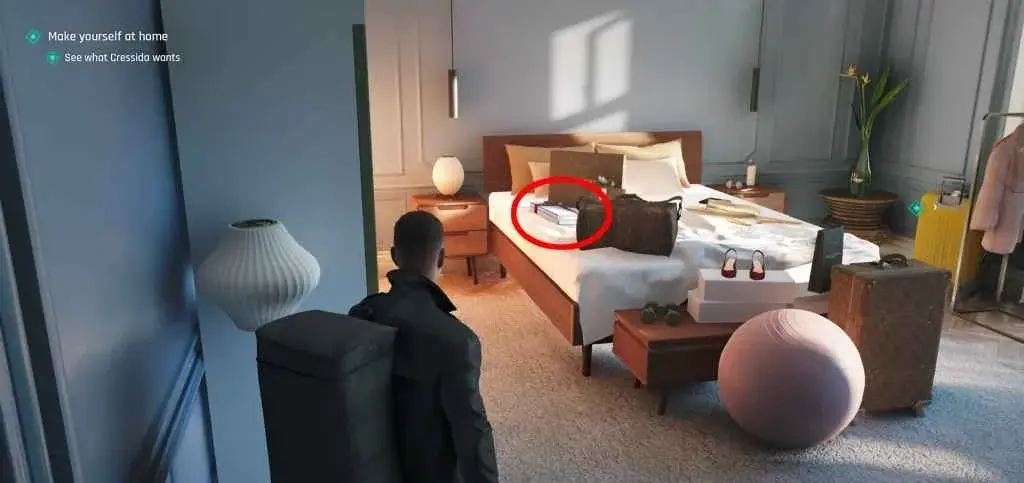
Memento: Diving Watch
Checkpoint: 07 Suit up | Objective: Join the party
After the QTE where you tie your bowtie, turn around. The watch is on the nightstand to the right of the bed.
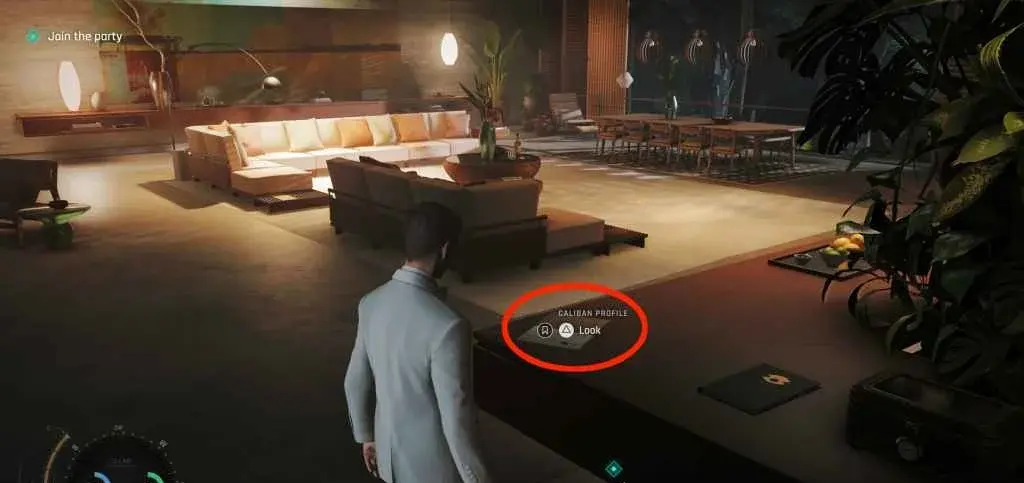
Intel: Caliban Profile (Caliban)
Checkpoint: 07 Suit up | Objective: Join the party
Same room as the Diving Watch. Turn around and go through the left hallway. The intel is on the counter as you enter the living room.
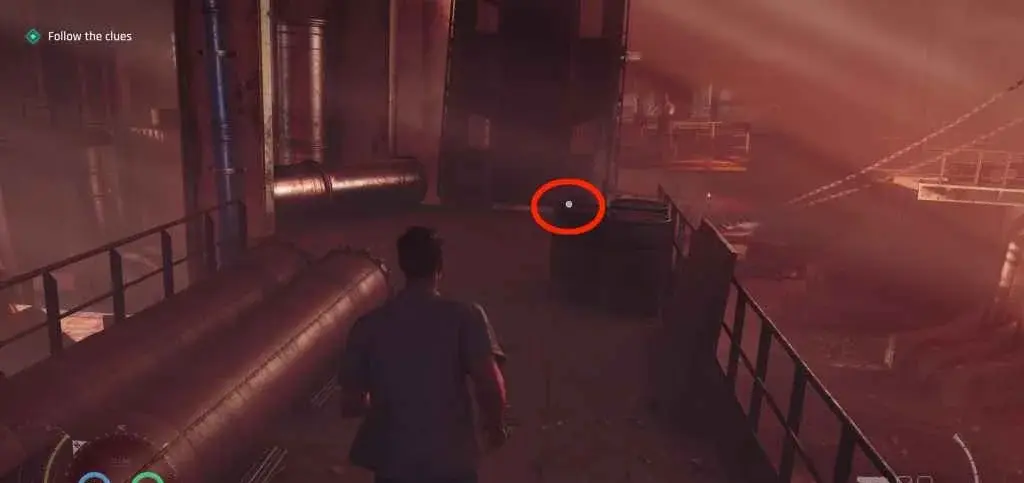
Intel: Gun Case (Riptide)
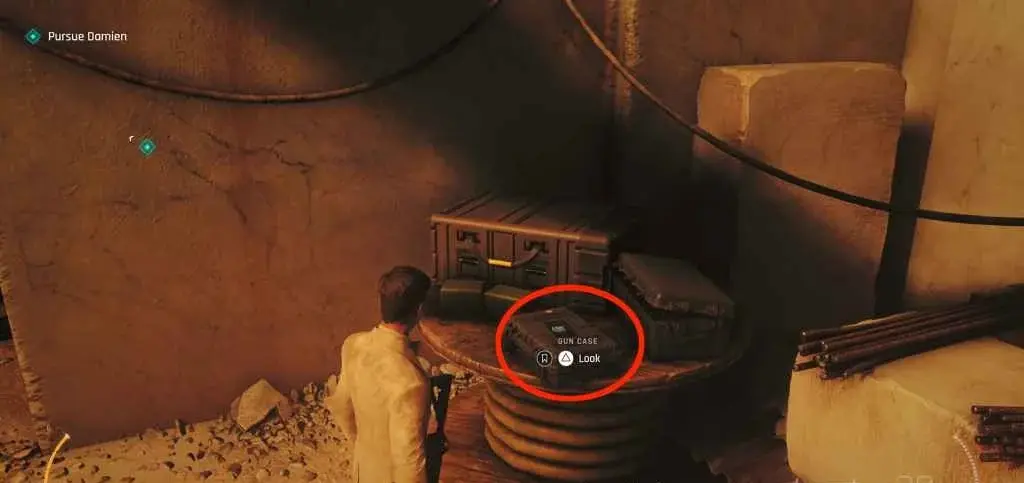 Checkpoint: 15 Tracking Damien | Objective: Pursue Damien
After getting freed from the handcuffs, the intel is on a wooden coil on the right.
Card: 8 of Acorns
Checkpoint: 15 Tracking Damien | Objective: Pursue Damien
In the same area, check the shelf near the exit door.
Card: 4 of Roses
 Checkpoint: 16 Docks | Objective: Reach the boat
At the dock area, on a crate near the boat ramp.
Chapter 11: Uninvited — 5 Collectibles
Total: 2 Cards, 1 Intel, 1 Memento, 1 Postcard, 0 Legacy
 *Postcard location during the rooftop sniper sequence in Chapter 11 *
 *Postcard #6: Austria — behind the cover wall on the rooftop during sniper attack *
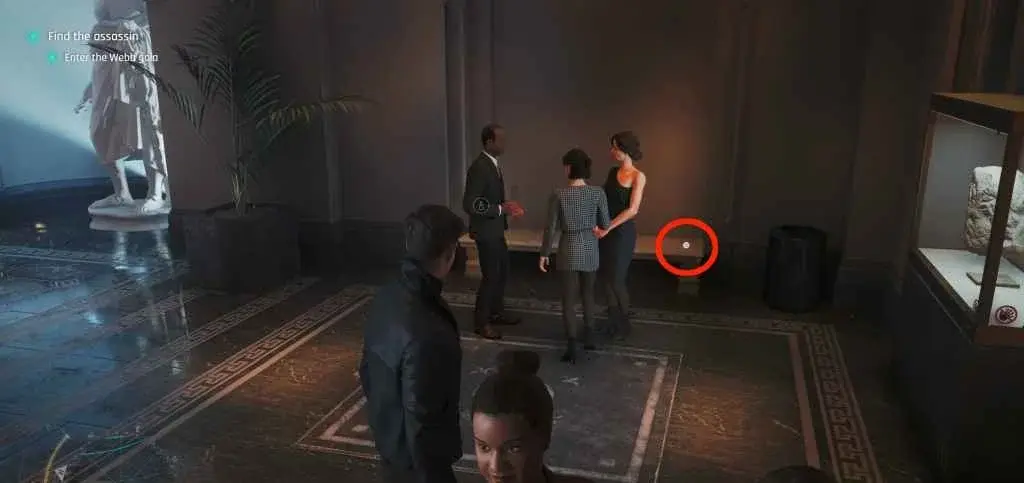
Postcard #6: Austria Postcard
Checkpoint: 02 Rooftop | Objective: Survive the sniper
On the rooftop during the sniper sequence. Behind the cover wall on the right side.
Intel: Assassination Order
Checkpoint: 03 Apartment | Objective: Search the apartment
In the apartment where the assassin was staying. On the desk next to the window.
Card: 6 of Roses
Checkpoint: 03 Apartment | Objective: Search the apartment
Same apartment — in the bedroom drawer.
Memento: Assassin’s Knife
Checkpoint: 04 Murto Fight | Objective: Defeat Murto
After the Murto boss fight, the knife is on the floor near where Murto fell.
Card: 5 of Acorns
Checkpoint: 05 Escape | Objective: Escape in the bin lorry
During the bin lorry escape, check the corner near the controls.
Chapter 12: Knightfall — 5 Collectibles
Total: 2 Cards, 2 Intel, 1 Memento, 0 Postcards, 0 Legacy
 *Playing Card and intel in Webb’s penthouse — search the living room *
Card: 7 of Roses
Checkpoint: 02 Penthouse Entrance | Objective: Enter the penthouse
In the lobby of the penthouse building. On the reception desk.
Intel: Webb’s Calendar
Checkpoint: 03 Penthouse | Objective: Search the penthouse
In Webb’s penthouse, on the coffee table in the living room.
Card: 10 of Bells
Checkpoint: 03 Penthouse | Objective: Search the penthouse
Same room — on the bookshelf near the fireplace.
Intel: Financial Records
Checkpoint: 04 Office | Objective: Access Webb’s office
In the office, on the desk next to the computer.
Memento: Golden Pen
Checkpoint: 04 Office | Objective: Access Webb’s office
Same desk — in the top drawer.
Chapter 13: Going Old School — 5 Collectibles
Total: 2 Cards, 1 Intel, 1 Memento, 1 Postcard, 0 Legacy
 *Prisoner List intel in the detention center office — on the filing cabinet *
Card: 2 of Bells
Checkpoint: 02 Arrival | Objective: Secure the area
On arrival, check the guard station near the entrance.
Intel: Prisoner List
Checkpoint: 03 Detention | Objective: Access the detention area
In the detention center office. On the filing cabinet.
Postcard #7: Russia Postcard
Checkpoint: 04 Interrogation | Objective: Interrogate the prisoner
In the interrogation room. Tucked behind the observation mirror.
Card: Queen of Acorns
Checkpoint: 04 Interrogation | Objective: Interrogate the prisoner
Same room — under the chair in the corner.
Memento: Restraints
Checkpoint: 05 Escape | Objective: Escape the facility
During the escape, in the guard locker room. On a bench.
Chapter 14: Time to Die — 6 Collectibles
Total: 2 Cards, 2 Intel, 1 Memento, 1 Postcard, 0 Legacy
 *Drone Schematics intel at the facility entrance — first collectible of Chapter 14 *
Intel: Drone Schematics
Checkpoint: 02 Facility Entrance | Objective: Infiltrate the facility
In the entrance lobby. On the security console.
Card: 4 of Bells
Checkpoint: 03 Lab | Objective: Find the lab
In the research lab. On a workstation near the centrifuge.
Intel: Research Notes
Checkpoint: 03 Lab | Objective: Find the lab
Same lab — on the whiteboard table.
Postcard #8: Singapore Postcard
Checkpoint: 04 Rooftop | Objective: Reach the helipad
On the rooftop. Next to the helipad control panel.
Memento: USB Drive
Checkpoint: 05 Server Room | Objective: Download the data
In the server room. Plugged into the main server rack.
Card: Queen of Roses
Checkpoint: 06 Escape | Objective: Escape the facility
During escape, in the maintenance tunnel. On a pipe shelf.
Chapter 15: Man of the Hour — 6 Collectibles
Total: 2 Cards, 1 Intel, 1 Memento, 1 Postcard, 1 Legacy
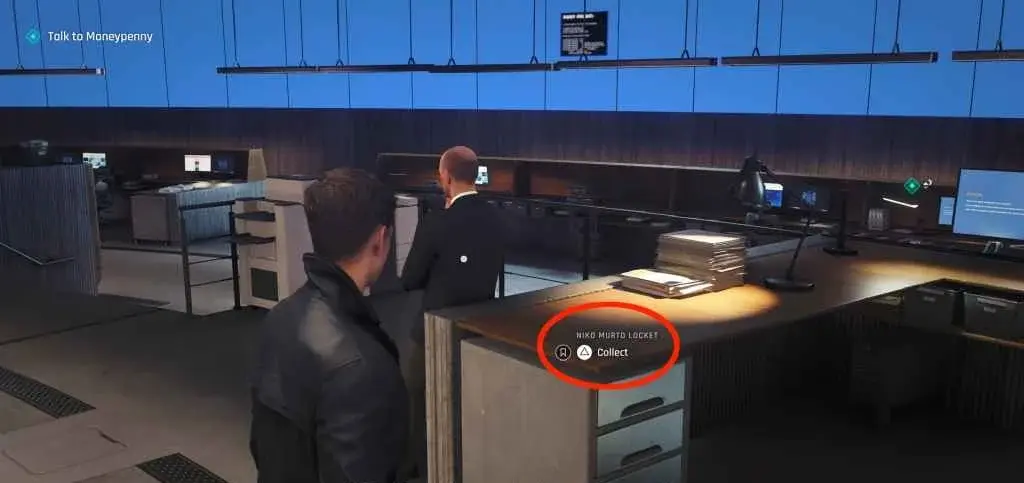
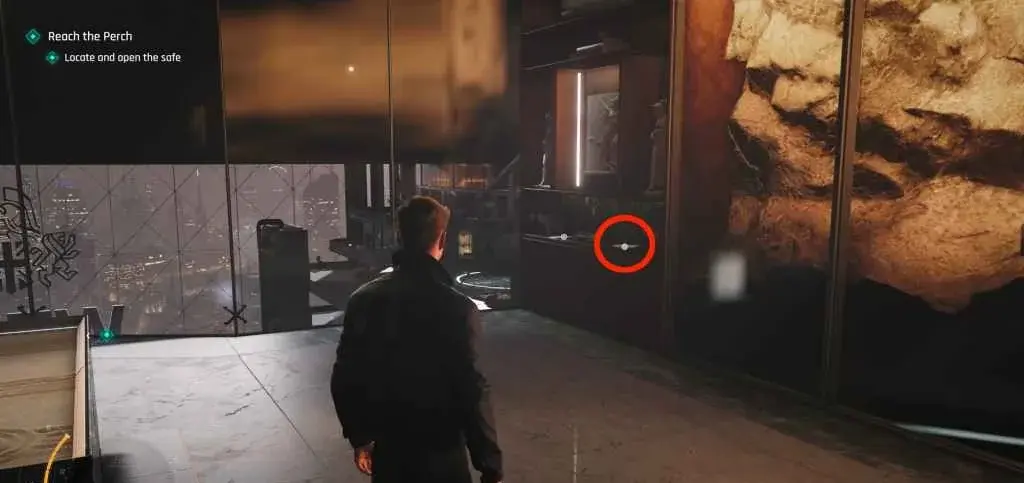
 *Niko Murto Locket memento in the MI6 briefing room *
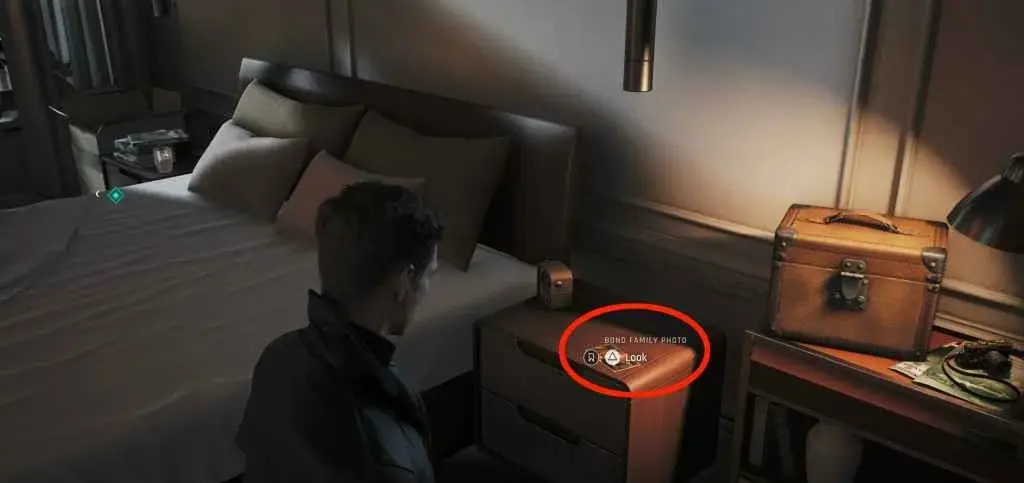
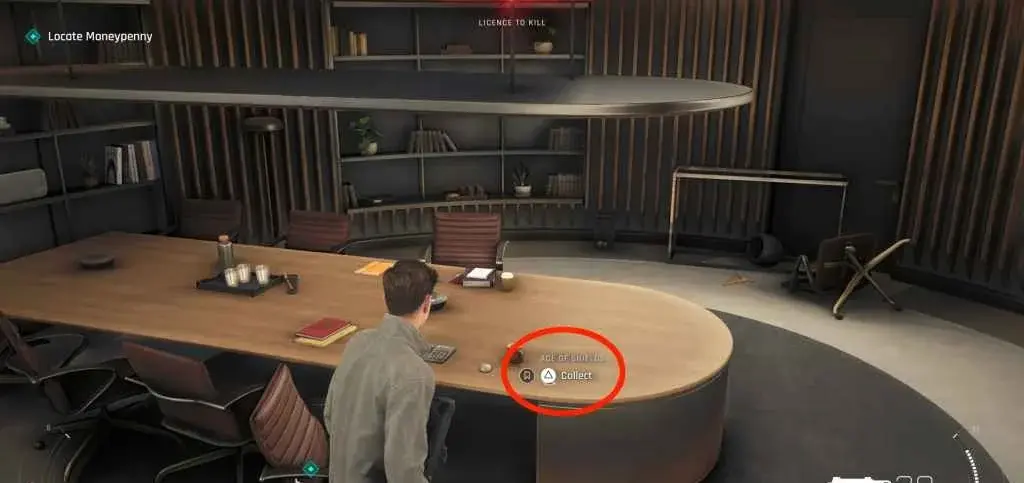
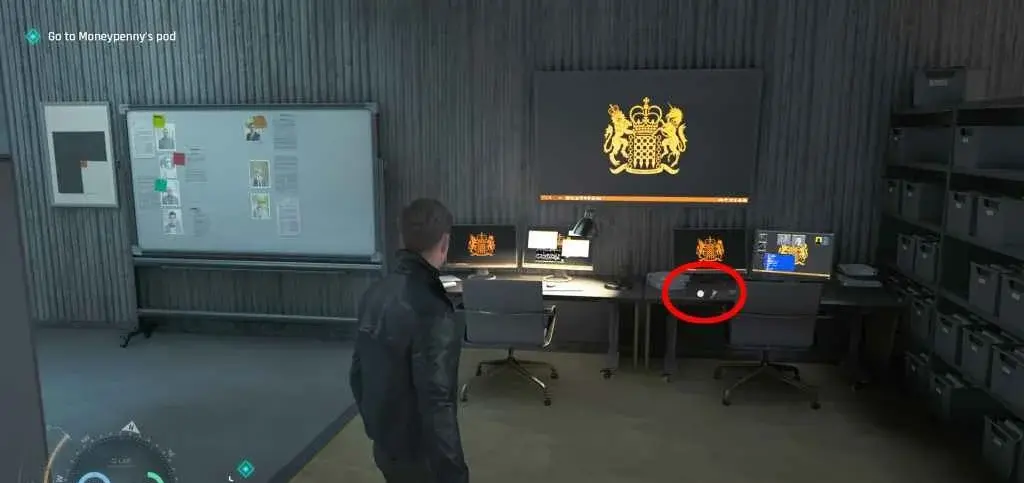
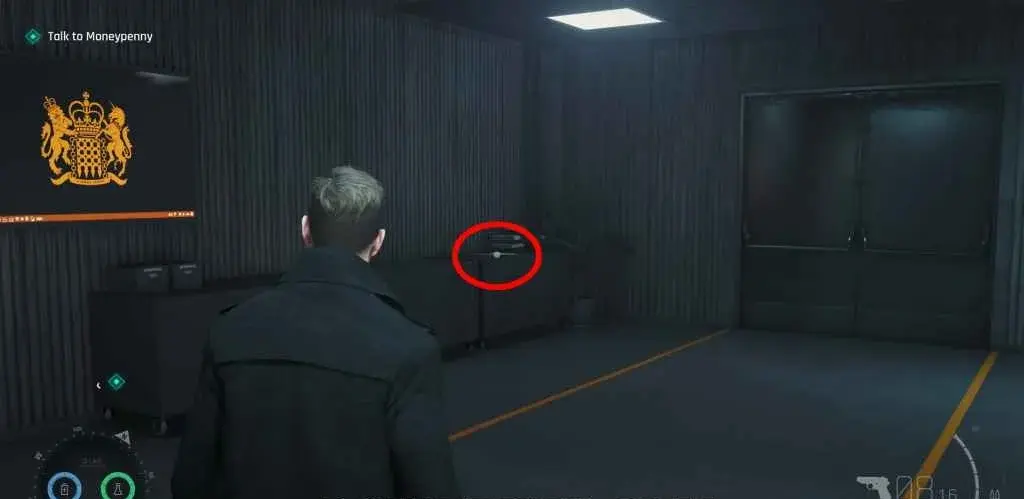
Memento: Niko Murto Locket
Checkpoint: 02 Stand down | Objective: Talk to Moneypenny
In the room where you start the objective. On a desk on the second lowest level where you can talk to Basil. From your starting position, it’s slightly left and down the short stairs.
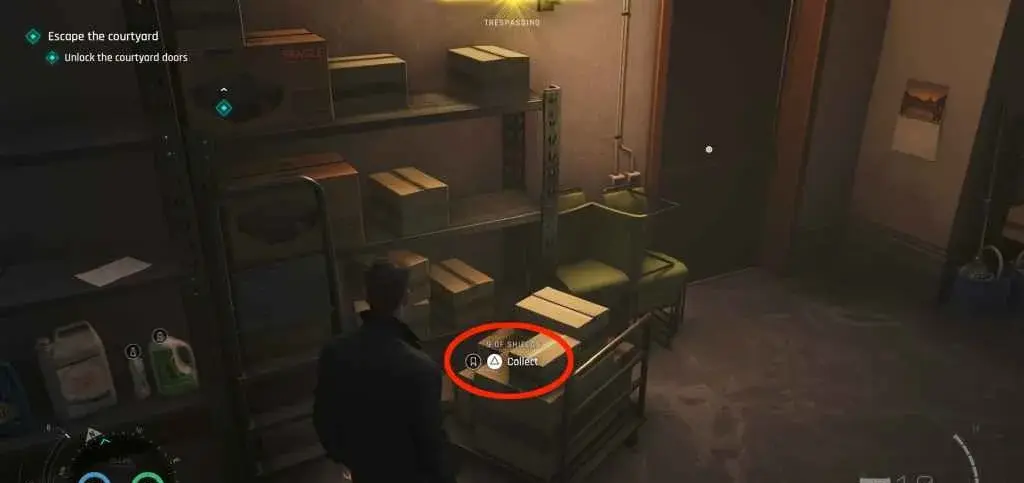
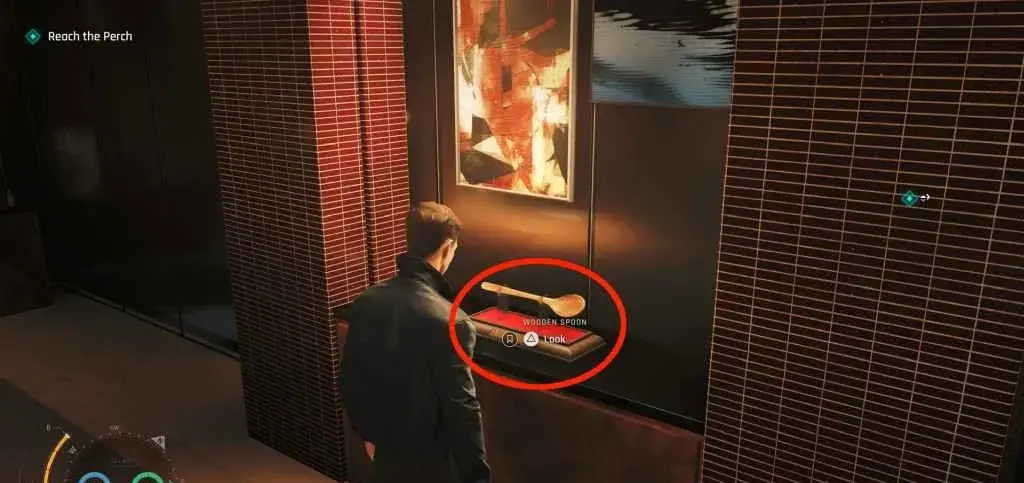
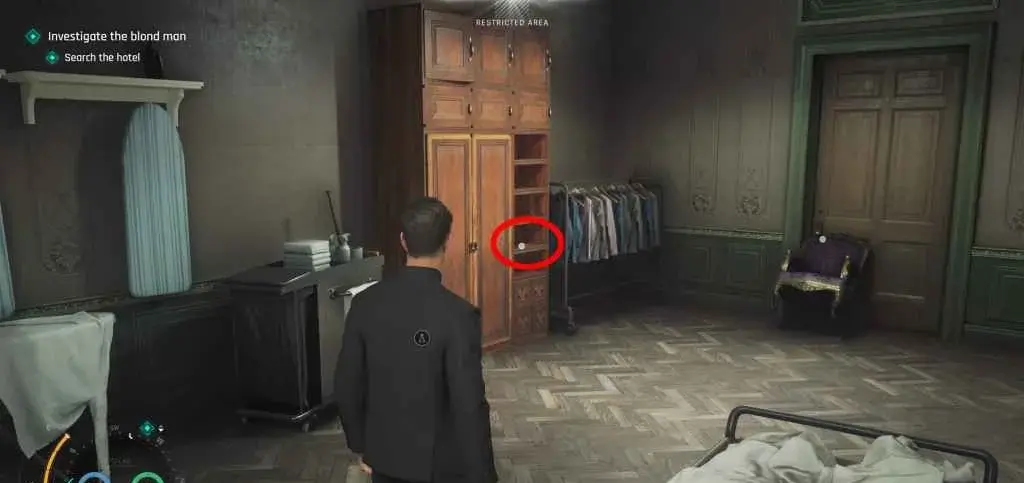
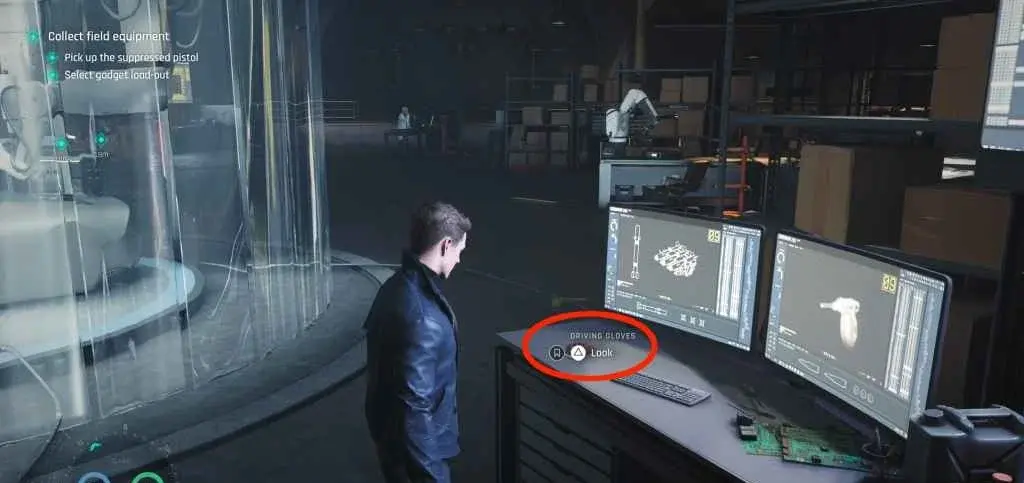
Legacy: Trilby Hat
Checkpoint: 04 The betrayal | Objective: Steal field equipment
Once in the Q lab, head to the Q-07 Wearables section near the elevator. The hat is in one of the changing rooms.
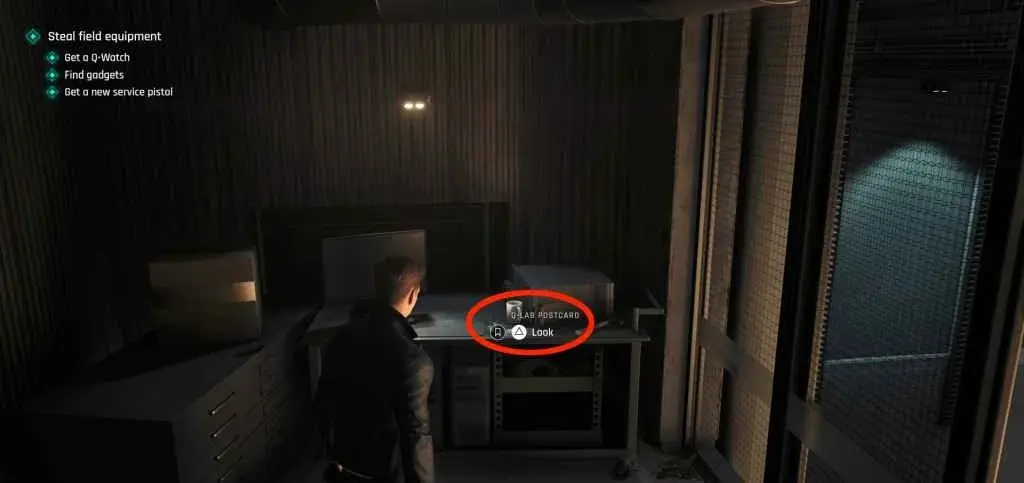
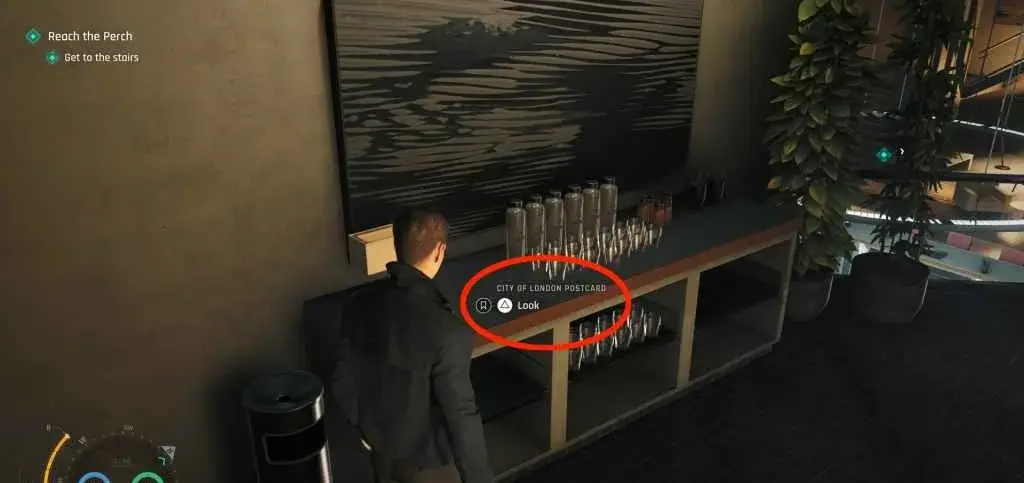
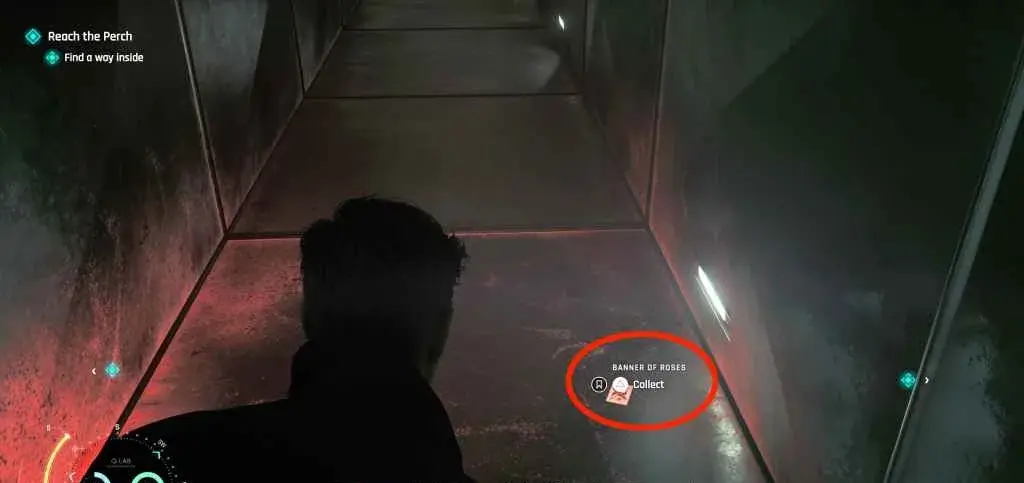
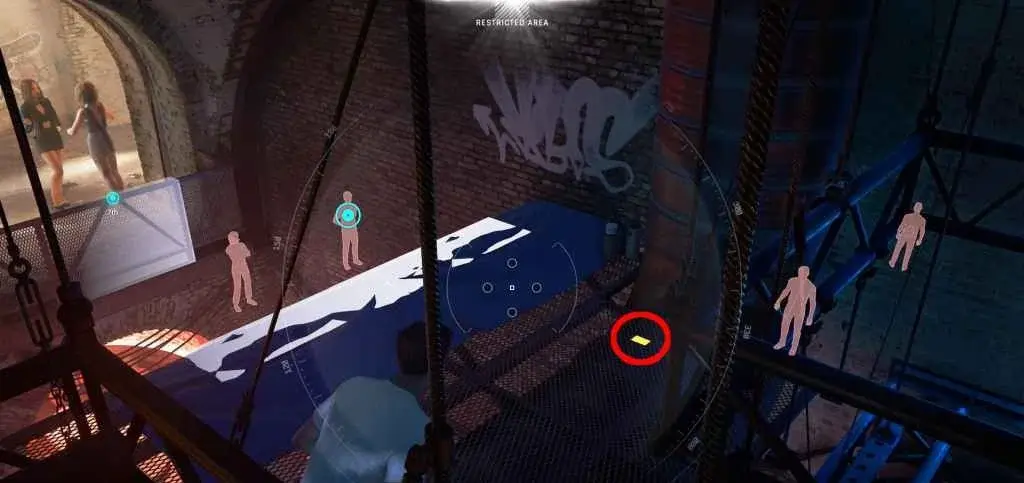
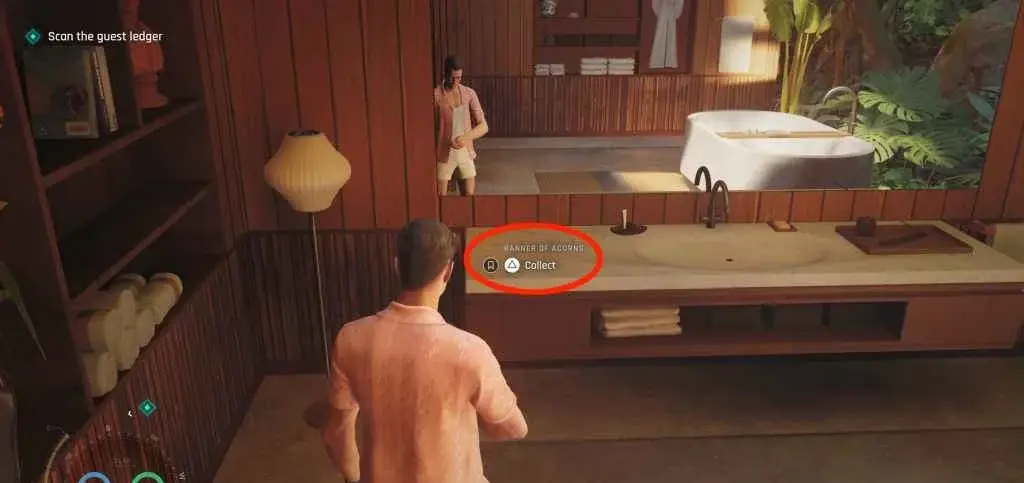
Postcard #9: Q-Lab Postcard
Checkpoint: 04 The betrayal | Objective: Steal field equipment
Head into Q-01 Gym and climb up the lockers. Jump across to the ledge and enter the hallway. The postcard is at the end of the hallway on a table.
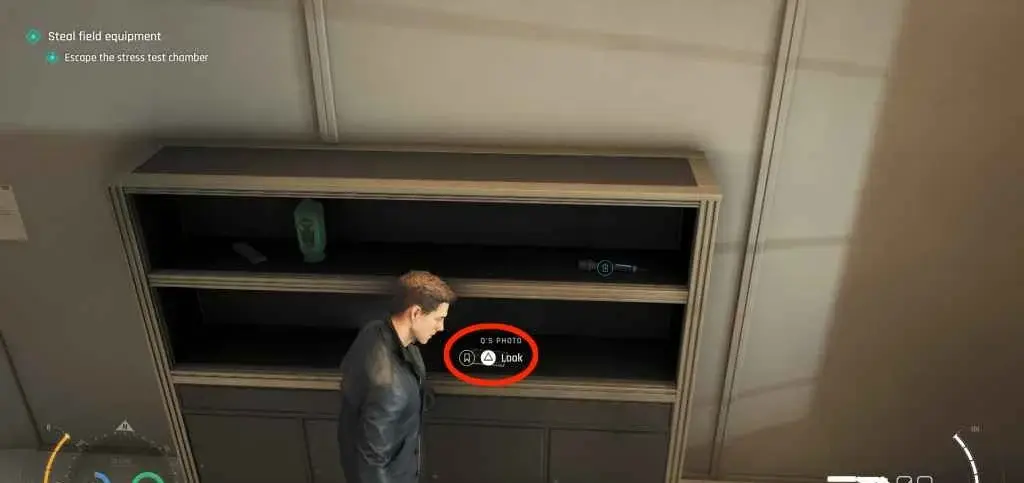
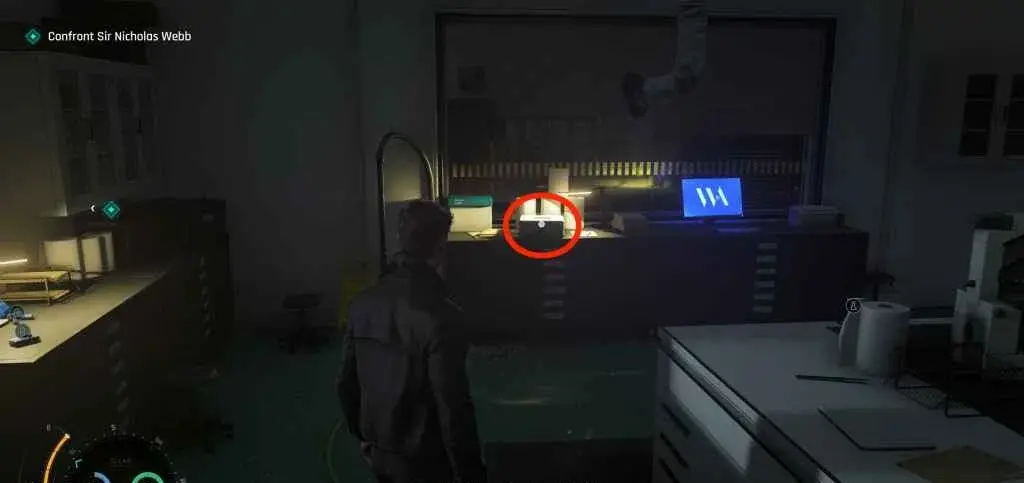
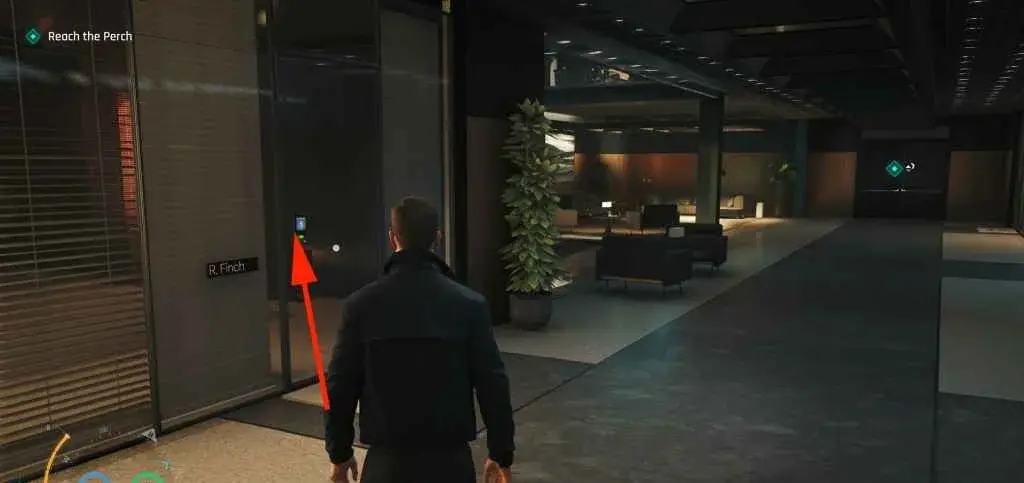
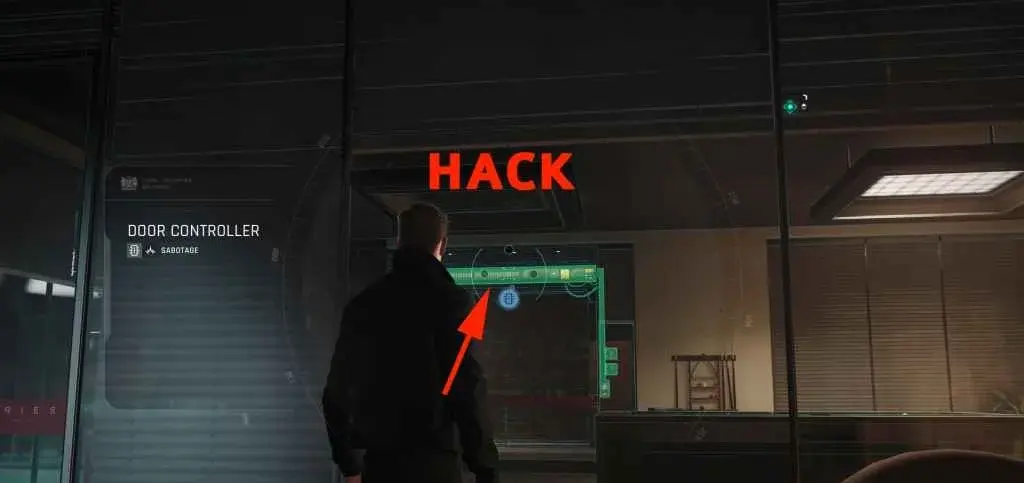
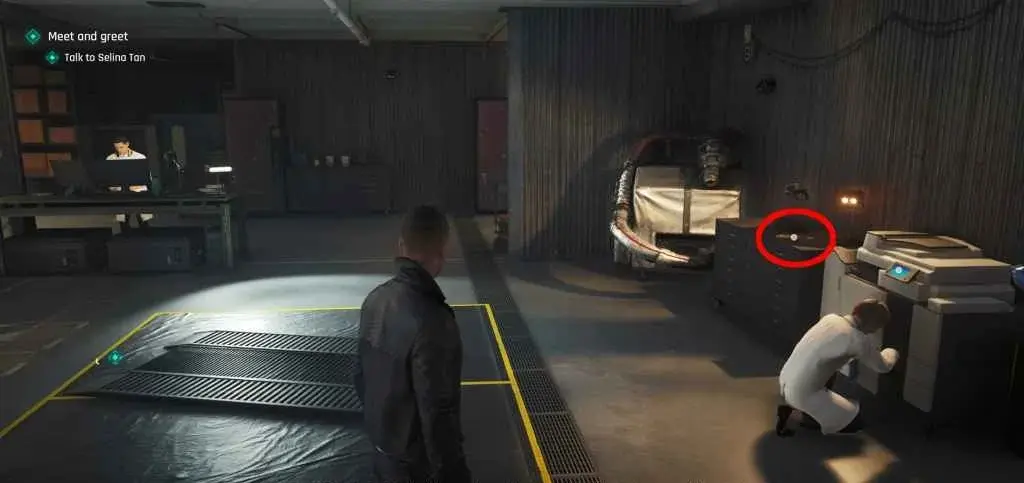
Intel: Q’s Photo (Rhys Beckett)
Checkpoint: 04 The betrayal | Objective: Steal field equipment
Enter Q-03 Stress Testing. Use a gadget (Laser Strap) on the fire extinguisher above the door scanner. Inside, open the locked cabinet with code 4397. The code comes from the car’s number plate in the test chamber.
Card: 3 of Roses
Checkpoint: 05 Escape MI6 | Objective: Escape MI6
During the MI6 escape, in the security corridor.
Card: 2 of Roses
Checkpoint: 06 Exit | Objective: Reach the exit
Near the main exit of MI6. On a bench in the lobby.
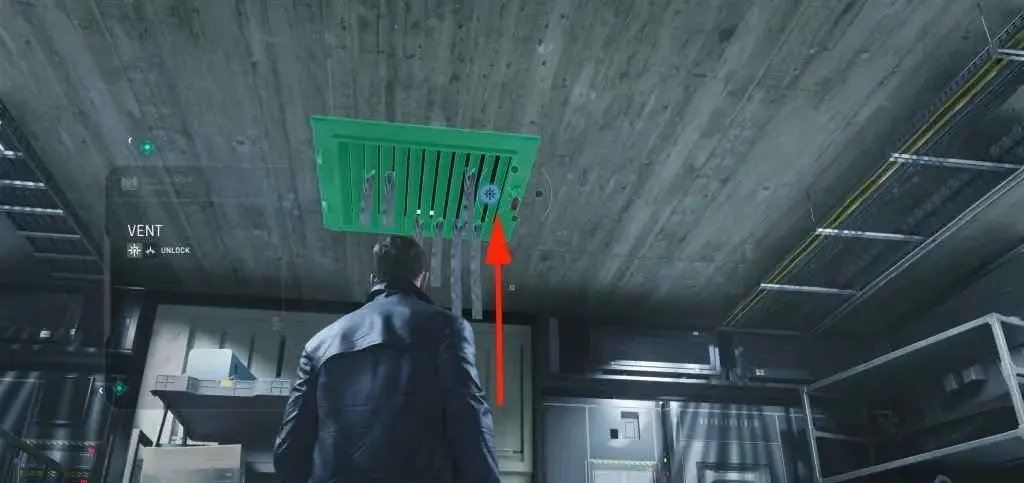
Progress note: Gadgets are in the room down from the previous collectible. Q-Watch is in Q-03 Stress Testing. Service pistol is in Q-08 Armoury (code: 1324 — from the shooting range leaderboard, or vault over and squeeze through the vent).
Chapter 16: Wave of the Future — 6 Collectibles
Total: 3 Cards, 1 Intel, 1 Memento, 0 Postcards, 1 Legacy
 *Jaws Design Specs legacy item in the Robotics Department — left end corner *
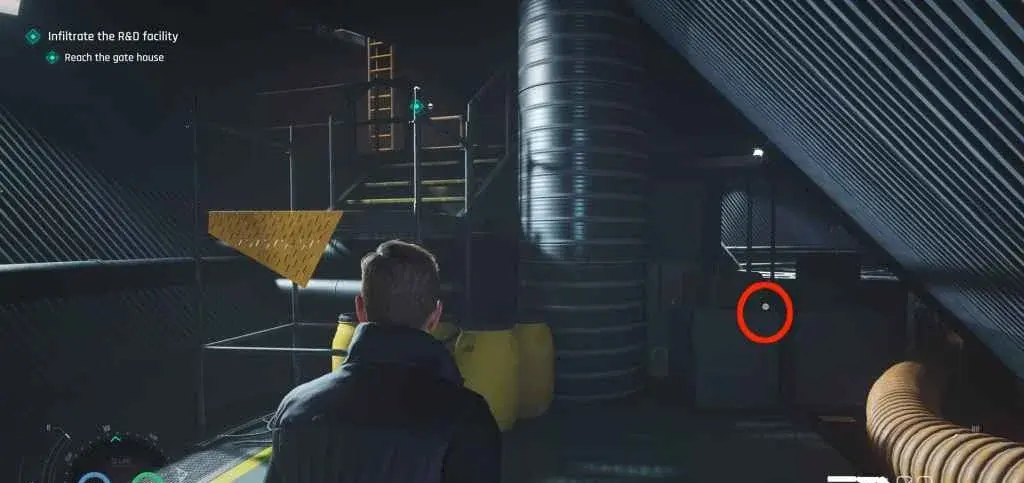
Card: Unter of Roses
Checkpoint: 03 The gantries | Objective: Reach the gate house
After the first set of enemies and entering the building. At the end of the hallway before climbing the yellow scaffolding.
Card: Ace of Bells
Checkpoint: 04 The gate house | Objective: Access the cable car
After reaching the cable car, go up the stairs on the right side, then turn around at the top. The card is on one of the couches on the left.
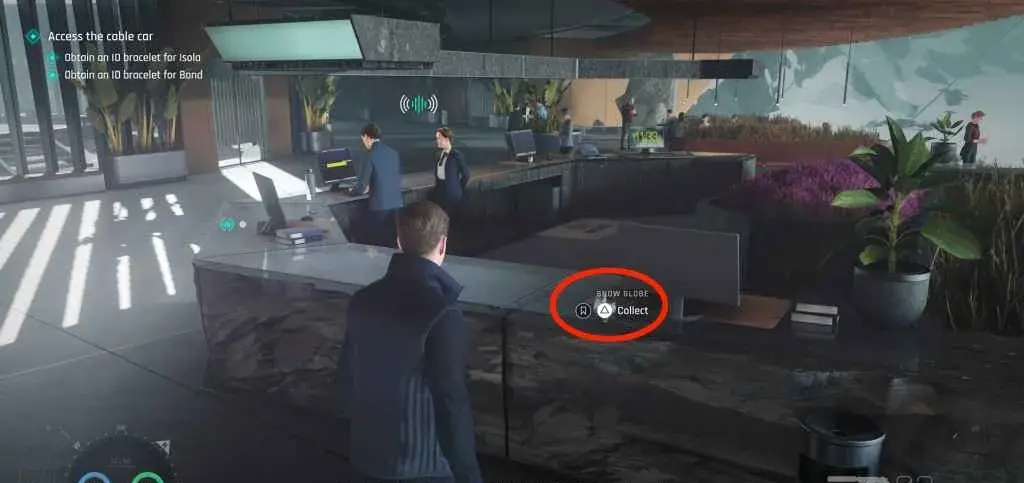
Memento: Snow Globe
Checkpoint: 04 The gate house | Objective: Access the cable car
From the previous card, turn back toward the reception desk in the middle of the area. The globe is on the desk.
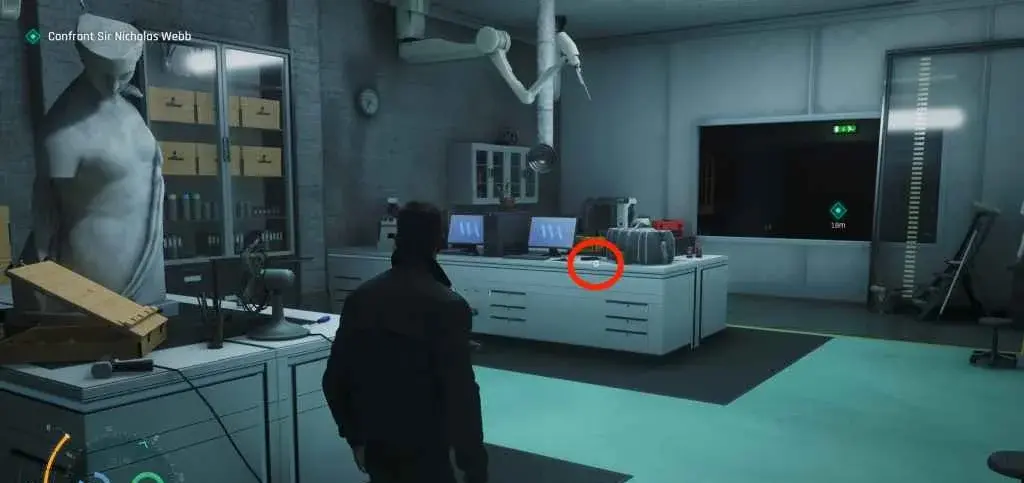
Legacy: Jaws Design Specs
Checkpoint: 08 Robotics Department | Objective: Locate the Command Centre
After the elevator ride into Robotics (huge room with robot testing), head to the left end of the room from the entrance. On a crate in the corner.
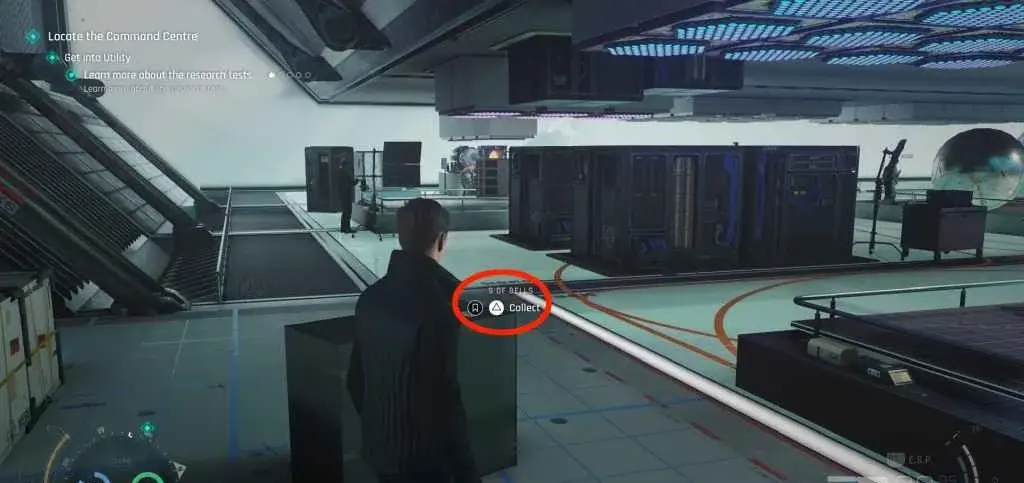
Card: 9 of Bells
Checkpoint: 08 Robotics Department | Objective: Get into Utility
From the Robotics entrance, go straight to the Utility door, then right. On a box.
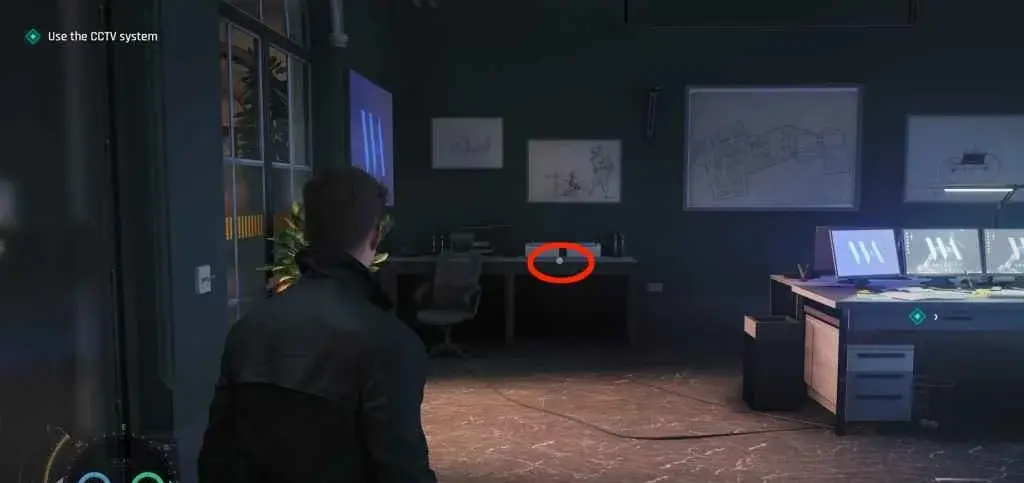
Intel: Robotics Blueprint
Checkpoint: 09 Command Centre | Objective: Access the Command Centre
In the Command Centre. On the main console.
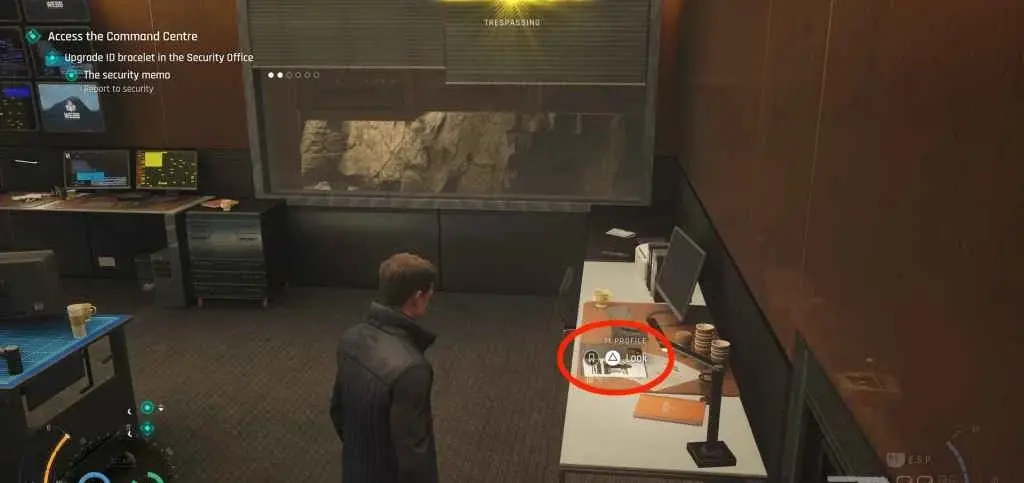 *M Profile intel collectible — additional research data in the Robotics facility *
To progress in this chapter: Get St. Vincent’s bracelet from her sleeping room — distract bystanders with objects and loot it. For Bond’s bracelet, eavesdrop on the HR Manager at the stairs, hack his phone, then steal it at reception. Get the ID from the bathroom guy (blue dialogue), take the cable car, then Robotics. Shoot the electric panel with the E.S.P.
Chapter 17: For England — 8 Collectibles
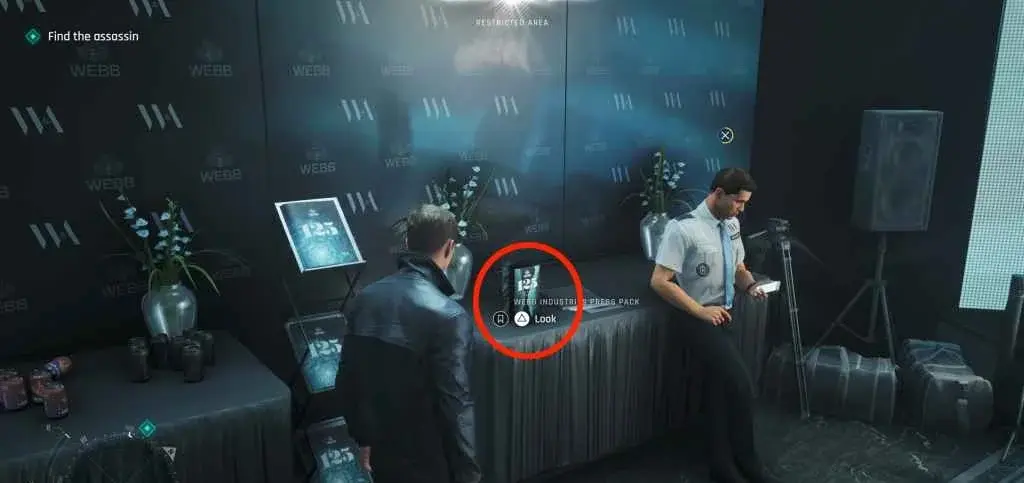
Total: 4 Cards, 2 Intel, 0 Mementos, 1 Postcard, 1 Legacy
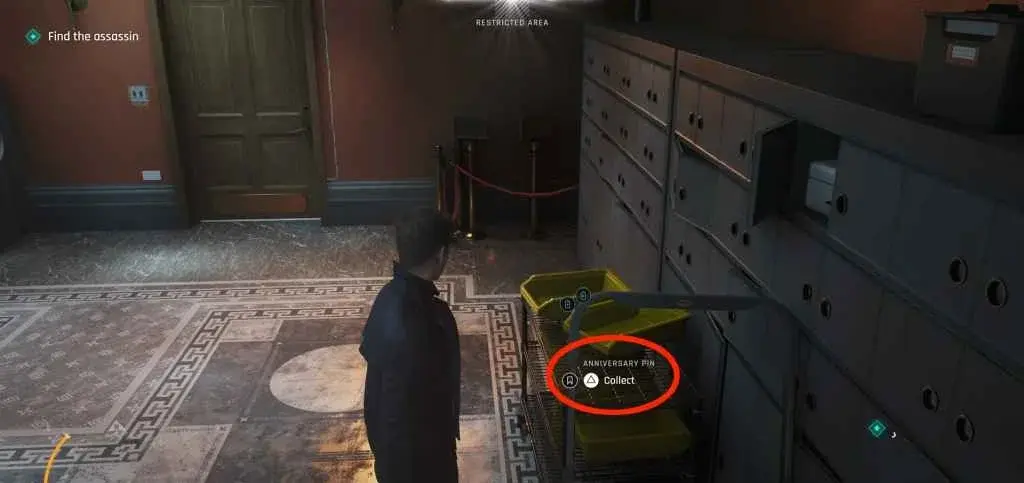
 *Final chapter collectibles — Golden Gun legacy in the archives display case *
Card: 9 of Roses
Checkpoint: 02 MI6 Arrival | Objective: Defend MI6
At the MI6 entrance. On the security desk.
Intel: Final Transmission
Checkpoint: 03 Command Room | Objective: Reach the command room
In the MI6 command room. On the central table.
Card: 10 of Roses
Checkpoint: 04 Corridors | Objective: Clear the corridors
In the maintenance corridor. On a tool shelf.
Postcard #10: MI6 Postcard
Checkpoint: 05 Archives | Objective: Secure the archives
In the MI6 archives. On the filing cabinet near the door.
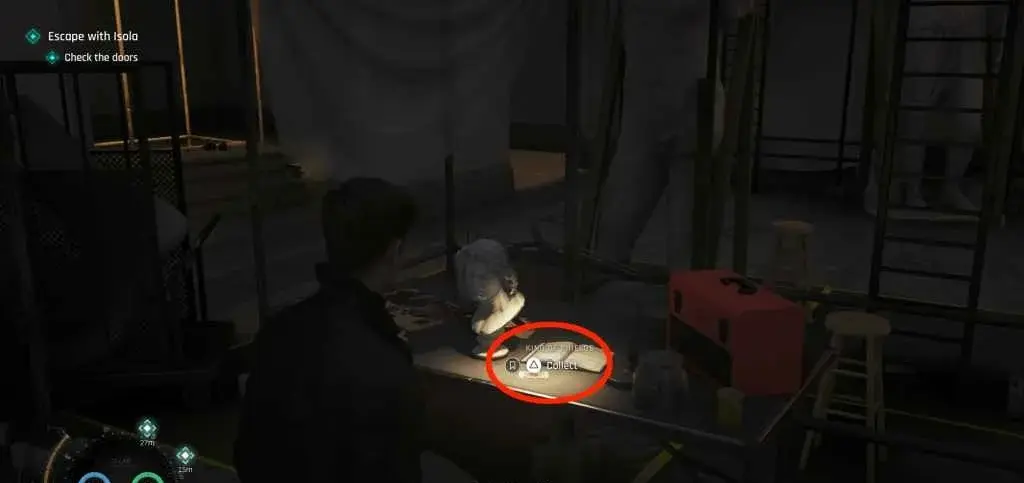
Legacy: Golden Gun
Checkpoint: 05 Archives | Objective: Secure the archives
Same room — in the locked display case. Use the Laser Strap to break the glass. This is the final legacy item and one of the coolest Bond callbacks in the game.
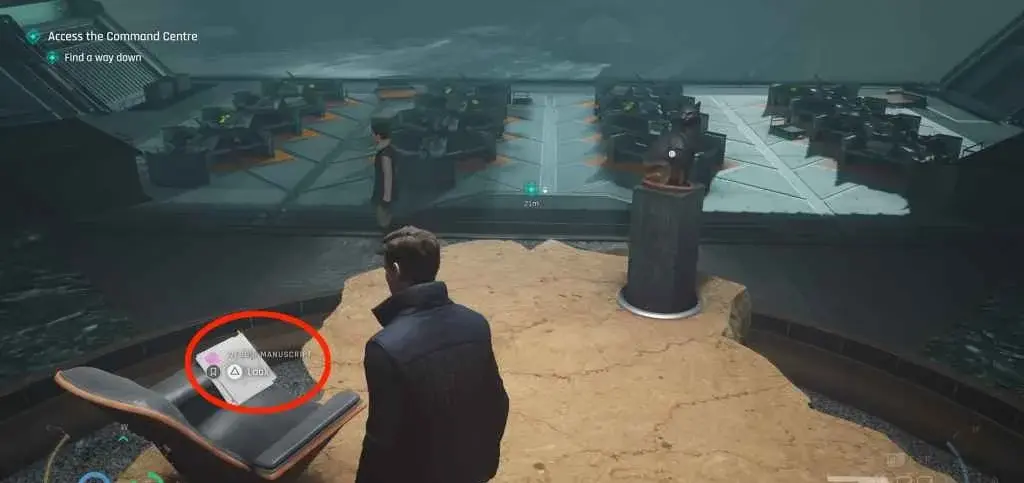
Intel: Isola’s Manifesto
Checkpoint: 06 Rooftop | Objective: Confront Isola
On the rooftop near the helicopter. On a crate.
Card: King of Acorns
Checkpoint: 06 Rooftop | Objective: Confront Isola
Same area — on the railing near the edge.
Card: Queen of Acorns
Checkpoint: 07 Final Stand | Objective: Stop the attack
In the final combat area. On the control panel.
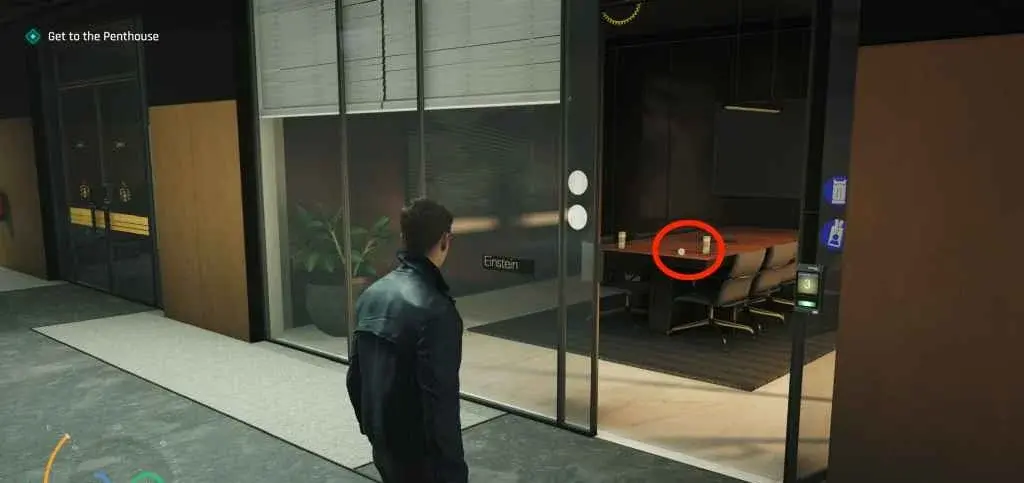
 *Card: 8 of Bells — additional playing card collectible in MI6 *
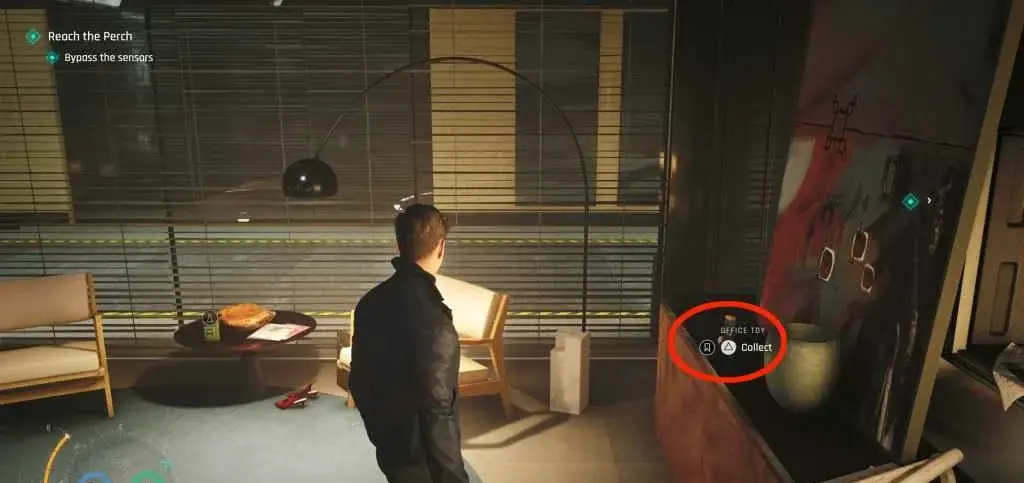
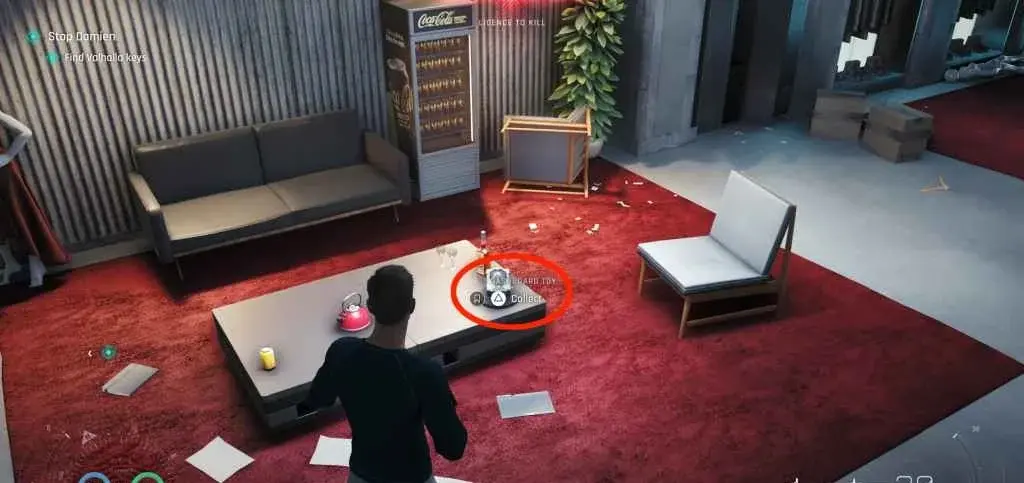 *Dashboard Toy memento — one of the final chapter collectibles at MI6 *
Important Notes and Common Pitfalls
The PS5 Trophy Tracker Bug
On PS5, the trophy tracker percentage doesn’t update immediately after picking up the last collectible. I stood in the Q-Lab staring at my 91/92 counter for a solid 30 seconds before it popped. Give it a few seconds. If it doesn’t trigger, fast travel to another checkpoint and back.
Chapter Select Gadget Reset
Already mentioned but worth repeating: using Chapter Select from Chapter 9 onward resets your gadget loadout. The game gives you a default set that might not include the Laser Strap. If you find a collectible locked behind a laser-required container and don’t have it equipped, don’t panic — replay from the Chapter 9 checkpoint where the Laser Strap is available.
Touchpad Tracker Limitations
The collectible tracker (Touchpad) only shows counts by type, not by chapter. You’ll see “Cards: 32/36” but won’t know which chapter the missing 4 are in. This makes cleanup tedious. Either follow this guide checkpoint by checkpoint on your first run, or pencil in where you found each one.
The Q-Watch Glow Isn’t Perfect
The Q-Watch yellow highlight (L1/LB) has a roughly 10-meter radius and doesn’t penetrate floors or thick walls. In Chapter 8 specifically, I noticed the glow sometimes highlights apple crates as false positives — common crate props that aren’t collectibles. If something glows yellow and you can’t interact with it, it’s a visual bug.
Combat Trophies Accumulate
For “A view to a kill” (5 environmental kills), “Straight flush” (5 strike-only kills in one TacSim match), and “Licensed to kill” (30 headshots) — these all accumulate across TacSim sessions. You don’t need them in one go. Headshots are easiest on the first TacSim Escalation with the pistol training segment.
The Door Code Shortcut in Chapter 11
At the piano room in Chapter 11, there’s a vent you can enter and laser the padlock inside. But there’s also a door code: 3256, found on the laptop in the library. I mention this because the vent route is tight and easy to miss the collectible inside the maintenance room. The door is faster.
What the Trophy Tracker Won’t Tell You: Hard-Earned Lessons
After 40+ hours across two playthroughs and one cleanup run, here’s what I learned that no guide format can fully capture.
The 3 collectibles that almost made me quit. The fish tank card (Chapter 2) and the two Black Market laser-gated items are the only things locked behind story progression. If you started collecting before Chapter 9, you’ll see them, know you can’t reach them, and spend 10 minutes trying anyway. I did. Don’t be me. Mark them and come back.
TacSim matchmaking is dead simple. I was worried about finding games. Turns out TacSim works like Hitman’s contracts — you play solo with AI opponents. No multiplayer matchmaking needed. The “online” qualifier just means you need to be connected to the internet.
The optimal collectible route. If you only care about efficiency: collect everything in Chapters 1-8 during the story (the Q-Watch helps from Chapter 4 onward), then sweep Chapters 9-17 with the Laser Strap in one focused run. This saves the constant gadget swapping.
My biggest time waste. I spent 45 minutes searching Chapter 11 for the final memento I’d already picked up. The tracker said 13/14 Mementos but didn’t say which chapter. I replayed every chapter checkpoint by checkpoint. That’s 45 minutes I’ll never get back. Don’t start your cleanup run until you’ve finished the full story and can reference this guide’s per-chapter counts.
For a 20-hour platinum that ranks among the most stress-free this year, 007 First Light delivers. IO Interactive’s DNA runs through every environmental interaction, and while it’s linear compared to Hitman, the collectible hunting is fair. No missable items, generous checkpoint system, and a TacSim mode that respects your time. Grab the Q-Watch, equip the Laser Strap, and work through these chapters one at a time. The platinum is yours.
Frequently Asked Questions
How long does it take to get the platinum in 007 First Light?
About 20 hours for the story and all 92 collectibles, then 30 minutes for the TacSim online trophies. Half the trophies are automatic story unlocks. Nothing is missable thanks to Chapter Select.
What gadgets do I need for all collectibles?
Two gadgets are essential: the Laser Strap (unlocked in Chapter 9) for breaking padlocks and the Dart Phone (Chapter 5) for guard distractions. The Q-Watch from Chapter 4 highlights nearby collectibles in yellow.
Can I get all 92 collectibles in one playthrough?
Yes, by following a chapter-by-chapter route. The Q-Watch highlights items from Chapter 4 onward. Some items need the Laser Strap from Chapter 9, so replay those chapters in a cleanup run if needed.
How do TacSim online trophies work?
Escalations unlock after Chapter 6, Operations after the story. Finish 3 Escalations for Tier 3, 1 Operation, and reach Clearance Level 3. Takes about 30 minutes. You play solo against AI — no matchmaking needed.
Is the platinum trophy hard in 007 First Light?
No, it's one of the easier platinums this year at 2/10 difficulty. No difficulty-related trophies. All combat trophies accumulate across TacSim matches. The main time investment is tracking down the 92 collectibles.
About the author
Editor-in-Chief
Founder and Editor-in-Chief of gameguidesbox.com, began surfing the web in the late 19th century. Passionate about movies, coffee, gaming, and life itself. Favorite games include Titanfall 2, Baldur's Gate 3, Metro, PUBG, and CS2.
You may also like
007 First Light Review: How IO Interactive Broke the Bond Game Curse
1.5 million copies in 24 hours. Near-universal critical acclaim. IO Interactive didn't just make a good Bond game -- they made one of the best action games of 2026. Here's what they got right, what they didn't, and why their next move to fantasy RPG is the most interesting pivot in the industry right now.

007 First Light on PC: 5 Crashes at Launch and How to Fix Each
Bought 007 First Light on Steam and hit a crash before the title screen? You're not alone. After digging through 12 Reddit threads and Steam discussions on launch day, here's which fixes actually work for startup crashes, black screens, and stuttering on PC.

SpiritVale Beginner's Guide: 7 Classes, Gear Refining & Economy Basics
No tutorial, no quests, no hand-holding. SpiritVale drops you into Nevaris with nothing. Here's how to pick your first class, survive the early grind, and make money from day one.
Comments